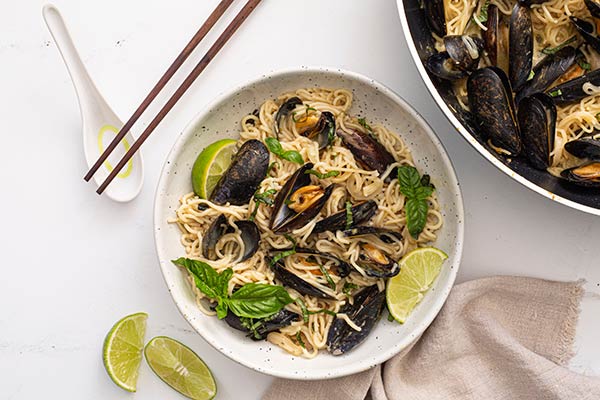
Need a gluten-free recipe for dinner that’s both effortless and impressive? Look no further than this Thai Green Curry Mussels and Noodles dish. Not only does it come together in under 30 minutes, but it also feels like something you’d order at your favorite upscale Thai restaurant. It’s quick enough for a weeknight meal, yet elegant enough to serve guests.
What makes this even better is how budget-friendly it is. Mussels are one of the most affordable seafood options, and when combined with just a few pantry staples, they transform into a dish that’s comforting, exciting, and just a little bit exotic. Even better, it’s incredibly flexible—you can add more spice, swap in shrimp, or toss in some extra veggies depending on your preferences.
¼ cup fresh basil or Thai basil, chopped (plus more for garnish)
Lime wedges, for serving
This dish hits all the right notes—fragrant, creamy, tangy, and just the right amount of spicy. In fact, the noodles soak up the curry-infused coconut broth perfectly, while the mussels add elegance and briny depth. For best results, don’t forget the extra lime and fresh basil on top—it really takes the whole dish to the next level.
Because this recipe is naturally gluten free, it’s a fantastic way to treat yourself without worrying about substitutions. Whether you’re cooking to impress guests or simply want a new favorite weeknight meal, this flavorful Thai-inspired dinner brings the wow factor—without the extra work.
Thai Green Curry Mussels and Noodles
Prep Time20 minutesmins
Cook Time15 minutesmins
Servings: 4
Calories: 136kcal
Author: Gluten Free & More
Cook the noodles for one minute less than the package directions. Drain and rinse with cold water. Set aside.
In a large skillet or braiser, heat the oil over medium-high heat. Add shallots, garlic, and ginger. Cook, stirring for 1 – 2 minutes. Add lemongrass paste, lime zest, and curry paste. Cook for another 2 minutes or until fragrant. Stir in lime juice, coconut cream, fish sauce, and sugar. Bring to a boil. Add the mussels, cover the pan, and cook for 4 – 5 minutes or until the mussels have opened. Discard any mussels that do not open. Add the noodles and chopped basil leaves, toss gently and cook for another minute or until everything is warmed through.
Serve with additional basil leaves and lime wedges.
Nutrition Facts
Thai Green Curry Mussels and Noodles
Amount Per Serving
Calories 136 Calories from Fat 54
% Daily Value*
Fat 6g9%
Saturated Fat 1g5%
Polyunsaturated Fat 1g
Monounsaturated Fat 3g
Cholesterol 24mg8%
Sodium 781mg33%
Potassium 404mg12%
Carbohydrates 11g4%
Fiber 1g4%
Sugar 3g3%
Protein 11g22%
Vitamin A 228IU5%
Vitamin C 14mg17%
Calcium 45mg5%
Iron 4mg22%
* Percent Daily Values are based on a 2000 calorie diet.
Disclaimer: All nutrition facts on Gluten Free & More are meant only as a guide and may differ depending on product brands used or ingredient substitutions. Some errors may occur, so you are encouraged to confirm the recipe’s ingredient and nutrition suitability for your own diet.
Have you tried this recipe? Give it a star rating and let us know your thoughts in the Ratings & Reviews section below.
Need a dinner that’s both effortless and impressive? Look no further than this Thai Green Curry Mussels and Noodlesdish. It’s the kind of meal that comes together in under 30 minutes, yet feels like something you’d order at your favorite upscale Thai restaurant. It’s quick enough for a weeknight, but with its rich, aromatic broth and elegant presentation, it’s also a showstopper for guests.
What makes this even better? It’s surprisingly budget-friendly! Mussels are one of the most affordable seafood options, and with just a few pantry-friendly ingredients, you can transform them into a dish that’s comforting, exciting, and just a little bit exotic.
¼ cup fresh basil or Thai basil, chopped (plus more for garnish)
Lime wedges, for serving
This dish hits all the right notes—fragrant, creamy, tangy, and just the right amount of spicy. The noodles soak up the curry-infused coconut broth perfectly, while the mussels add elegance and briny depth. Don’t forget the extra lime and basil on top—it takes the whole dish to the next level.
Whether you’re cooking for guests or just treating yourself to something special, this is a meal that brings the wow-factor without the work.
Thai Green Curry Mussels and Noodles
Prep Time20 minutesmins
Cook Time15 minutesmins
Servings: 4
Calories: 136kcal
Author: Gluten Free & More
Cook the noodles for one minute less than the package directions. Drain and rinse with cold water. Set aside.
In a large skillet or braiser, heat the oil over medium-high heat. Add shallots, garlic, and ginger. Cook, stirring for 1 – 2 minutes. Add lemongrass paste, lime zest, and curry paste. Cook for another 2 minutes or until fragrant. Stir in lime juice, coconut cream, fish sauce, and sugar. Bring to a boil. Add the mussels, cover the pan, and cook for 4 – 5 minutes or until the mussels have opened. Discard any mussels that do not open. Add the noodles and chopped basil leaves, toss gently and cook for another minute or until everything is warmed through.
Serve with additional basil leaves and lime wedges.
Nutrition Facts
Thai Green Curry Mussels and Noodles
Amount Per Serving
Calories 136 Calories from Fat 54
% Daily Value*
Fat 6g9%
Saturated Fat 1g5%
Polyunsaturated Fat 1g
Monounsaturated Fat 3g
Cholesterol 24mg8%
Sodium 781mg33%
Potassium 404mg12%
Carbohydrates 11g4%
Fiber 1g4%
Sugar 3g3%
Protein 11g22%
Vitamin A 228IU5%
Vitamin C 14mg17%
Calcium 45mg5%
Iron 4mg22%
* Percent Daily Values are based on a 2000 calorie diet.
Disclaimer: All nutrition facts on Gluten Free & More are meant only as a guide and may differ depending on product brands used or ingredient substitutions. Some errors may occur, so you are encouraged to confirm the recipe’s ingredient and nutrition suitability for your own diet.
Have you tried this recipe? Give it a star rating and let us know your thoughts in the Ratings & Reviews section below.
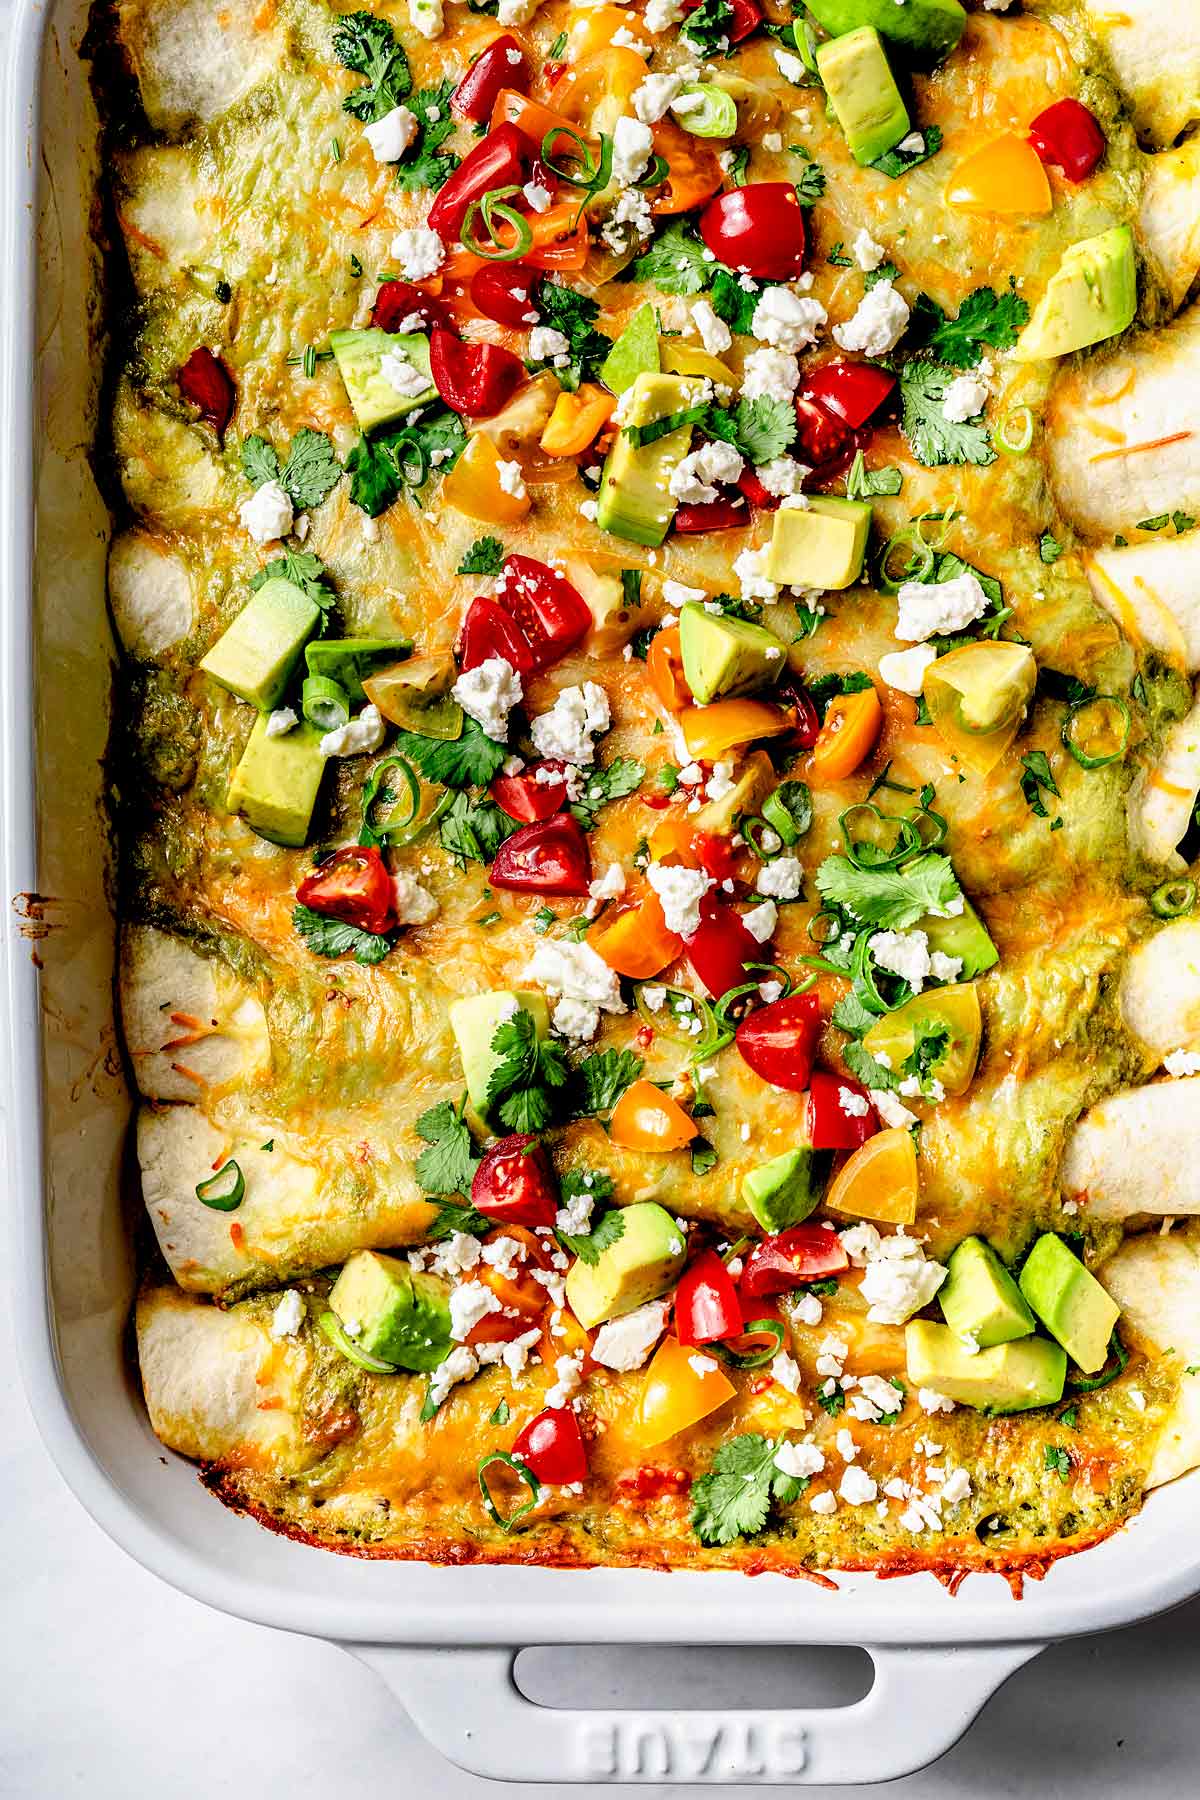
Juicy shredded chicken is rolled up in flour tortillas and topped with the creamiest cilantro lime sauce to make the best-ever green chicken enchiladas.
These chicken enchiladas doused in green sauce are fast, easy, and oh so flavorful.
The sauce comes together in 5 minutes with the help of your trusty blender and is made extra creamy thanks to the addition of ripe avocados and heavy cream.
To keep this recipe extra easy breezy, a store-bought rotisserie chicken is shredded and used for filling the tortillas. Any pre-cooked chicken will do, but why make life harder than you have to?
Green chicken enchiladas are hearty and filling, yet bursting with the fresh flavors of cilantro, lime, and green onion. Mexican food is truly the best.
Heidi’s Tips for Recipe Success
I prefer using flour tortillas in this recipe because I love the way they nearly melt into the cheese. If you’re looking for something a little heftier, go ahead and give white corn tortillas a try.
Store-bought rotisserie chicken is the easiest to shred, and I typically go at the bird using just two forks and some willpower.
Unlike traditional enchilada sauce, the green sauce in this recipe isn’t cooked and is bursting with fresh ingredients. Because of that, it’s best prepared and used right away.
What’s in This Recipe?
The full recipe, with amounts, can be found in the recipe card below.
Canned hatch chiles — The distinct fruity, smoky flavor of the hatch chiles really takes the filling to the next level. They’re not too spicy, but they definitely pack in some heat.
Onion — Dice it finely so you don’t crunch down on big bites in the filling.
Shredded Mexican cheese blend — Feel free to swap in another favorite cheese, like Monterrey Jack or cotija.
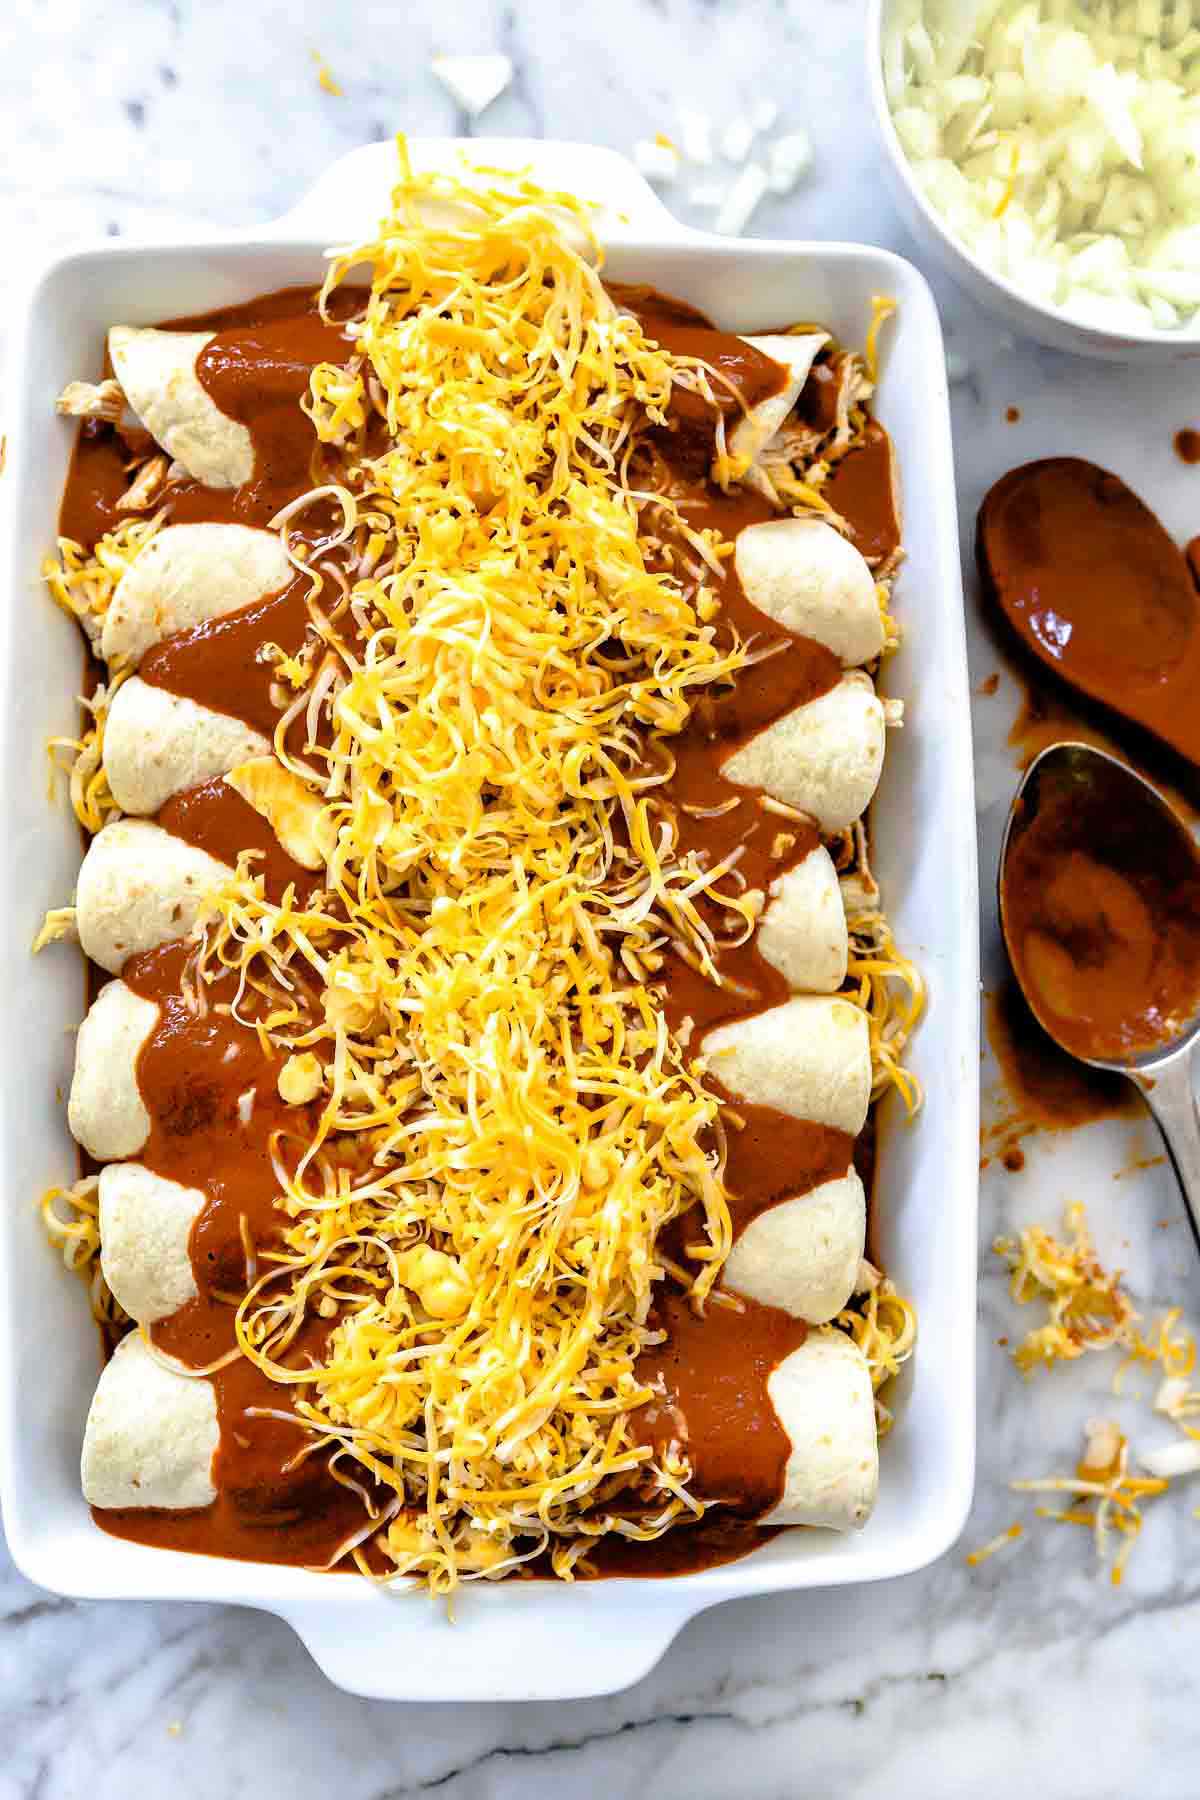
Flour tortillas — Flour tortillas almost melt into the filling. If you’re a corn tortilla purist, fry them quickly in canola oil (about 10 seconds) to make them pliable and easy to roll.
Heavy whipping cream — Makes for a creamy sauce and balances out any spiciness from the hatch chiles.
Avocados — Lends the sauce even more creamy richness without making it taste heavy.
Chicken broth — Thins out the sauce without making it taste watery.
Fresh cilantro — Since the green enchilada sauce gets blitzed in the blender, you can use both the stems and leaves.
Lime juice — Brightens up the sauce and cuts through the heavy cream.
Spices — A little ground cumin, garlic salt, and kosher salt are all you need to finish the sauce.
How to Make Green Chicken Enchiladas
Blend up the sauce. It’s as easy as adding everything to a blender and mixing until smooth.
Make the filling. Stir together the shredded chicken, onion, and hatch chiles.
Sauce them up. Add part of the green sauce to inject the filling with flavor and keep it moist.
Roll ’em up. Add a little of the chicken mixture and shredded cheese to each tortilla, then roll the enchiladas. Place them seam-side down in your baking dish to avoid leakage in the oven.
Heidi’s Tip: I like to spoon a little sauce into the bottom of the baking dish to prevent the enchiladas from sticking and flavor them from the bottom-up.
Sprinkle with cheese and bake. Finish the enchiladas with a final layer of sauce and a hearty sprinkling of cheese before baking until browned and bubbling. Cover the pan with foil to seal in the moisture and encourage even cooking before removing so the cheese can brown in the final few minutes.
FAQs
Can enchiladas be frozen?
Enchiladas are a fantastic freezer meal to have on hand. Assemble the enchiladas, then cover tightly with plastic wrap and foil before freezing.
Bake the enchiladas from frozen (remove the plastic wrap first!) for 45 minutes, covered, then a final 10 minutes uncovered.
Can I use a different enchilada sauce?
If you’re not in the mood for green enchiladas, swap out the cilantro lime sauce with classic red enchilada sauce or mole sauce.
Should I cover enchiladas when baking them?
Pop the enchiladas into the oven covered, then after about 20 minutes remove the foil. This ensures the enchiladas will be heated through with a golden layer of cheese on top without the danger of drying them out.
Storage Tips
Leftover enchiladas will last up to 5 days in the fridge, noting that the tortillas will continue to soften as they sit in the sauce. Reheat enchiladas for 30-second bursts in the microwave or covered in a 350ºF oven.
What to Serve With Green Chicken Enchiladas
If you make this recipe, please let me know! Leave a ⭐️⭐️⭐️⭐️⭐️ rating below, leave a comment to tell us what you think, and tag me on Instagram @foodiecrush.
Green Chicken Enchiladas Recipe
Chicken enchiladas are topped with the creamiest homemade avocado cilantro sauce for an easy dinner the whole family will gobble up.
To prepare the sauce: Mix whipping cream, chicken broth, 2 avocados, cilantro leaves and stems, cumin, garlic salt, lime juice and ½ teaspoon kosher salt in a blender and mix well to combine. Season with more salt if needed.
In a large bowl mix together chicken, chiles and onion. Add half of the avocado cream and stir to mix well. Add more salt if needed (this will depend on how salty your rotisserie chicken is.)
Prepare a 9×12-inch baking dish by giving it a light coat of cooking spray and ¼ cup of avocado cream spread evenly on bottom of baking dish.
To assemble enchiladas: Place about ⅓ cup chicken mixture along the bottom third of tortilla and top with ¼ cup of shredded cheese. Carefully roll the tortilla and place it seam-side down in the baking dish. Repeat placing tortillas side by side until you’ve run out of space. Pour avocado cream evenly over the tortillas and spread 1 cup cheese on top.
Cover with foil and bake for 20 minutes, remove foil and bake for another 10 minutes or until enchiladas are cooked through and cheese is lightly browned.
Garnish with chopped green onion, cotija cheese, additional avocado, cilantro leaves and salsa or fresh tomatoes.
We send good emails. Subscribe to FoodieCrush and have each post plus exclusive content only for our subscribers delivered straight to your e-mail box.
As always, thank you for reading and supporting companies I partner with, which allows me to create more unique content and recipes for you. There may be affiliate links in this post of which I receive a small commission. All opinions are always my own.
Disclosure: This is a working partnership with Avocados from Mexico and Muy Bueno Cookbook. I was compensated for recipe development but as always my opinions are my own and my opinion is I love avocados.


