This website may contain affiliate links and advertising so that we can provide recipes to you. Read my disclosure policy.
Not to be dramatic, but Frito Chili Pie might have saved my sanity. Zero whining, zero leftovers, it was a total dinner miracle.Crunchy, flavorful and ridiculously easy… you need this in your life ASAP.
Crunchy, Saucy, Totally Addictive
Big flavor, little effort: Layers of savory chili, crunchy Fritos, and melty cheese are all the things your kids love! It couldn’t be easier, and it tastes amazing!
Made-From-Scratch or Made-in-Minutes: This recipe has you make your own chili from scratch. But, if you need dinner on the table now? Grab your favorite canned chili and call it a win.
Frito Chili Pie Ingredients
Short on Time? Use Canned Chili instead! You can either make the chili from scratch using this recipe or keep things quick and easy by swapping in two (14-ounce) cans of your favorite store-bought chili.
Customize This Recipe: One of my favorite things about homemade chili is how easy it is to customize — you can mix in extra veggies, leave the beans out, adjust the spices, swap ground turkey for beef, or tweak it any way you like!
How to Make Frito Chili Pie
Frito chili pie is not just for Texans! Just whip up the tasty chili (or crack open a couple cans if you’re keeping it easy), layer it over crunchy chips, add plenty of cheese, and pop it in the oven.
Cook the Meat: Heat a pot over medium-high heat on the stove, add the ground beef and diced onion to the pot. Cook for 8 minutes until the meat is browned and the onions are tender.
Add Seasonings: Add the garlic, chili powder, oregano, ground cumin, coriander, salt, and pepper to the meat mixture, then stir to combine. Cook for one more minute.
Add Tomatoes and Beans: Add in the beef broth, tomato sauce, Rotel tomatoes, pinto beans, and kidney beans, then stir and simmer for another 5 minutes to heat through.
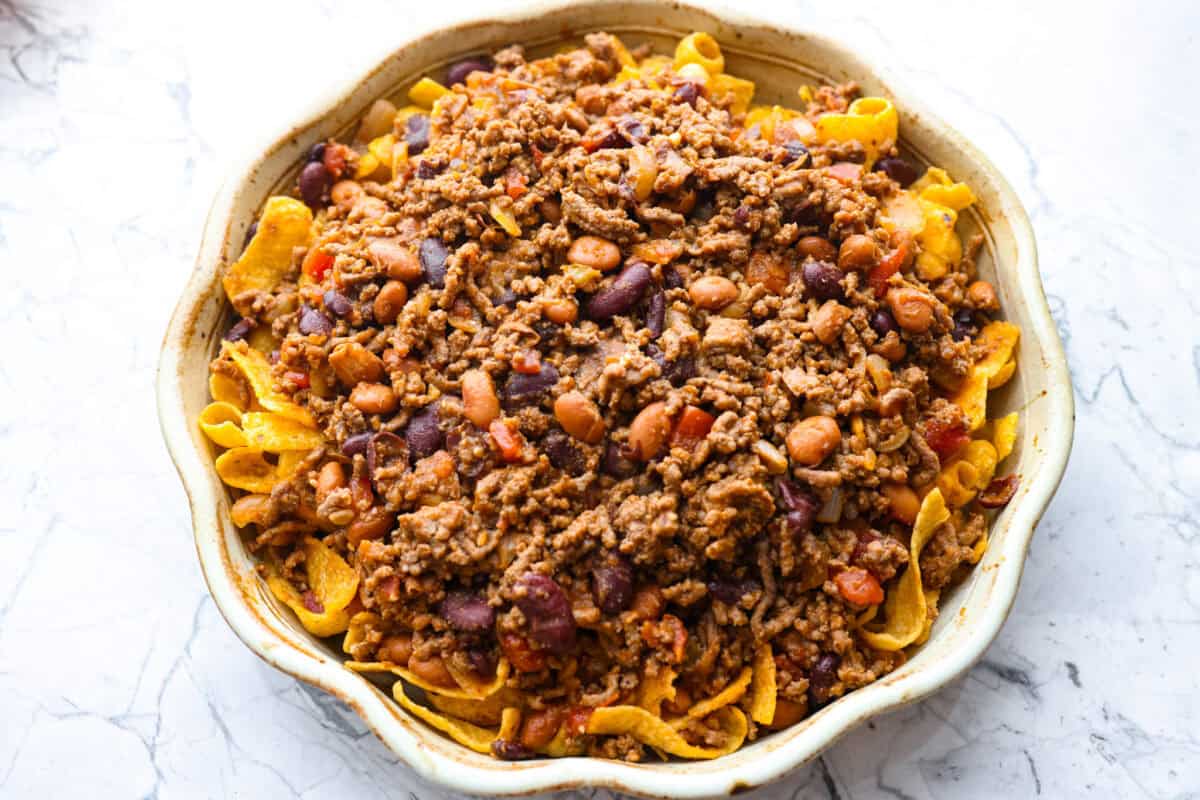
Prep Pie Pan: Spray a 2-inch deep 9-inch pie pan with non-stick cooking spray and dump the bag of Fritos chips into the pan.
Assemble: Pour the chili evenly over the Fritos in the pie pan.
Bake with Cheese: Top with shredded sharp cheddar cheese. Broil the pie on HIGH in the oven for 2-3 minutes until the cheese is melted and bubbling. Remove from the oven and then serve fresh.
Alyssa’s Pro Tip
No deep pie pan? No problem. You can either split the Frito Chili Pie ingredients between two pans, use a 9×13 dish, or serve the extra chili on the side!
Storing Leftovers
In the Fridge: I recommend enjoying this dish fresh; storing it will make the chips go soggy. But you can store leftovers in the fridge in an airtight container for 5 days.
In the Freezer: To freeze, store separately in an airtight container, and keep it frozen for up to a month.
More Delicious Chili Recipes
The great thing about this recipe is that you can add all of the toppings you want. cilantro, salsa, guacamole, jalapeños, and green onions. Here are some more chili recipes you can have fun with different toppings!
Spray a 2-inch deep 9-inch pie pan with non-stick cooking spray and dump the 1 (9-ounce) bag original Fritos chips into the pan.
Heat a pot over medium-high heat on the stove, add the 1 pound ground beef and 1 cup diced onion to the pot. Cook for 8 minutes until the meat is browned and the onion is tender.
Add the 3 teaspoons minced garlic, 1 tablespoon chili powder, 2 teaspoons oregano, 1 teaspoon cumin, 1 teaspoon coriander, 1 teaspoon salt, and ½ teaspoon pepper to the meat mixture and stir to combine. Cook for one more minute.
Add in the 1 cup beef broth, 1 (8-ounce) can tomato sauce, 1 (10-ounce) can Rotel tomatoes,1 (15-ounce) drained and rinsed can pinto beans, and 1 (15-ounce) drained and rinsed can kidney beans. Stir and cook for another 5 minutes to heat through.
Pour the chili evenly over the Fritos in the pie pan.
Top with 1 ½ cups shredded sharp cheddar cheese. Broil the pie on HIGH in the oven for 2-3 minutes until the cheese is melted and bubbling. Remove from the oven and serve fresh.
Published: · Modified: by Lucy · This post may contain affiliate links · 1 Comment
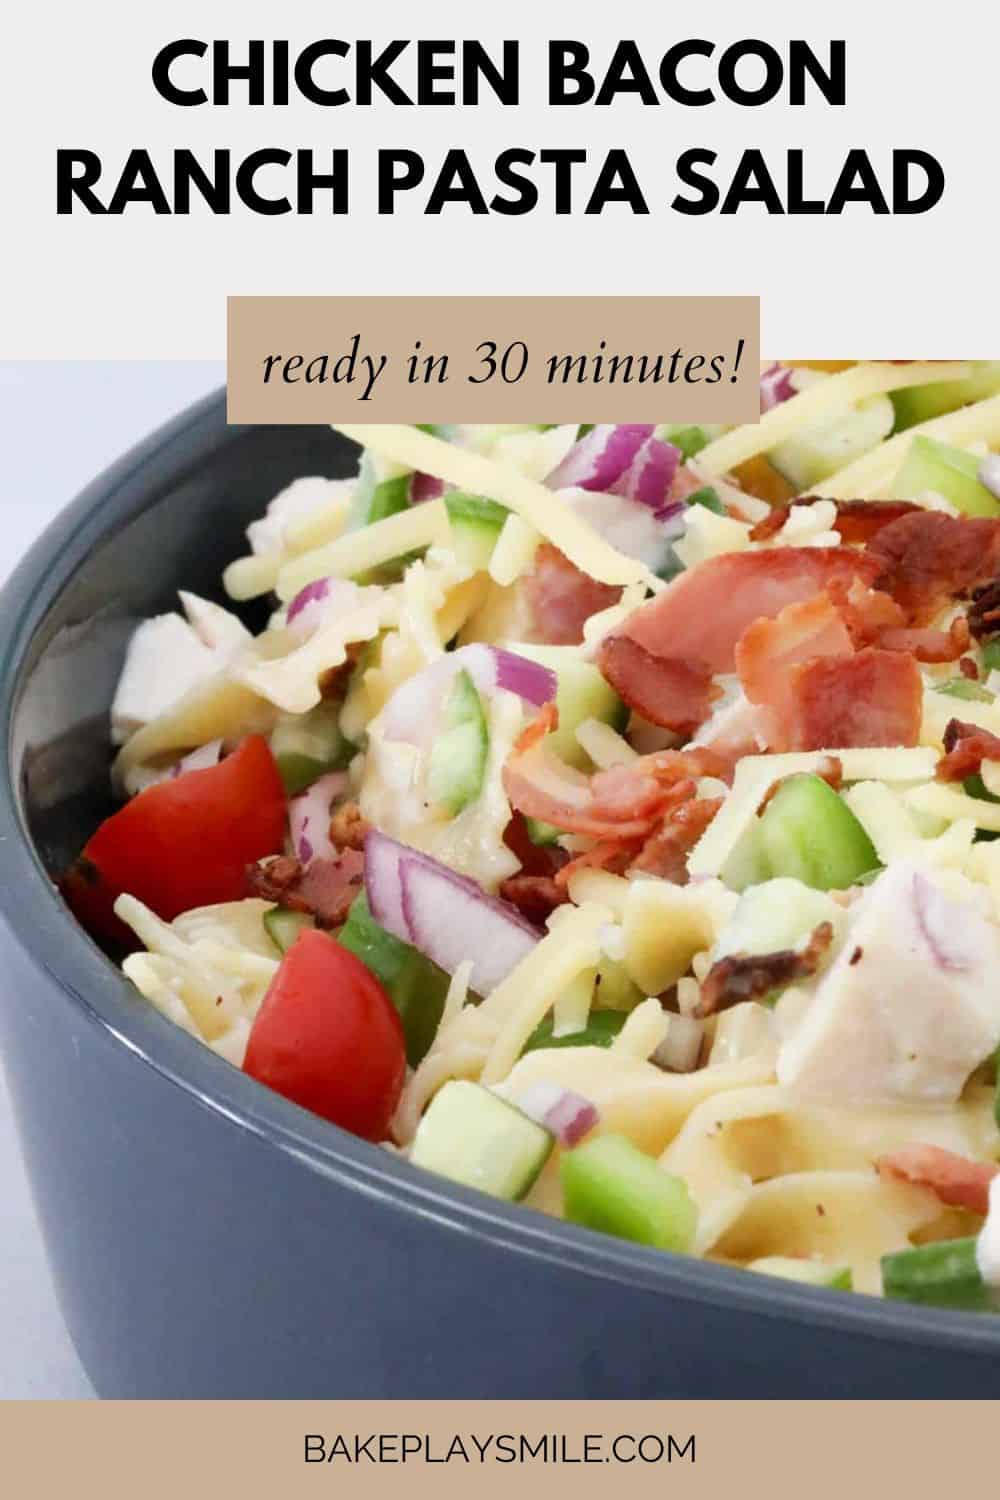
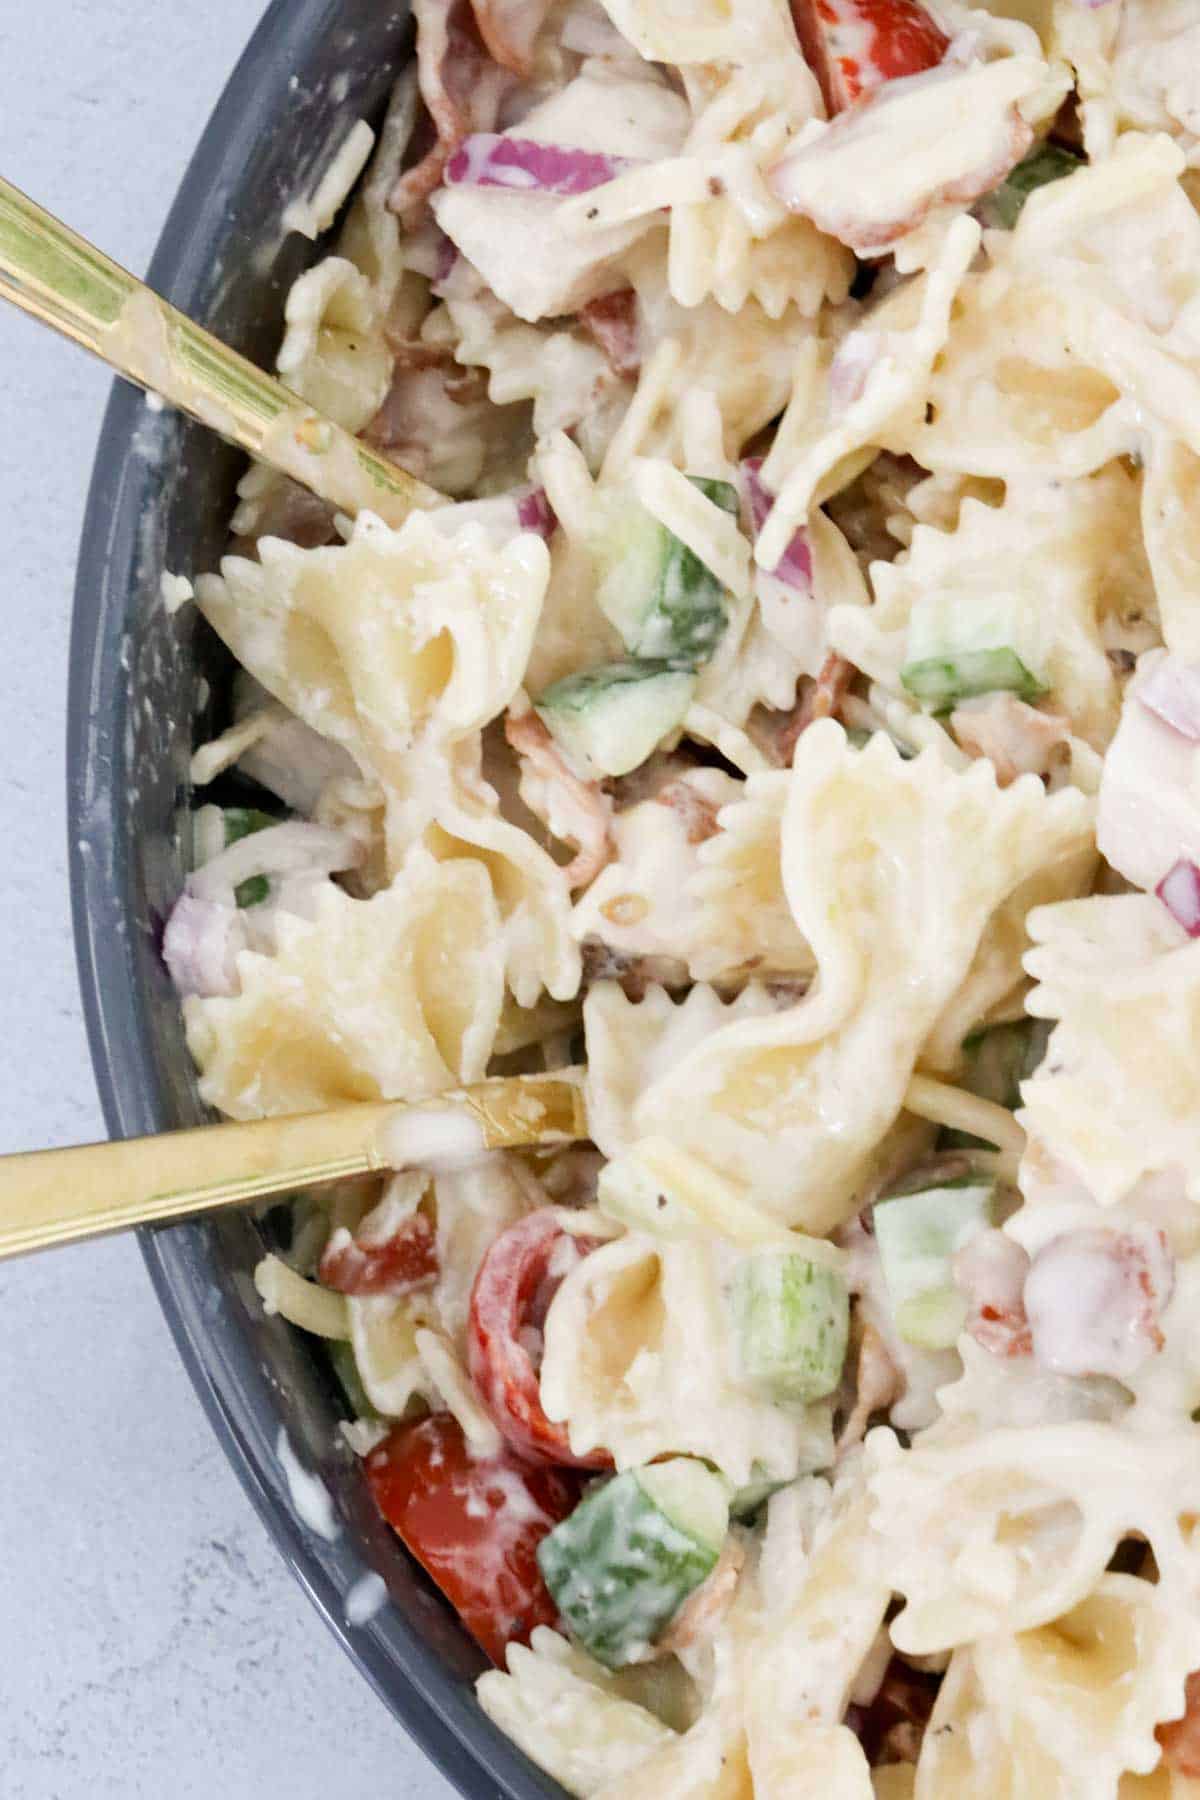
A delicious and creamy Chicken Bacon Ranch Pasta Salad packed full of flavour! This easy-to-make recipe is a perfect side dish for BBQs, family gatherings, or a quick midweek meal.
It’s a guaranteed crowd-pleaser, loaded with tender chicken, crispy bacon, fresh vegetables, and a creamy ranch dressing.
The beauty of this pasta salad recipe is that you can prepare many of the ingredients ahead of time. Then, you can simply combine the salad and dress it prior to serving.
Quick & Easy – Ready in just 25 minutes, this easy pasta salad recipe is a great option for those busy days when you need something tasty but fuss-free.
Full of Flavour – The smoky bacon, juicy chicken, and creamy ranch dressing make every bite a delight.
Great for Meal Prep – Make it ahead of time and store it in the fridge for an easy grab-and-go meal.
Versatile – Easily adaptable to suit your preferences with different veggies or protein options.
What You Need
Note: Scroll to the recipe card at the bottom for the ingredients quantities and full detailed method.
Ingredients
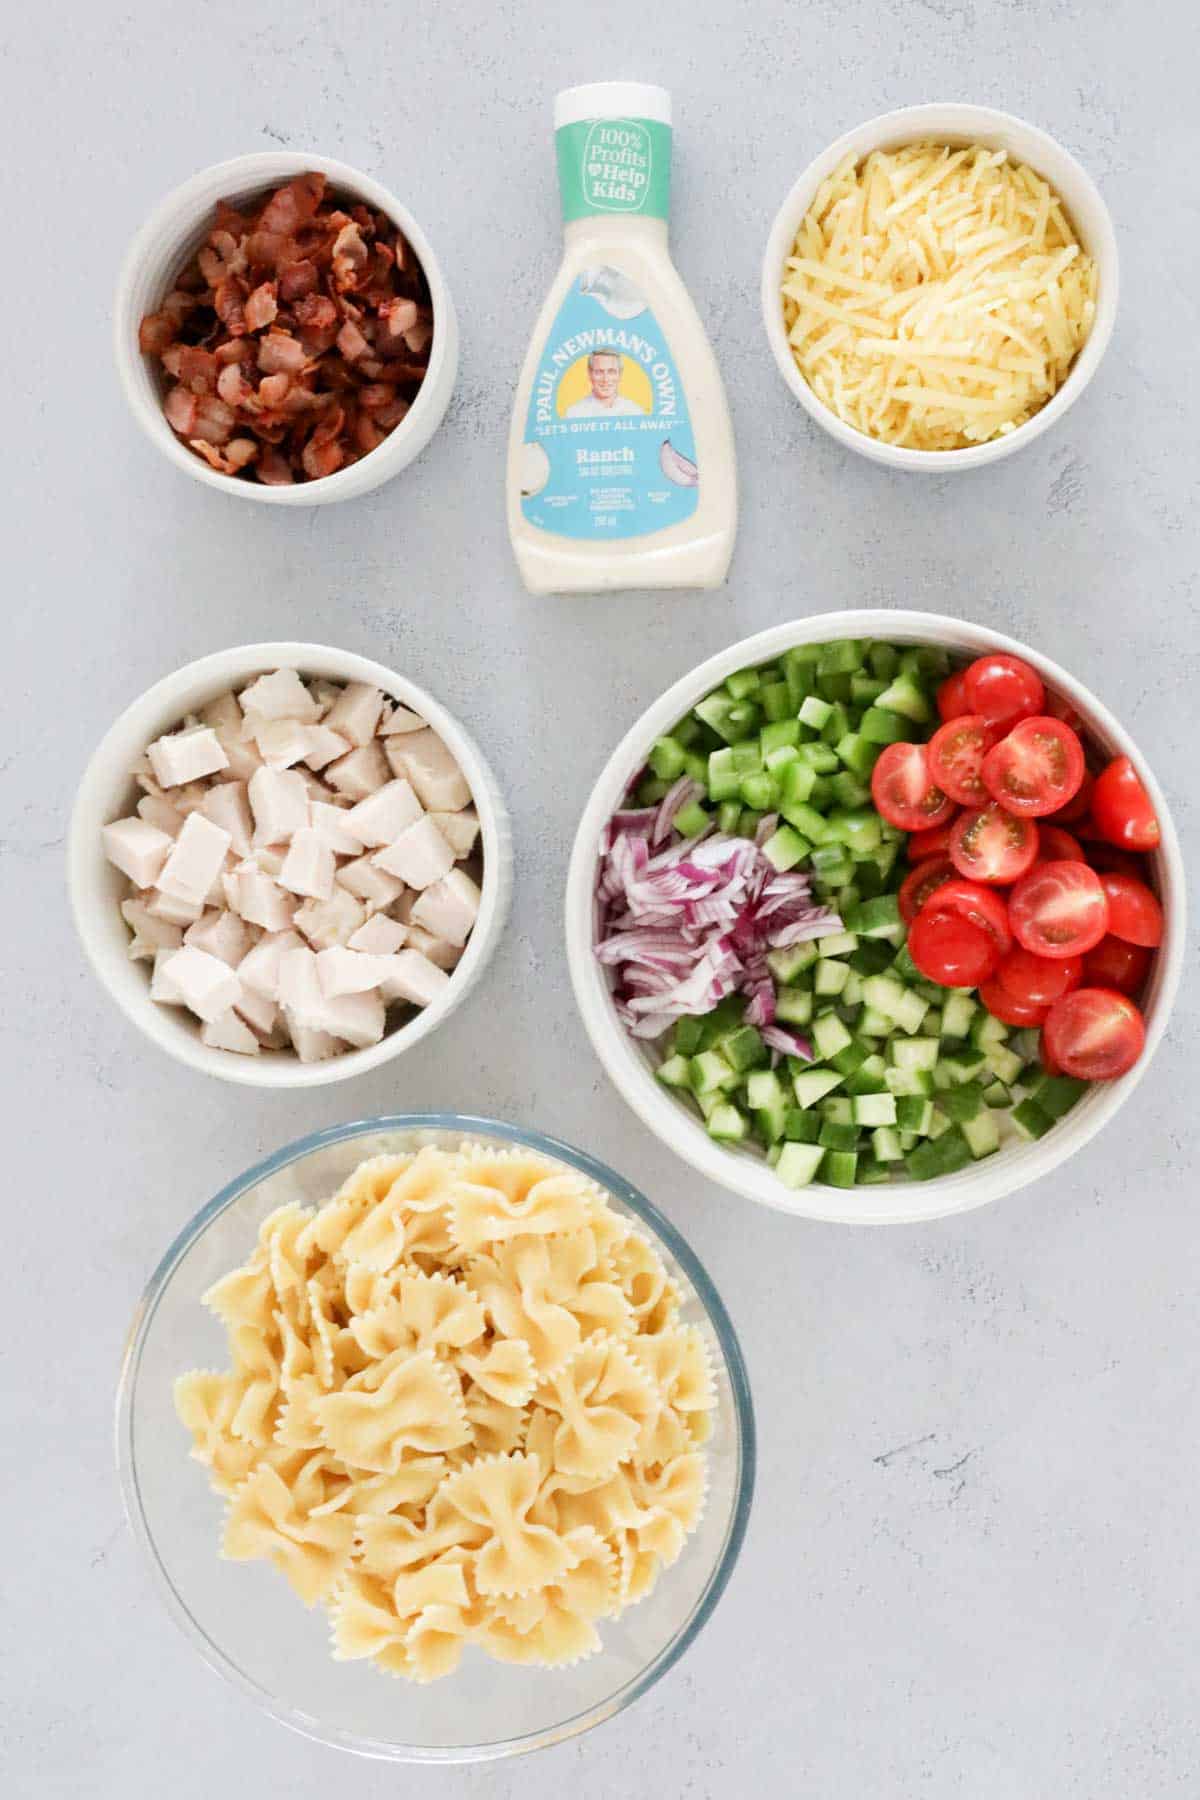
Uncooked pasta – Bow-tie or spirals work best as they hold the dressing well and add a great texture.
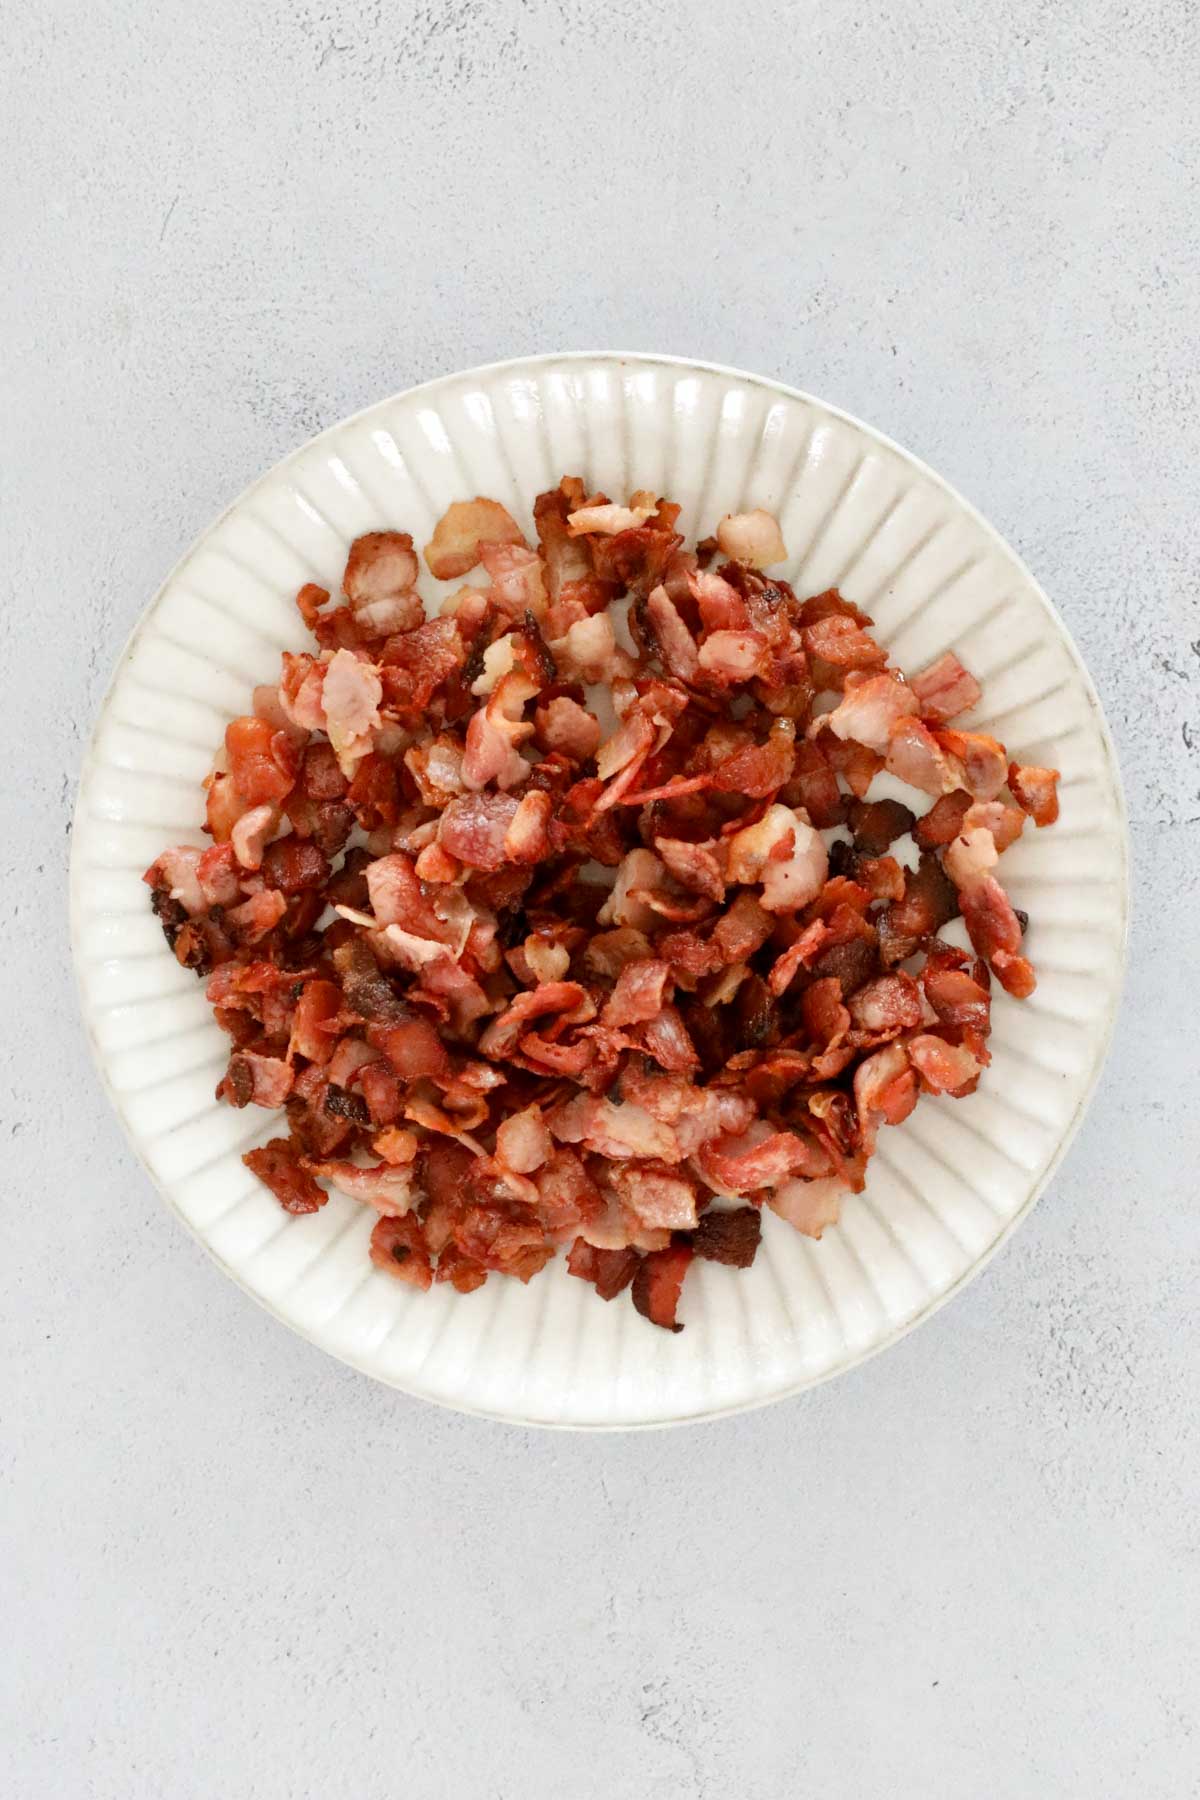
Streaky bacon – Crispy bacon adds a delicious smoky, savoury crunch to the salad.
Cooked chicken breast or thigh – A great way to use leftover chicken or BBQ rotisserie chicken for extra convenience.
Red onion – Adds a mild bite and a touch of colour to the salad. You could substitute with spring onions / green onions too.
Cherry tomatoes – These juicy, sweet tomatoes balance out the savoury elements perfectly.
Cucumber – Fresh and crunchy, cucumber helps to keep the salad light and refreshing.
Green capsicum – Adds a subtle sweetness and crisp texture. Capsicums are also known as bell peppers in the US.
Grated cheddar or tasty cheese – A rich and creamy element that ties the dish together.
Ranch dressing—The star of the dish, store-bought ranch dressing adds creaminess and flavour to every bite. Alternatively, you could make your own ranch dressing using sour cream, mayonnaise, herbs, and seasonings.
Salt and pepper – To taste, season, and enhance all the flavours.
Equipment Required
To make this recipe, you’ll need:
A large pot for cooking the pasta
A colander for draining the pasta
A frying pan for cooking the bacon
A sharp knife and chopping board for prepping the ingredients
A large bowl for combining everything
A spoon or spatula for mixing the salad.
Step-by-Step Instructions
Note: Scroll to the recipe card at the bottom for the ingredients quantities and full detailed method.
Step 1: Prepare The Pasta
Start by bringing a large pot of salted water to a boil. Cook the pasta according to the packet instructions until it’s just al dente. Drain the cooked pasta and rinse it under cold water to cool it down and prevent sticking. Set aside.
Step 2: Cook The Bacon
Heat a frying pan over medium heat and add the diced bacon. Cook until crispy and golden brown, stirring occasionally to ensure even cooking. Once done, transfer the bacon to a plate lined with paper towels to drain any excess oil.
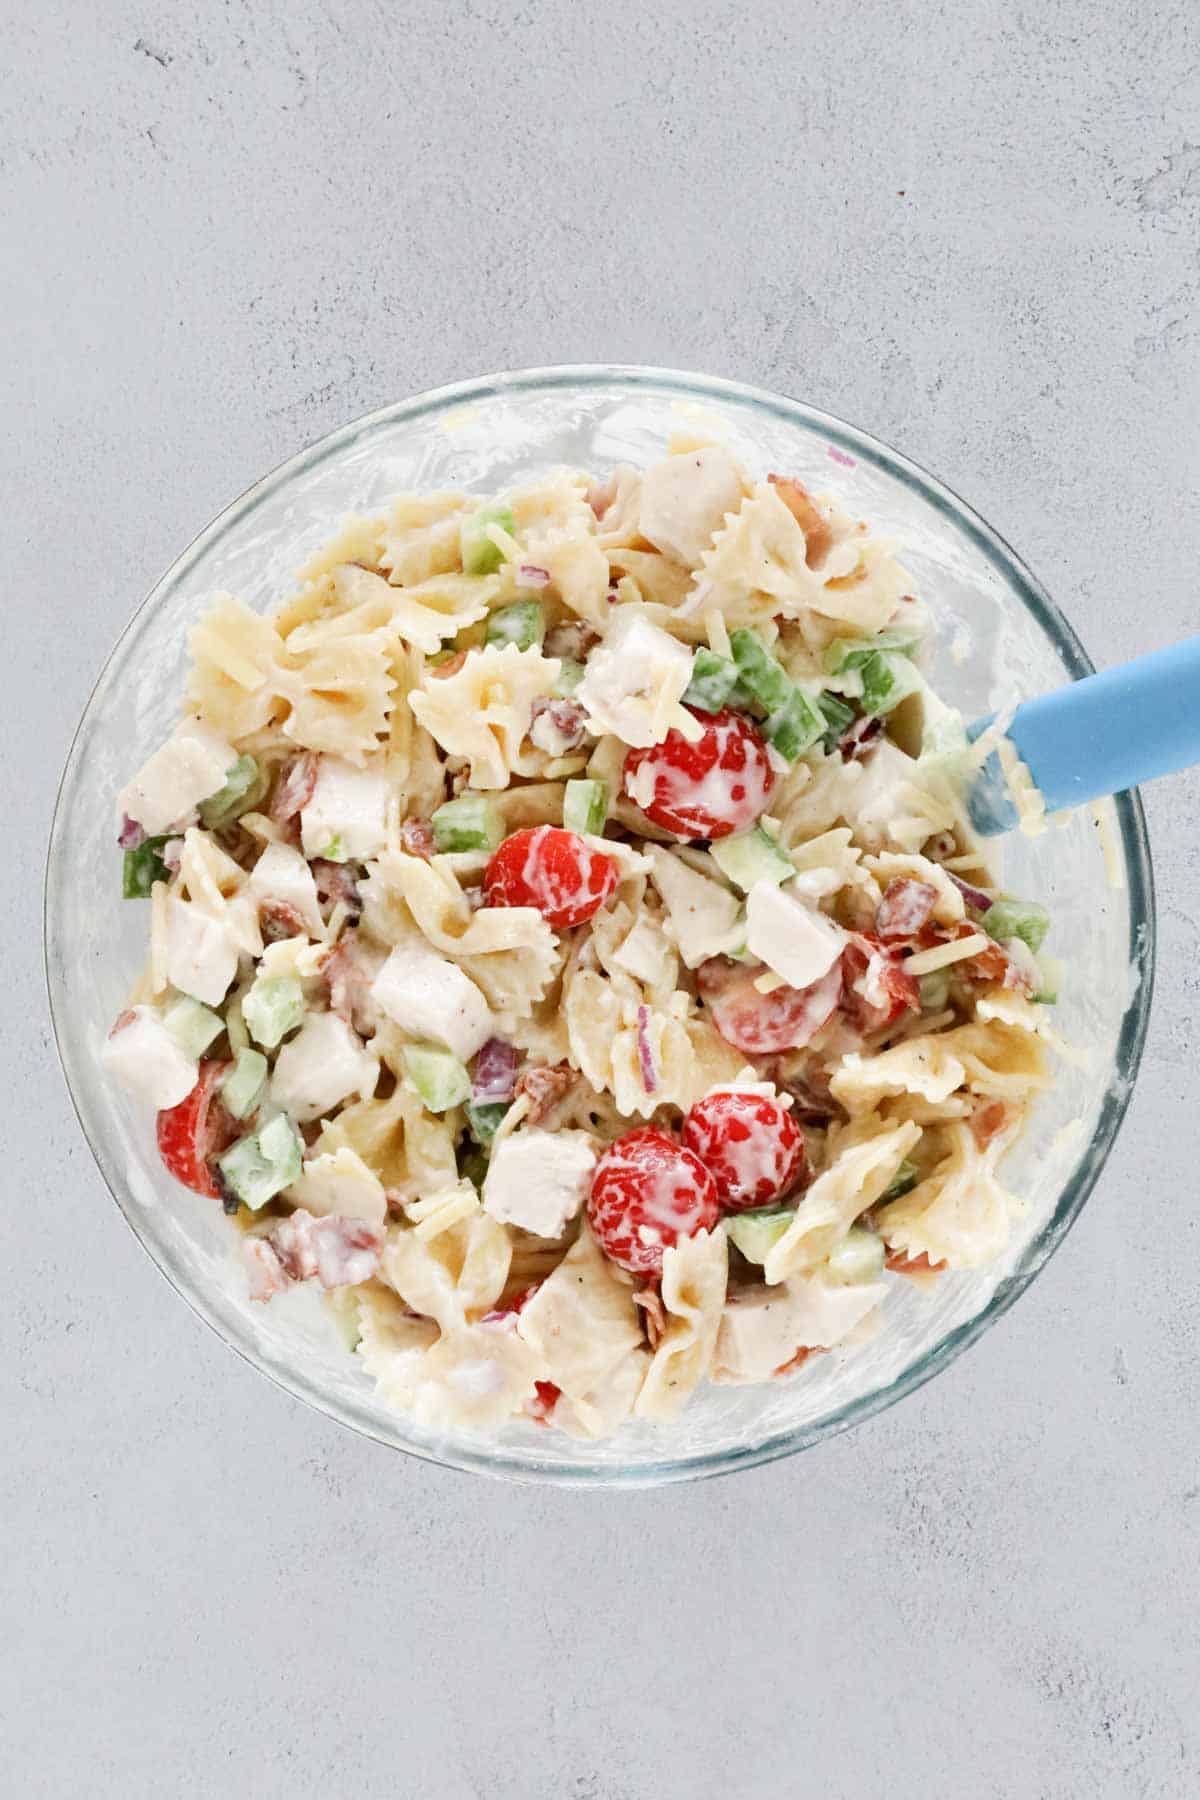
Step 3: Mix The Ingredients
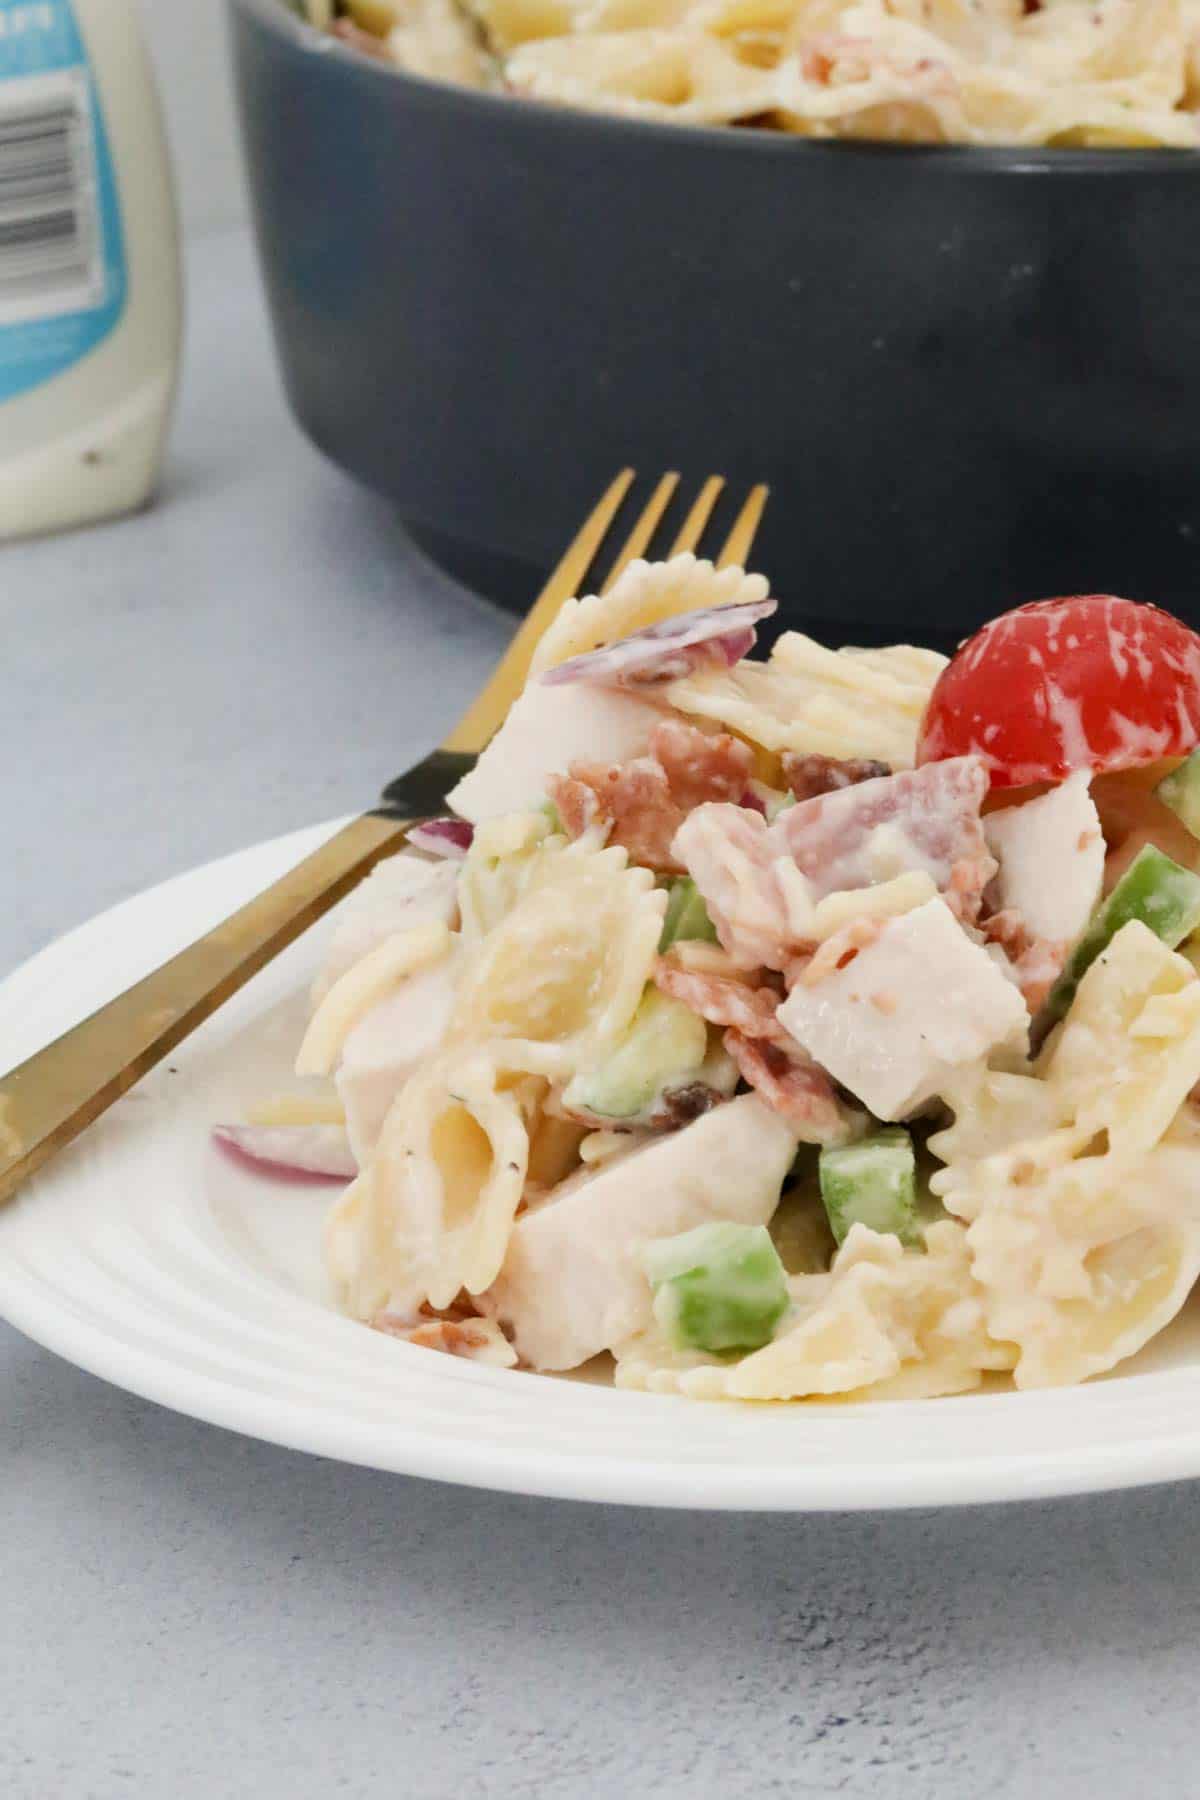
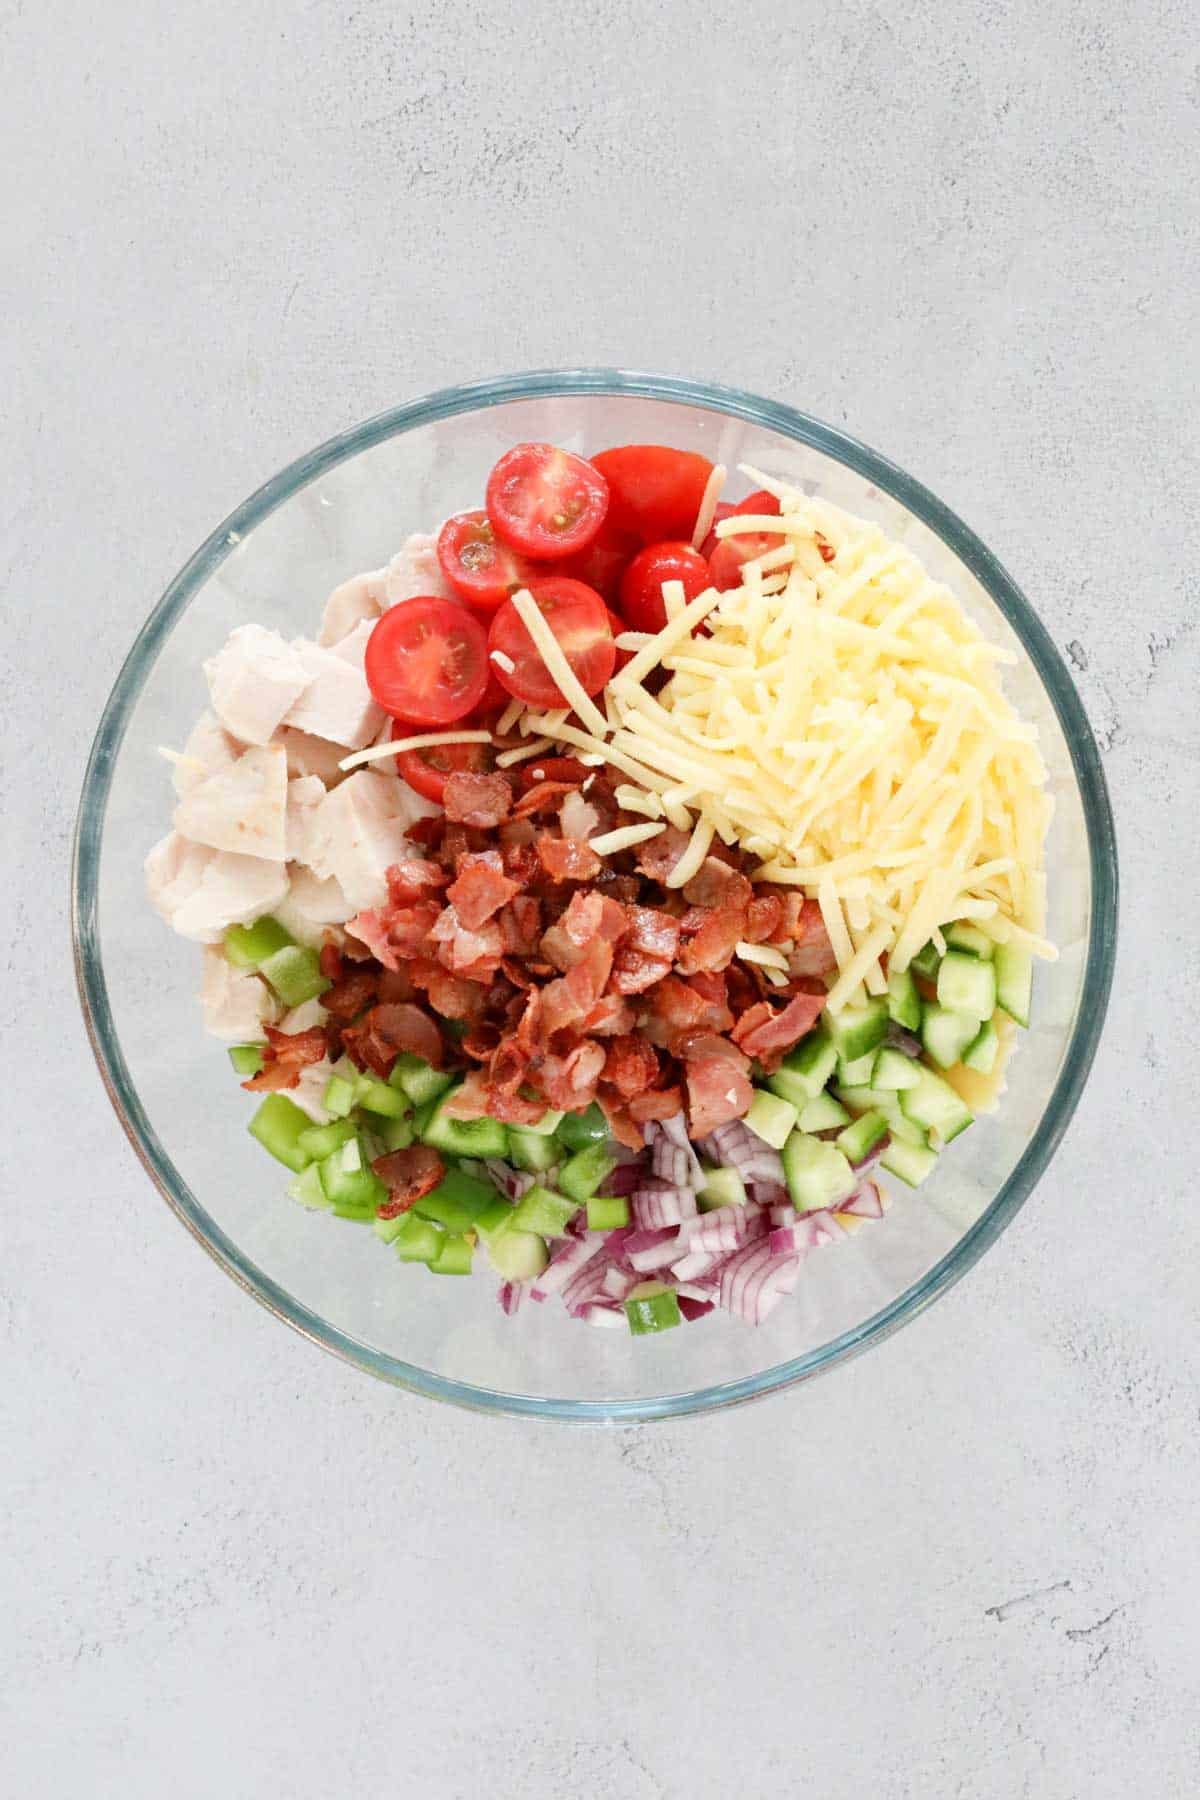
In a large mixing bowl, combine the cooled pasta with the crispy bacon, diced chicken, red onion, cherry tomatoes, cucumber, green capsicum, and grated cheese.
Toss all ingredients to evenly distribute, reserving a little cooked bacon and grated cheese to sprinkle over the top.
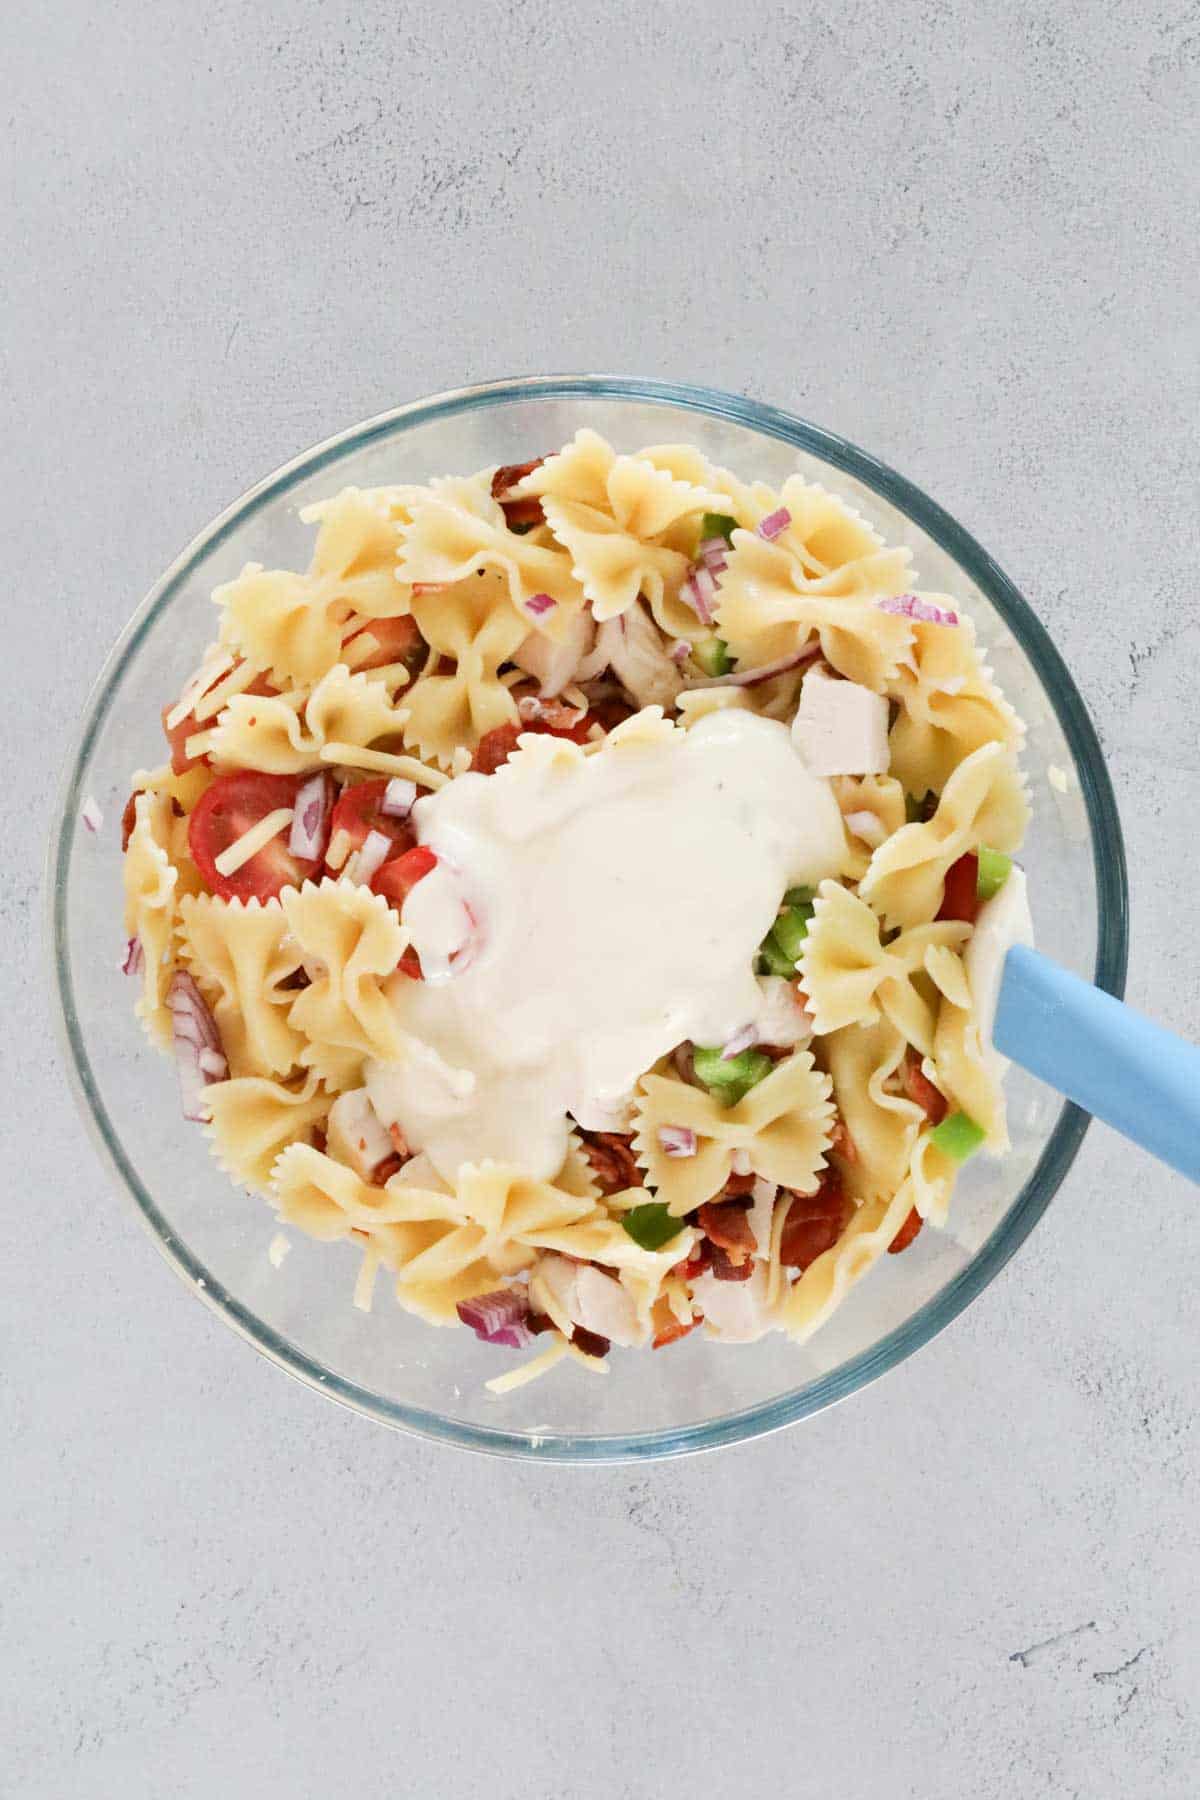
Step 4: Add Dressing
Drizzle three-quarters of the ranch dressing over the salad and gently mix until everything is well coated.
Taste and add extra dressing if needed. Season your chicken pasta salad with salt and pepper to your liking.
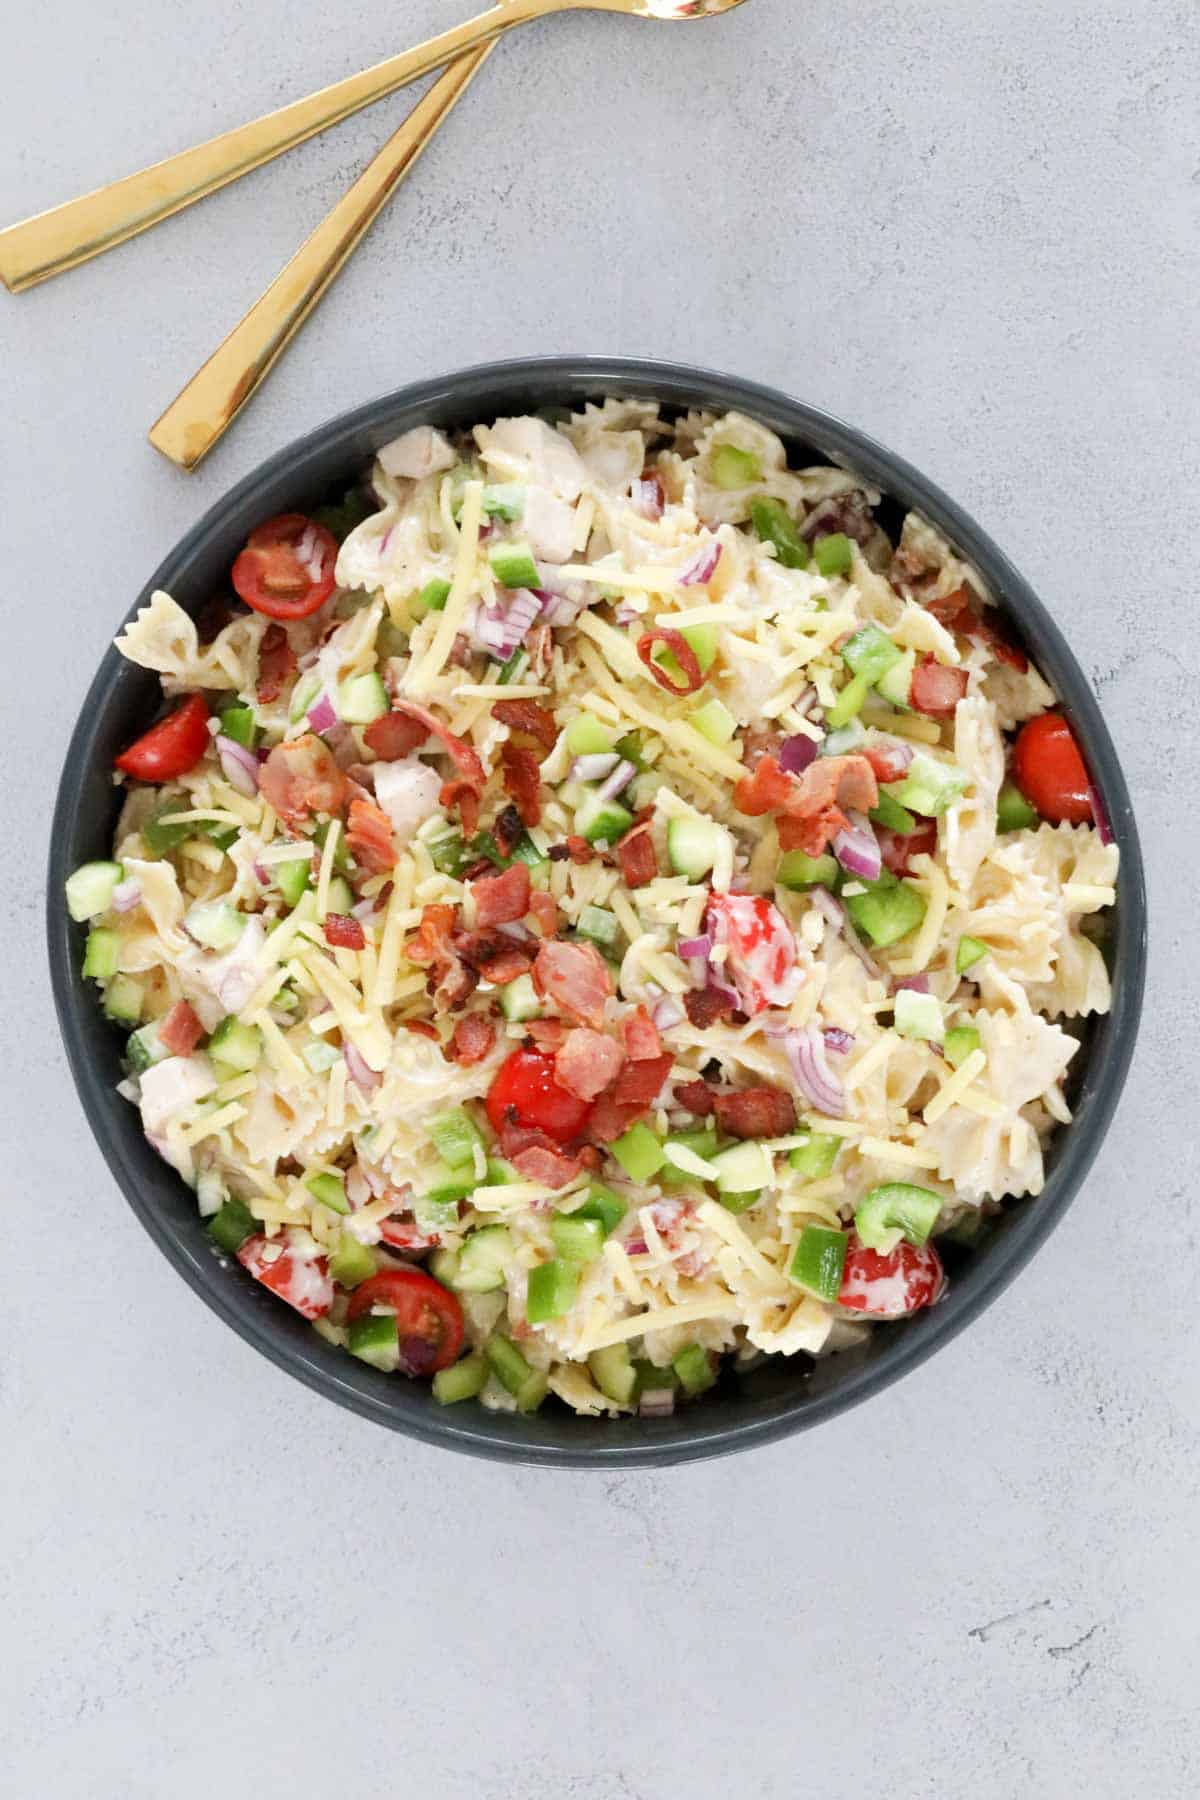
Finally, sprinkle the reserved bacon and cheese on top.
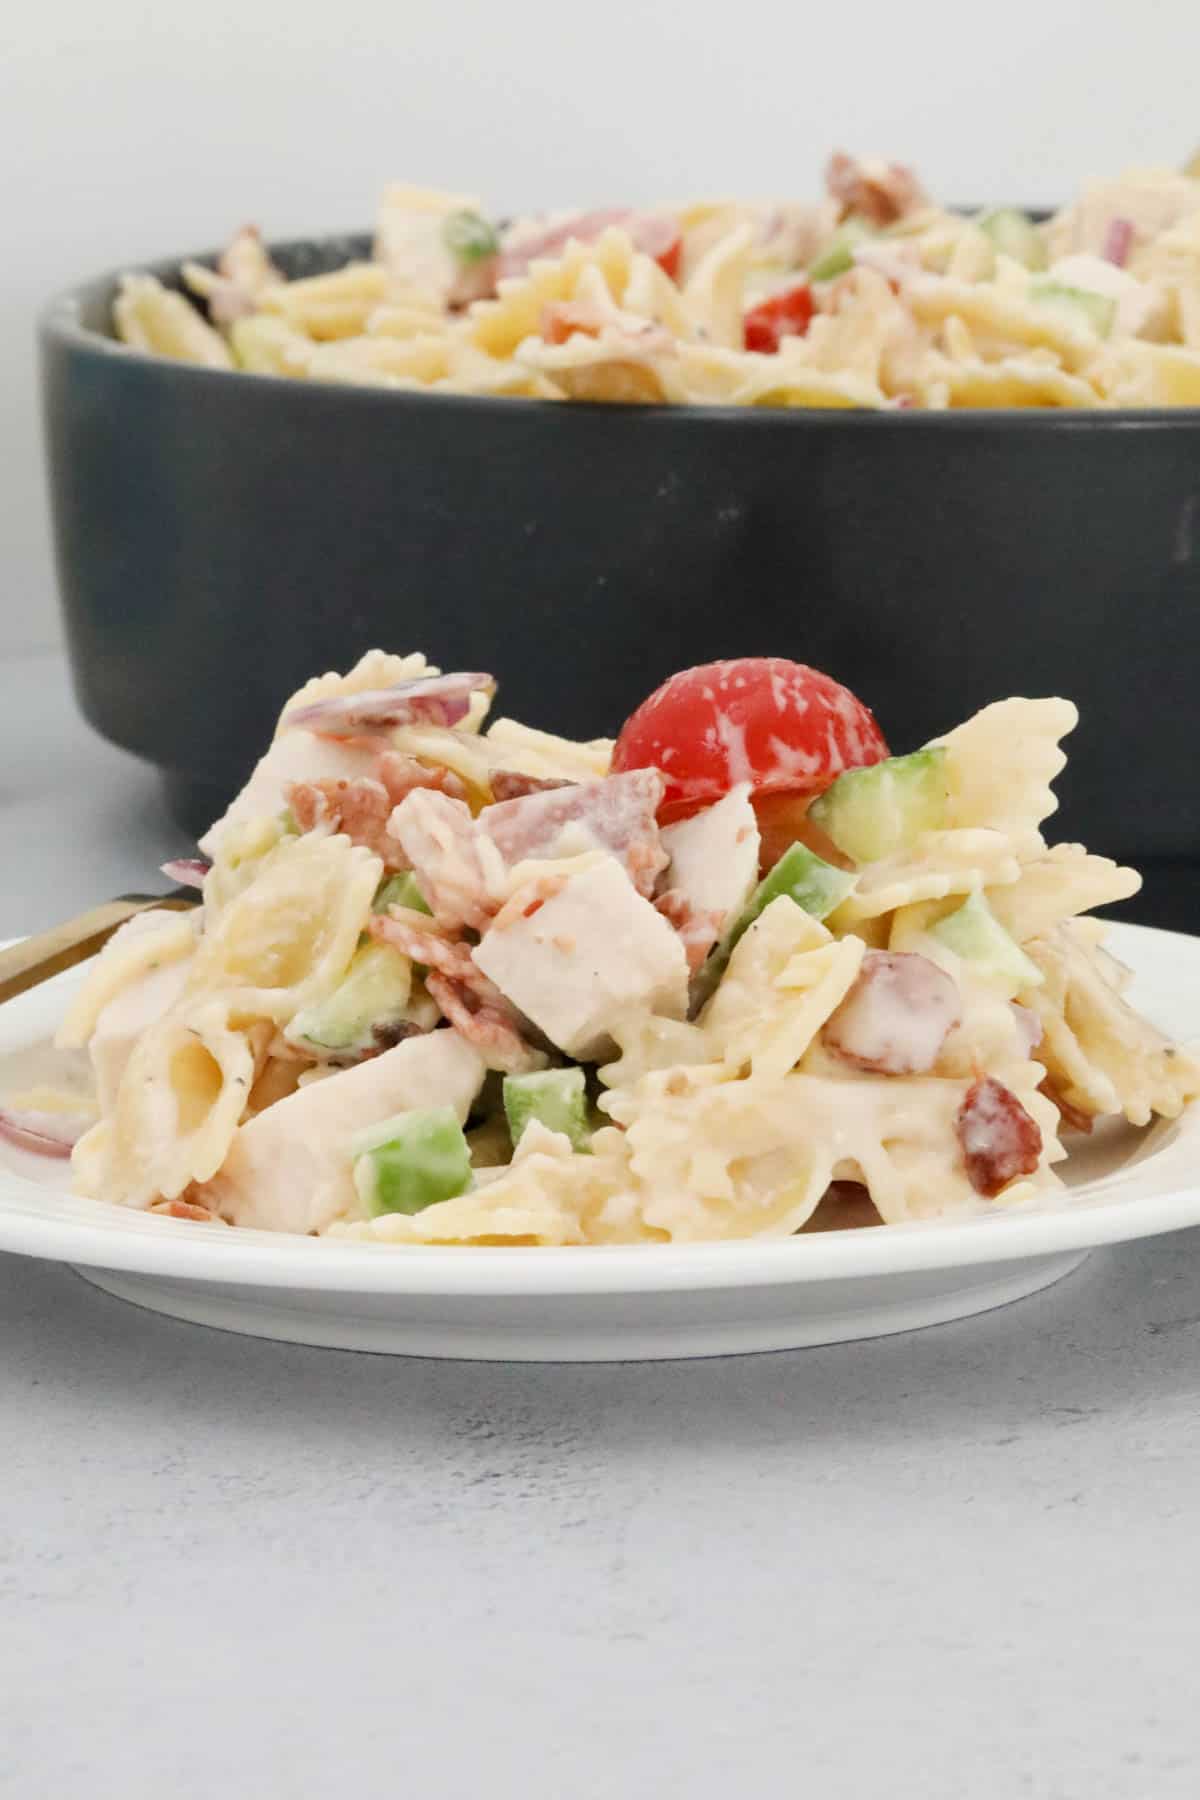
Step 5: Serve And Enjoy
This delicious pasta salad is best enjoyed at room temperature for the best flavour and texture. If you’ve prepared it beforehand, allow it to sit out for a few minutes before serving.
Recipe Tips & Variations
Type of Pasta: Bow-tie (farfalle) or spirals work well, but penne or macaroni are great alternatives. Be sure not to overcook the pasta to keep it tender yet firm.
Chicken Options: Use leftover roast chicken, rotisserie chicken, or quickly pan-fry some chicken breasts or chicken strips for this recipe.
Extra Add-Ins: For extra flavour and texture, try adding avocado, black olives, shredded lettuce, or even corn.
Make It Lighter: Swap out the full-fat ranch for a light version, or mix half ranch and half Greek yogurt for a healthier dressing or for personal preference.
Cheese Options: Swap cheddar for mozzarella, parmesan cheese, or feta for a different flavour twist.
FAQs
Can I make chicken bacon ranch pasta salad ahead of time?
Yes! You can prepare all the ingredients in advance and store them separately in the fridge. Mix everything together with the dressing just before serving to keep it fresh.
How long does this pasta salad last in the fridge?
This salad can be stored in an airtight container in the fridge for up to 2 days. Just stir it the next day before serving.
Can I use a different dressing instead of ranch?
Absolutely! Caesar dressing, honey mustard, or a simple homemade vinaigrette are great alternatives if you want to switch things up.
What other vegetables can I add?
You can mix in whatever veggies you like! Add diced avocado, shredded carrots, corn, or even spinach or rocket for extra colour and nutrition.
Can I serve chicken bacon pasta salad warm?
Yes, while it’s traditionally served at room temperature or chilled, you can serve it slightly warm if preferred. Just add the pasta salad dressing last to keep the flavours balanced.
Storage & Meal Prep
Refrigeration: Store leftovers in an airtight container in the fridge for up to 2 days.
Freezing: Not suitable for freezing as the texture of the pasta and dressing changes.
Make Ahead: Prepare everything ahead, but add the dressing just before serving for the best texture.
Serving Suggestions
Serve as a standalone main course for lunch or dinner.
Pair with a crusty bread roll for a more substantial meal.
Enjoy as a side dish at your next BBQ, picnic, or family gathering.
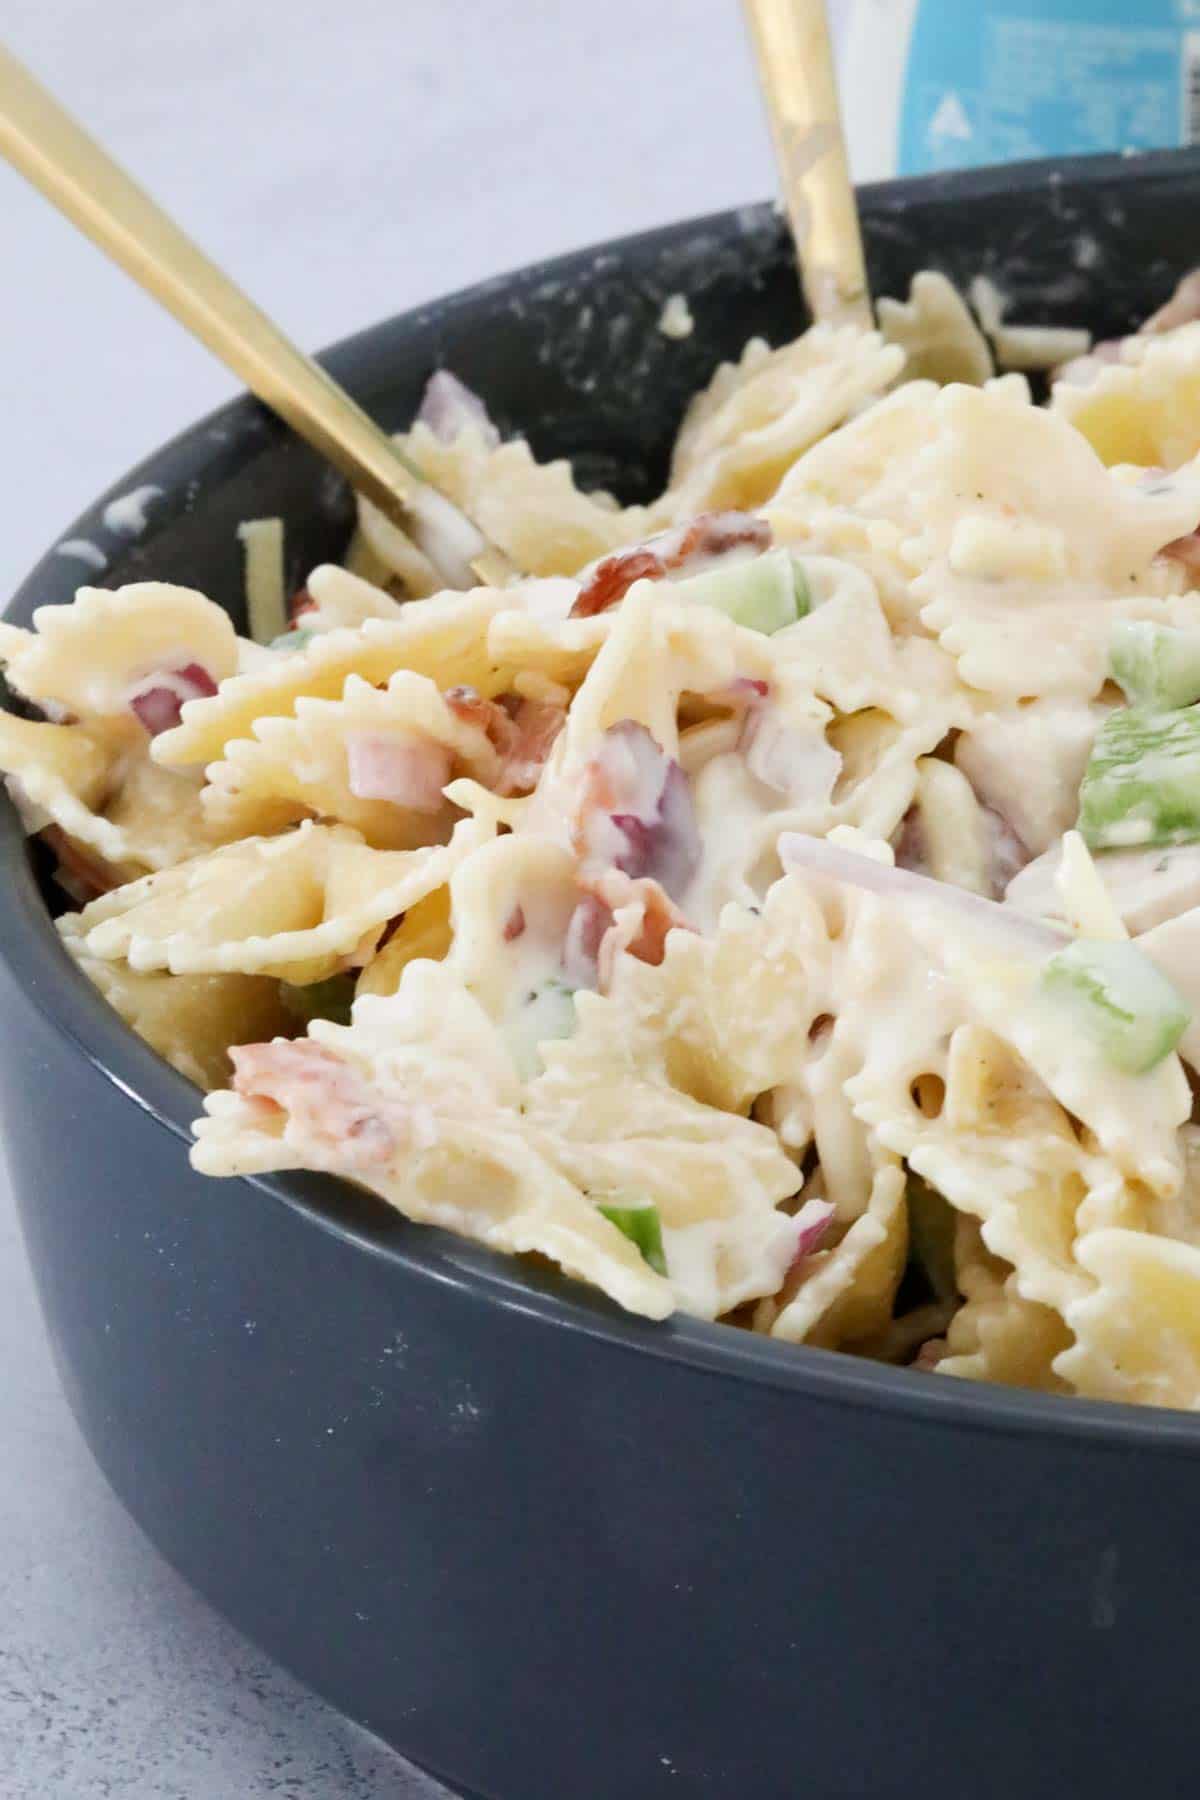
This Chicken Bacon Ranch Pasta Salad is guaranteed to be a huge hit with the whole family! Creamy and savoury, with tender pasta and full of fresh ingredients, this easy pasta salad recipe is the ultimate meal that everyone will love. Enjoy!
For more easy salad recipes, check out these tasty summer salads, which are always popular. Any leftover pasta salad makes a fabulous lunch the next day, too!
Cook the pasta according to the packet directions until just al dente. Run the pasta under cold water and strain well.
Cook the bacon in a frying pan until crispy. Set aside on paper towel to remove any excess oil.
Place the pasta into a large mixing bowl.
Add the crispy bacon, diced chicken, red onion, cherry tomatoes, cucumber, green capsicum and grated cheese. Mix until well combined.
Pour over ¾ cup of the ranch dressing and mix to combine.Taste the salad and add the remaining dressing if desired.Season with salt and pepper.
Notes
RECIPE NOTES & TIPS
Pasta – I like to use bow-tie pasta. However, spirals or penne also work well. Cook the pasta until just al dente (do not overcook).
Chicken – This recipe is a great way to use up leftover cooked chicken! Alternatively, you can use a cooked rotisserie chicken or pre-cooked chicken breast.
Versatile – Mix and match with your favourite vegetables! Try substituting the red onion with spring onion, add some diced avocado, shredded lettuce or black olives, or use a different coloured capsicum (peppers).
Make it look even more impressive by reserving a small amount of bacon, cheese, tomatoes, cucumber and red onion to sprinkle over the top!
Serve at room temperature – This salad is best served at room temperature as the dressing remains creamy. If storing in the fridge, bring the salad to room temperature before serving.
Store – Store the salad in an airtight container in the fridge for up to two days.
Freezing – This salad is not suitable for freezing.
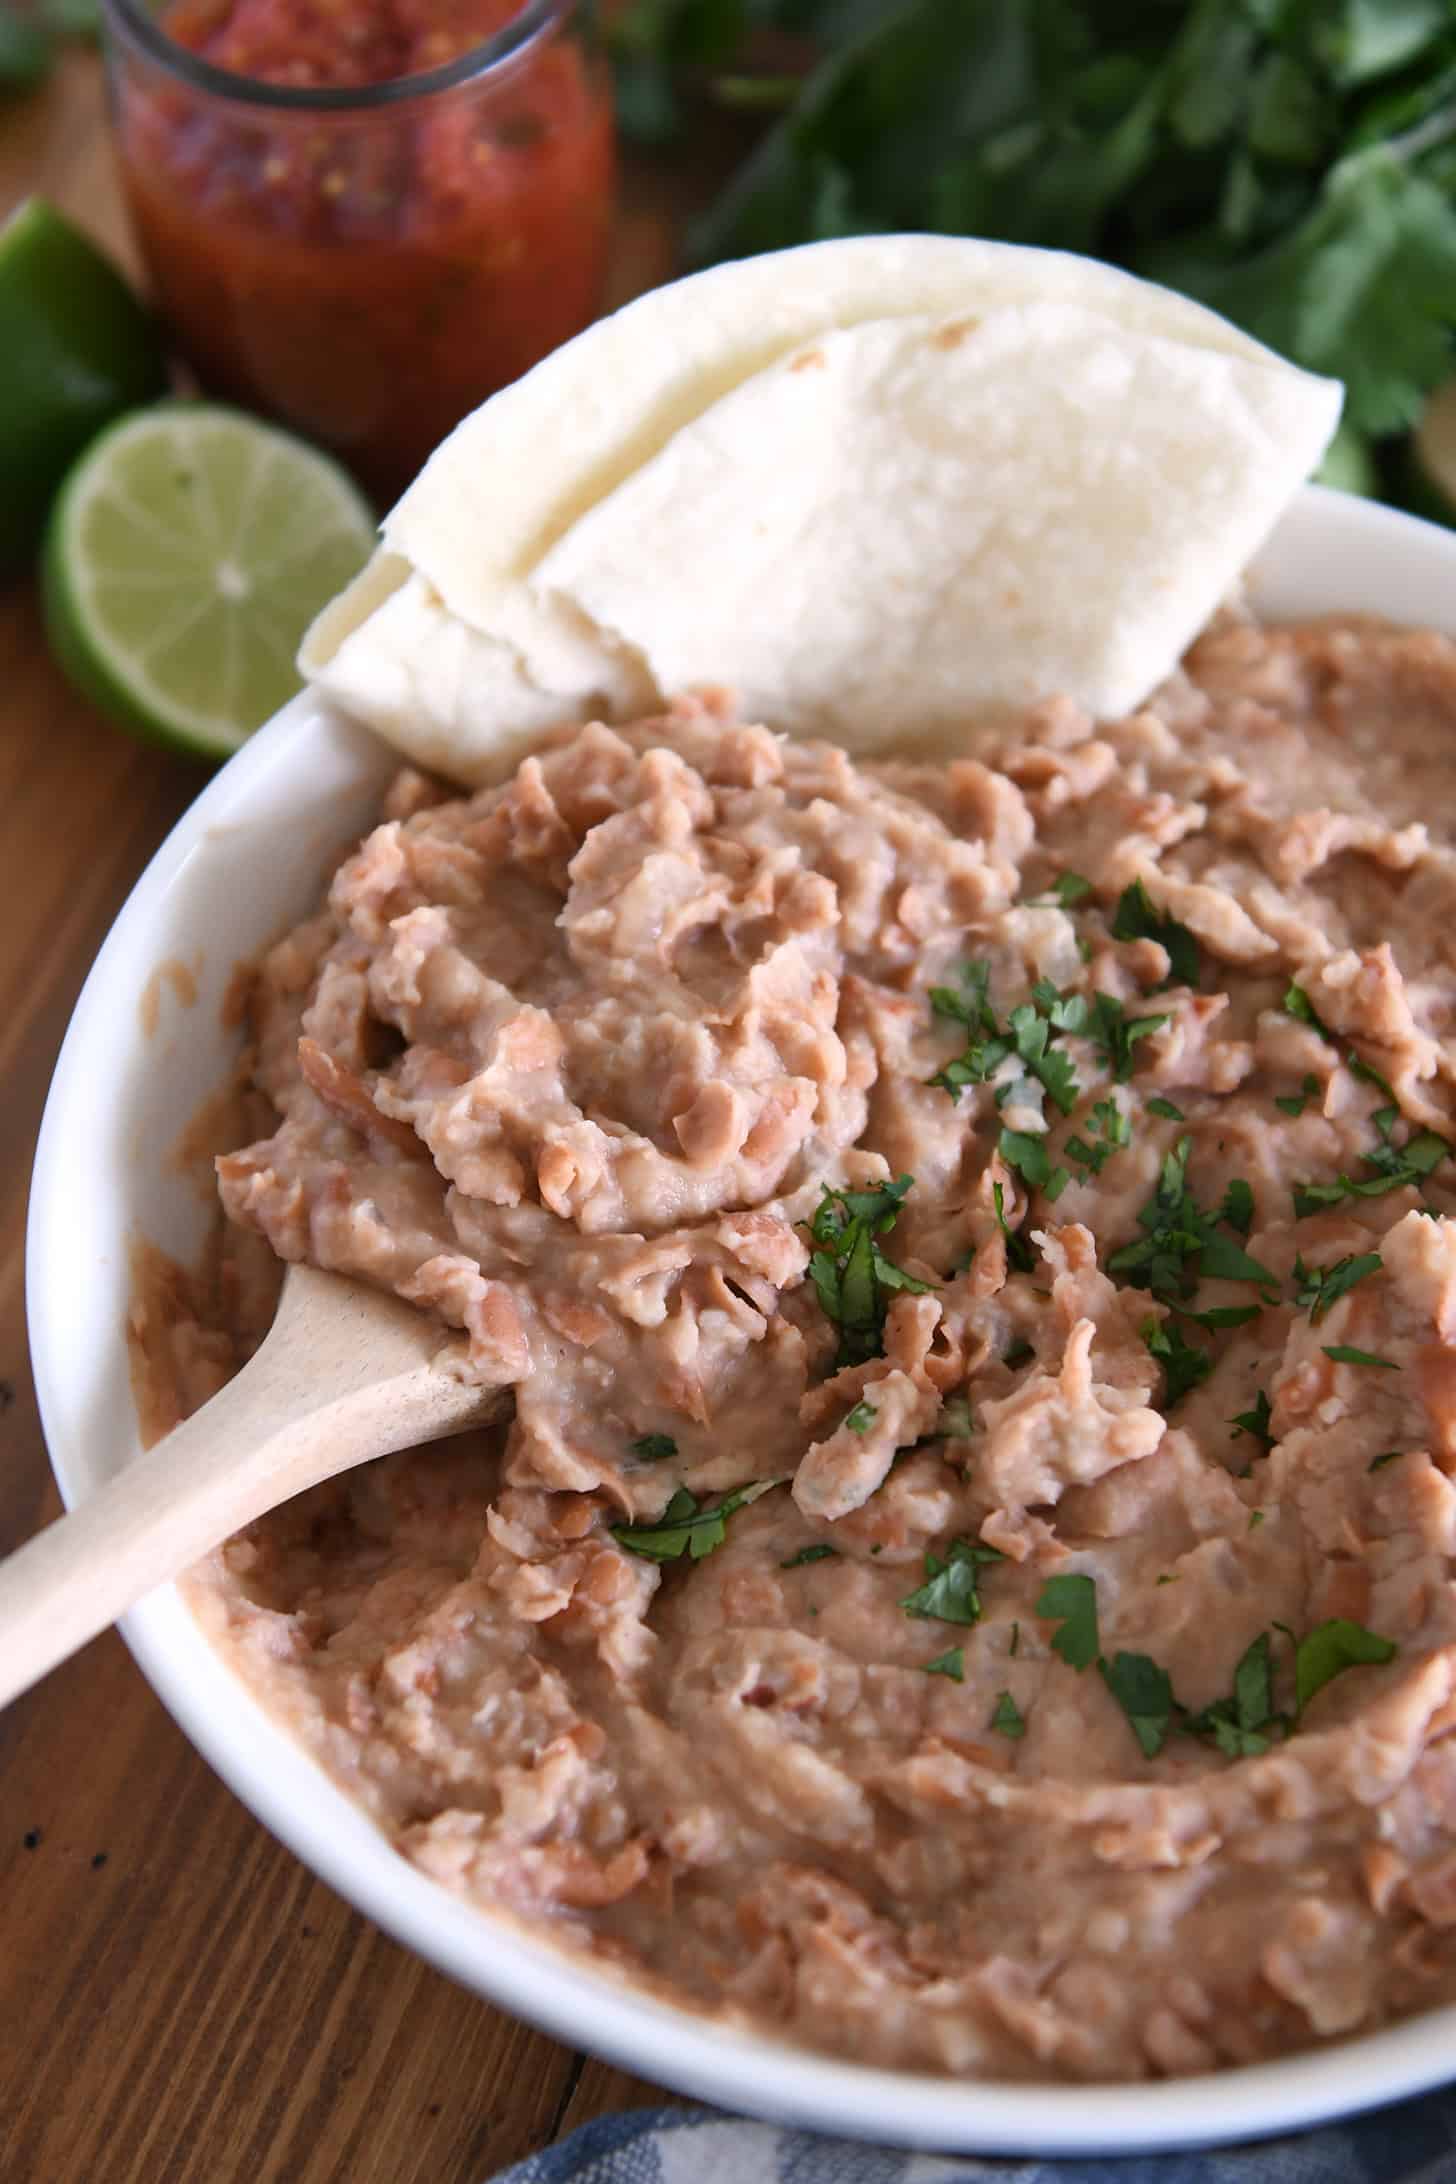
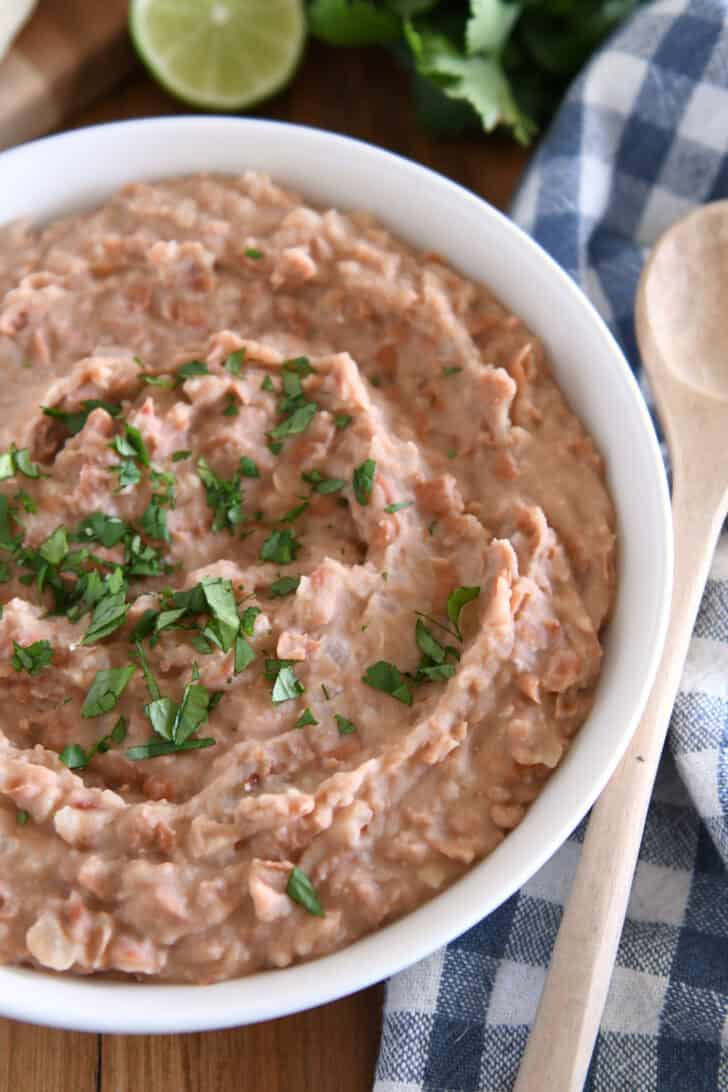
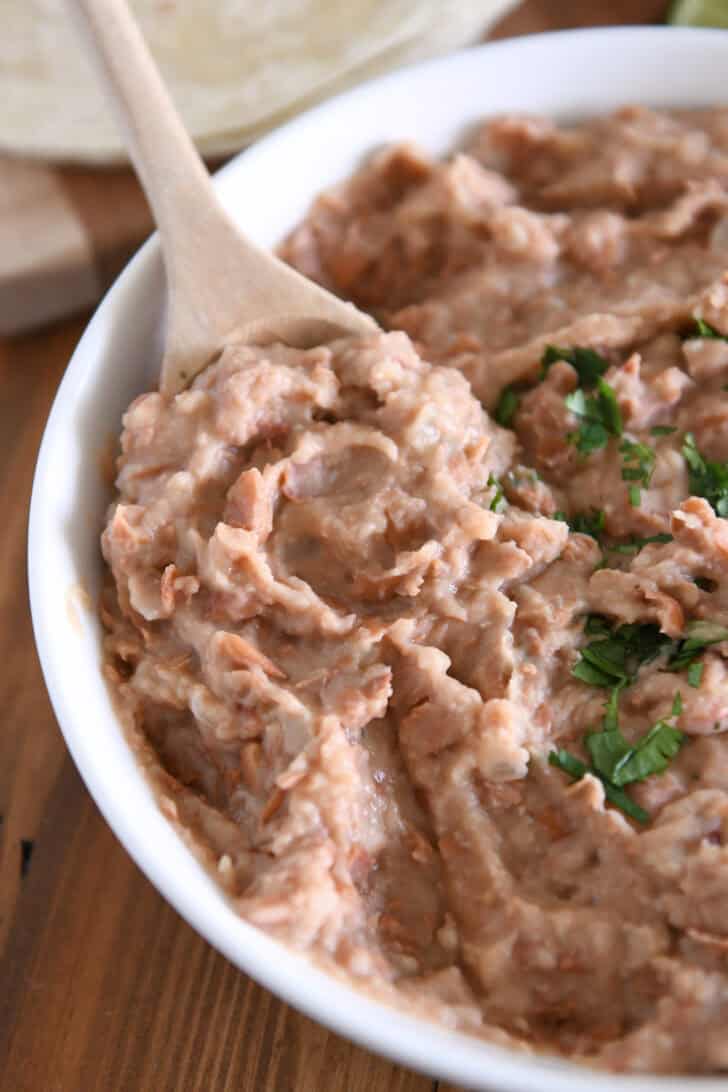
Make delicious, better-than-restaurant refried beans in 20 minutes or less! These easy refried beans are creamy, flavorful and make the perfect side dish.
Homemade refried beans are SO GOOD, but making them from dried beans is a long process. Now you can have all the tastiness of refried beans in a fraction of the time!
How to Make Easy Refried Beans
The key to making these easier refried beans is using canned pinto beans.
Now before you ask yourself (or me) why on earth you’d use canned beans to make refried beans if you could just open up a can of refried beans, let me tell you why. ⤵️
Because these simple and quick refried beans are about a thousand times yummier than any can of refried beans I’ve ever met. And why are they yummier? ⤵️ ⤵️
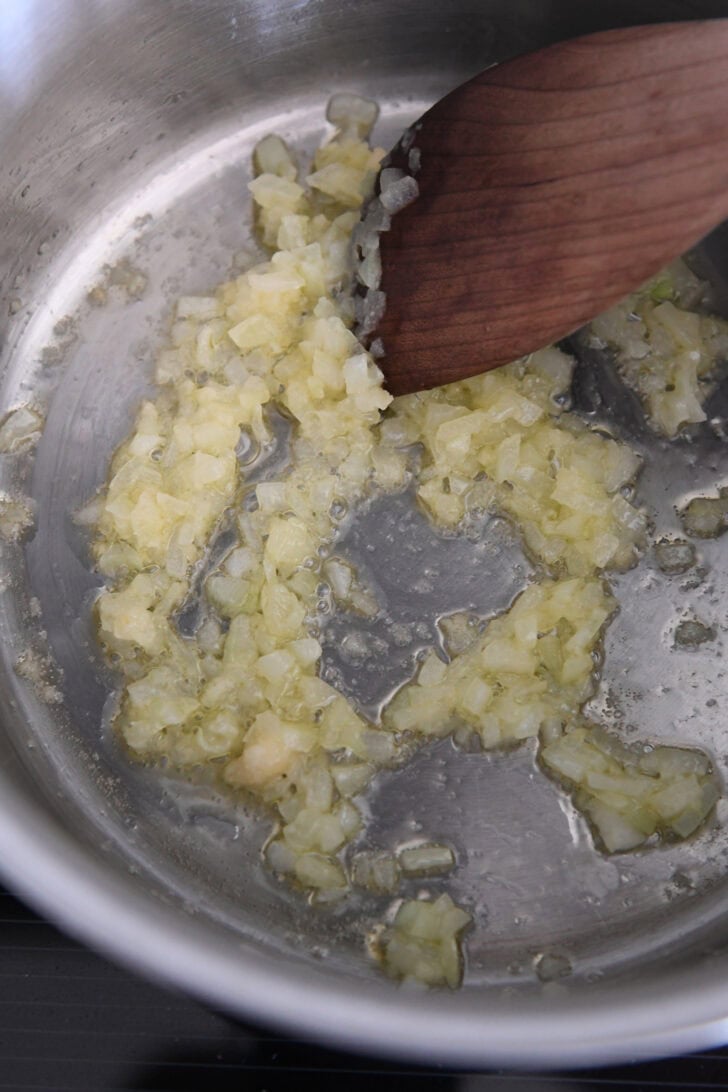
We’re building layers of flavor by sautéing garlic and onions in the first step.
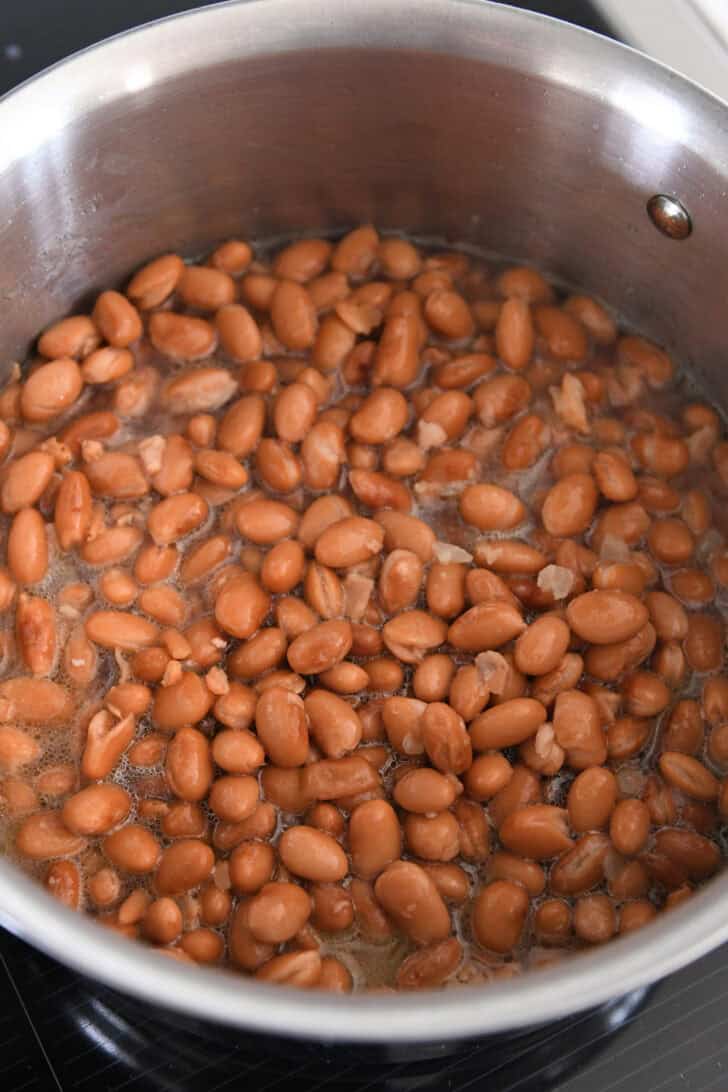
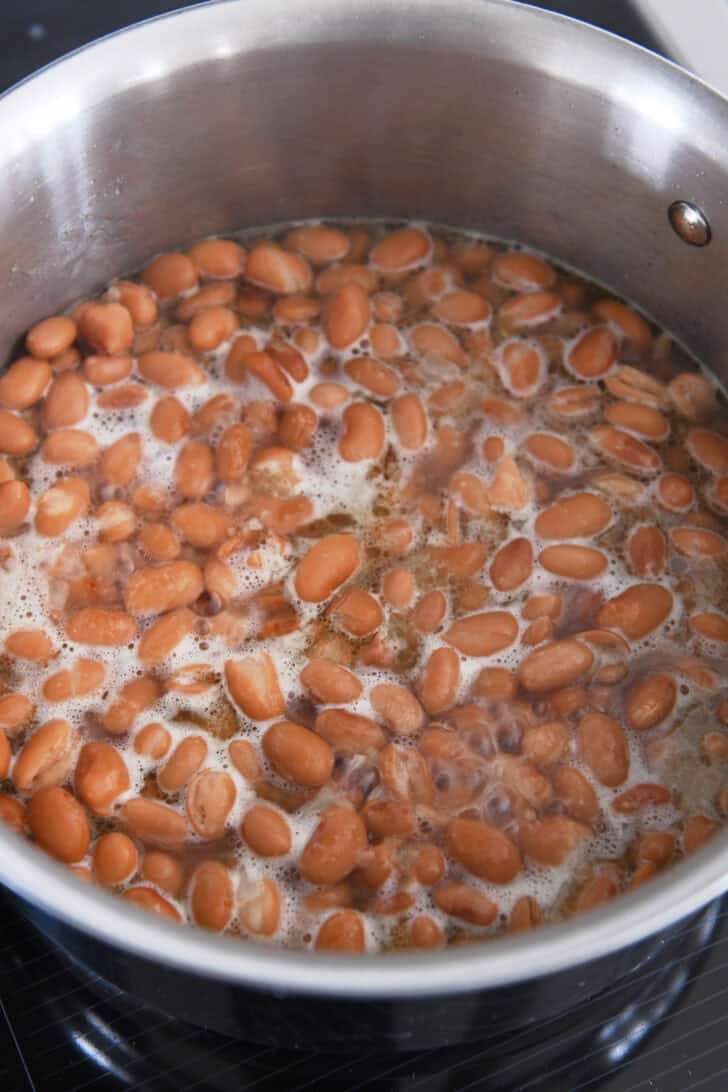
Rinsed and drained beans get a quick simmer with a few extra, important ingredients that continue building a more complex flavor profile.
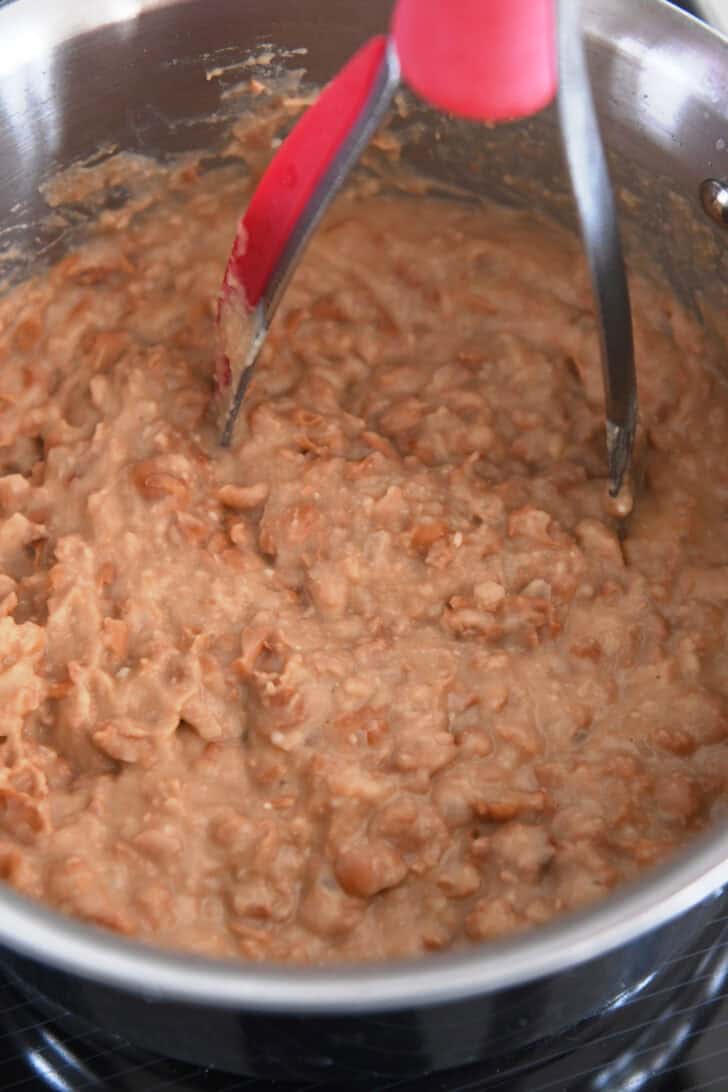
YOU control the consistency of the finished refried beans when you mash them in the last step.
The finished refried beans can be as smooth or as chunky as you like. For a super smooth consistency, get in there with an immersion blender.
Otherwise, a potato masher is the perfect tool for turning the soft beans into refried beans with some texture.
Additionally, you can add a bit of hot water at the end if you’d like the beans less thick. Basically, what I’m saying is: YOU HAVE ALL THE CONTROL HERE. Use it wisely. 😉
But there have been times when I don’t have the time (or the dried beans) to make that recipe happen. So I took notes from that recipe and transferred the yummy flavors to these easy refried beans, and WOW, they are so, so good.
They are perfect as a side dish for many a Mexican-inspired meal. And they make the most excellent super fast bean and cheese burrito/quesadilla thingies (yeah, the kind you whip up in two seconds and throw in the microwave – YUM).
This is such a great recipe to have in your back pocket when you need really, really good refried beans and you need them now!
2cans (15-ounces each)pinto beans, rinsed and drained
1cupwater
2teaspoonswhite vinegar
¼teaspoonsalt
Prevent your screen from going dark
In a medium saucepan, heat the olive oil over medium heat. Add the onion and garlic and sauté for 2 to 3 minutes until the onions are translucent.
Add the drained beans, water, vinegar, and salt. Bring to a simmer. Cover the pot and cook at a gentle simmer for 5 minutes (check once or twice to make sure the beans aren’t sticking to the bottom of the pot; moderate heat as needed).
Uncover and cook 2 to 3 minutes longer until thick and syrupy.
Use a potato masher to mash the beans to desired consistency. Add additional salt to taste, if needed.
Water can be added a little at a time to adjust consistency, if needed. Serve warm.
Additions:a finely diced jalapeno can be added with the onions and garlic for heat.
Disclaimer: I am a participant in the Amazon Services LLC Associates Program, an affiliate advertising program designed to provide a means for me to earn fees by linking to Amazon.com and affiliated sites. As an Amazon Associate I earn from qualifying purchases.
This website may contain affiliate links and advertising so that we can provide recipes to you. Read my disclosure policy.
My homemade BBQ seasoning brings bold, smoky flavor to just about anything! It’s the perfect blend of sweet, savory, and just a little kick, ready to shake onto chicken, veggies, ribs, and more.
Why You’ll Want to Keep This on Hand
Big flavor, few ingredients: Just a few pantry spices turn into a tasty blend that you can use all BBQ season long!
Totally customizable: Dial up the heat or sweetness to make it your own.
Use it on EVERYTHING: Perfect for grilling, roasting, or seasoning snacks like popcorn and roasted nuts!
BBQ Seasoning Ingredients
Paprika: Use smoked paprika for a more smoky flavor.
Sugar: Brown sugar adds a sweet balance, but feel free to cut it back if you want more spice than sweet in your bbq rub.
Spice level: This blend’s got a little kick—skip or reduce the cayenne pepper if you’re not into the heat.
How to Make BBQ Seasoning
Get ready to level up your grilling game! This easy BBQ seasoning mix comes together in minutes and brings rich, smoky depth with a touch of sweetness to everything you add it to!
Add Spices: In a small bowl, add paprika, brown sugar, kosher salt, chili powder, garlic powder, onion powder, black pepper, and cayenne pepper.
Mix: Whisk all of the ingredients together until evenly mixed, then store in an airtight container.
How to Store Homemade Seasoning
This is great to have in the spice cabinet to add great flavor to so many different recipes.
Storing: Store your homemade seasoning in a spice jar or an airtight container in a cool, dark place.
How long does BBQ Seasoning Last? If you make sure it is in an airtight container, it will keep at room temperature for 1 year.
How Do I Use BBQ Seasoning?
This spice blend is great for meat rubs, seasoning vegetables, steak, pork, shrimp, and more. Here are a few more options for you to try!
In a small bowl, add 3 tablespoons paprika, 2 tablespoons brown sugar, 1 tablespoon kosher salt, 1 tablespoon chili powder, 2 teaspoons garlic powder, 2 teaspoons onion powder, 1 teaspoon black pepper, and ½ teaspoon cayenne pepper.
Whisk all of the ingredients together until evenly mixed. Store in an airtight container.
This post may contain affiliate links. Please read my disclosure policy.
If you’ve never had Zeppole before, get ready — these fluffy, powdered-sugar-coated Italian donuts are dangerously good! Light, airy, and made with ricotta, this is the kind of sweet treat you’ll be making on repeat.
Years ago, my Italian friend taught me how to make these little golden clouds of joy known as Zeppole — and let me tell you, it took zero convincing for me to keep the tradition alive. These ricotta donuts are ridiculously easy to make (we’re talking one bowl, no yeast, and done in 30 minutes), which is both a blessing and a problem… because I now make them far more often than I probably should. Light, fluffy, and shamelessly coated in powdered sugar — they’re what you serve when you want people to think you’re fancy, without actually doing anything fancy.
Why You’ll Love These Ricotta Zeppole
No yeast, no drama. Seriously. No proofing, no rising, no praying to the dough gods. Just mix, scoop, and fry.
Ricotta magic. The ricotta keeps them moist and fluffy inside, which means you get that perfect soft bite every single time. No dry, sad donuts here.
30 minutes to glory. That’s right. You could be eating a warm, sugar-dusted pile of these beauties faster than it takes to watch one episode of your favorite cooking show (no judgment if it’s Kitchen Nightmares).
Crowd-pleaser. Always. Whether it’s Sunday brunch, holiday dessert, or a “just because I need fried dough” moment—these never last more than 5 minutes on the plate.
Customizable. Want them plain? Great. Filled with jam? Even better. Drizzled with chocolate? Now you’re speaking my love language.
Before You Start: Tips & Ingredient Notes
Ricotta matters – Use full-fat ricotta for rich, creamy zeppole that actually taste like something. If yours is watery, give it a quick drain—unless you’re aiming for fried soup blobs (please don’t).
Don’t overmix – As soon as the wet and dry ingredients come together, stop stirring. This isn’t arm day. The less you fuss with the batter, the lighter and puffier your zeppole will be.
Temperature is everything – Fry at 350°F (175°C) and keep it steady. Too cold? Grease bombs. Too hot? Charred outsides and raw middles. Trust me, a cheap candy thermometer will save you a world of heartbreak.
Scoop smart – A small cookie scoop keeps them uniform and cooks them evenly. Two spoons work too—if you’re feeling patient and slightly chaotic.
Eat immediately – Zeppole are a “live in the moment” kind of dessert. They’re absolute perfection fresh out of the fryer, dusted with way too much powdered sugar, and eaten like you’re hiding them from someone.
How To Make Ricotta Zeppole
Whisk the dry ingredients
Flour, baking powder, salt, sugar—into a big bowl they go. Give it a good whisk. You want everything evenly mixed so you don’t end up biting into a salty or baking powder explosion later. (Ask me how I know.)
In a second bowl, whisk the eggs, ricotta, vanilla, and milk until mostly smooth. Little ricotta lumps? Totally normal. This is homemade, not factory-made—embrace the rustic vibes.
Mix it all together (gently!)
Add the wet stuff to the dry stuff and stir just until it comes together. Thick, sticky, and slightly ugly? Perfect. Stop mixing the moment it looks combined—overmixing makes tough zeppole, and nobody wants to eat little rubber balls unless they’re training a Labrador.
Heat your oil—and mean it
Get about 2 inches of vegetable oil into a heavy-bottomed pot or skillet and bring it to 350°F (175°C). No thermometer? Drop a little batter in—if it sizzles and floats, you’re close. If it sinks like a stone or goes nuclear, adjust. Oil that’s too cool = greasy sadness. Too hot = burnt armor with raw insides.
Use a small cookie scoop (or two spoons if you’re feeling chaotic) to drop blobs of batter into the oil. Fry a few at a time—don’t overcrowd or the oil temp tanks and you end up with soggy fritters that even your dog will judge.
After about 2–3 minutes, once they’re puffed and golden, flip them over with a slotted spoon. If you’re wrestling with them, your oil’s probably too cold—turn the heat up a smidge and carry on.
Drain and sugar like you mean it
Scoop them out onto a paper towel-lined plate. Don’t be shy with the powdered sugar—you want that snowstorm effect. If people aren’t coughing sugar clouds across your kitchen, you didn’t use enough.
Zeppole do not age gracefully. These are a fry-them-and-eat-them situation. Pour some coffee, park yourself next to the plate, and pretend you might share. (You won’t.)
Serving Suggestions
These donuts are pure magic warm and dusted with powdered sugar — but if you want to take things up a notch (and why wouldn’t you?), here’s how:
Jam or preserves: Raspberry, strawberry, apricot — basically anything sticky and sweet you can dunk them into.
Nutella or melted chocolate: Because sometimes you just need to go full “treat yourself” mode.
Honey drizzle: For when you’re feeling fancy but lazy.
Espresso or strong coffee: Perfect excuse to call it “breakfast” and not feel guilty about eating six.
Feeling extra indulgent? Pair these zeppole with a few more of my favorite treats:
Absolutely. Slice them open like little sandwich buns and stuff with jam, Nutella, pastry cream—whatever makes your heart (and waistband) happy. Just make sure they’re cooled a bit first or you’ll have a hot mess on your hands. Literally.
Can I air fry them instead?
Not this recipe, no. The batter is way too soft and loose—you’d need a much thicker dough to even stand a chance. If you try to air fry this version, you’ll just end up with sad, flat blobs. Real talk: these were made to be fried the old-fashioned way. It’s faster, it tastes better, and your kitchen will smell like an Italian bakery instead of dashed dreams.
Can I make the batter ahead?
Nope. This is a mix-and-go situation. If you let the batter sit around, the baking powder will lose its mojo and your donuts will fry up sad and flat. You deserve fluffy.
How do I keep them fresh?
Short answer: you don’t. Zeppole are best eaten fresh—like, within an hour. If you have to save them, keep them loosely covered at room temperature and pop them in the oven at 350°F (175°C) for a few minutes to crisp back up. Just know… they’re never as good as that first glorious bite.
Can I freeze them?
Honestly? Not recommended. Fried donuts just don’t freeze well. They turn weirdly chewy and sad. If you must, freeze the raw batter in dollops on a baking sheet, then fry straight from frozen. But fresh is king here.
Try These Delicious Donuts Next
Before You Begin! If you make this, please leave a review and rating letting us know how you liked this recipe! This helps our business thrive & continue providing free recipes.
Easy Ricotta Zeppole (Italian Donuts)
Prep 15 minutesminutes
Cook 15 minutesminutes
Total 30 minutesminutes
Fluffy Ricotta Zeppole, fried to golden perfection and buried under powdered sugar — ready in just 30 minutes!
Before You Begin! If you make this, please leave a review and rating letting us know how you liked this recipe! This helps our business thrive & continue providing free recipes.
Instructions
In a large bowl, whisk together the flour, baking powder, salt, and sugar.
In a separate bowl, whisk the eggs, ricotta cheese, vanilla extract, and milk until smooth.
Gradually add the wet ingredients to the dry ingredients, mixing until just combined. The batter will be thick and sticky.
Heat about 2 inches of vegetable oil in a deep, heavy-bottomed pot or skillet to 350°F (175°C). Use a candy thermometer to maintain the temperature.
Using a small cookie scoop or two spoons, drop tablespoon-sized portions of the batter into the hot oil. Do not overcrowd the pot. Fry for 2-3 minutes per side, or until golden brown and puffed. Use a slotted spoon to turn them as they cook.
Remove the zeppole with a slotted spoon and drain them on a plate lined with paper towels.
Once slightly cooled, dust the zeppole generously with powdered sugar.
Serve warm, with optional sides like chocolate sauce, honey, or fruit preserves for dipping.
Notes
Ricotta: Use full-fat ricotta. If it’s very wet, drain it a little in a fine mesh sieve so your batter isn’t too loose.
Oil Temperature: Keep the oil steady at 350°F (175°C). Too cold = greasy. Too hot = burnt on the outside, raw inside. A cheap candy thermometer is worth it.
Don’t overcrowd: Fry just a few at a time. Adding too many drops the oil temp fast and gives you sad, soggy donuts.
Best served fresh: Zeppole are at their peak warm and fluffy, right after frying. They don’t store well—make them, eat them, no regrets.
Optional fillings: Once cooled, slice and fill with jam, Nutella, or pastry cream for a next-level treat.
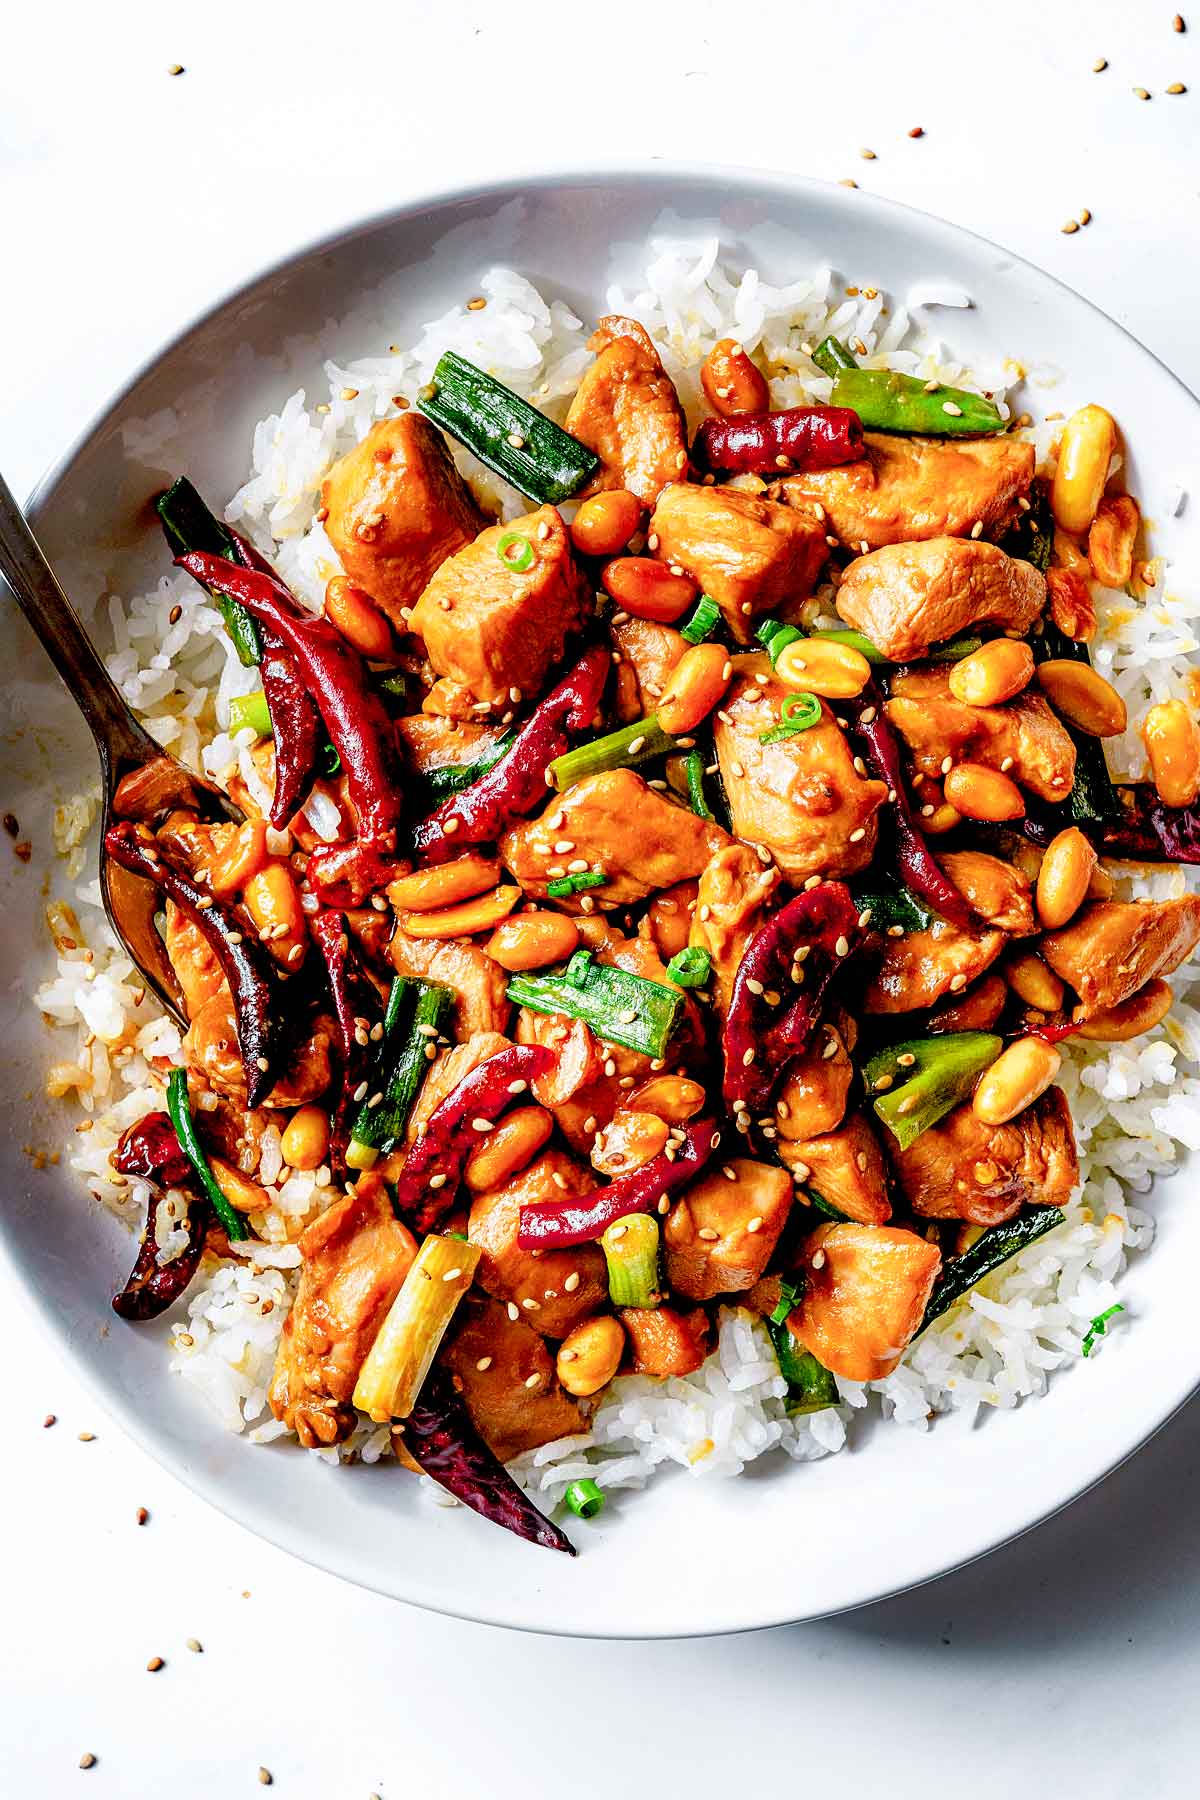
A delectably spicy, sweet, and savory Asian-inspired sauce clings to every piece of juicy chicken in this easy dish. Kung pao chicken is quicker to make at home than ordering takeout, and it tastes so much better too.
Kung pao chicken is a deceptively simple recipe to make by stir-frying juicy pieces of chicken in a nuanced spicy-sweet-savory sauce.
Add in some toasted peanuts and before you know it, your favorite Chinese dish is on the dinner table in just 30 minutes for a fraction of the price of takeout.
Is this recipe 100% authentic? No. It’s sure tasty, though.
The kung pao chicken from your favorite Chinese restaurant typically leaves your mouth feeling numb and tingly from the Sichuan peppercorns that are traditionally included in this dish. But since Sichuan peppercorns are hard to find at most grocery stores (and can be pricey, to boot) this recipe uses dried red chiles for tons of flavor minus the tingling.
Heidi’s Tips for Recipe Success
Cook this homemade kung pao chicken in a wok or a skillet, and make it so easy to make at home
Give the chicken a quick marinade to make it tender and juicy. With crunchy peanuts, fresh green onions, and spicy-sweet-savory sauce, there are flavors and textures galore in this recipe.
This recipe delivers the unique flavors that kung pao chicken is known for using easy-to-find ingredients you can purchase at your local grocery store.
What’s in Kung Pao Chicken?
The full recipe, with amounts, can be found in the recipe card below.
Chicken breasts — trim off any excess fat before dicing into ½-inch pieces
Soy sauce — lends the sauce so much umami flavor
Shao xing cooking wine — sometimes called “Chinese cooking wine;” it’s slightly sweet and nutty in flavor, and it helps to tenderize the chicken
Cornstarch — thickens the sauce and gives it a super glossy finish
Sugar — you need a little sweetness to balance out the salty soy sauce and tangy vinegar
Rice vinegar — this mild, sweet, and tangy vinegar rounds out the sauce (do NOT confuse it with rice wine)
Toasted sesame oil — has a much richer sesame flavor than regular sesame oil
Oil — use a neutral-flavored oil with a high smoke point, like canola or vegetable, for stir-frying the chicken
Peanuts — choose roasted unsalted peanuts for lots of crunch
Dried red chiles — use 6 to 10 depending on how spicy you like your kung pao chicken
Garlic — a couple cloves finish off the stir-fry
Green onions — you’ll be using both the green tops and white bottoms, but keep them separated after slicing
Ingredient Swaps and Substitutions
Soy sauce — you should be fine to use tamari if you need to keep the sauce gluten-free
Shao xing cooking wine — replace it with sherry for a similar flavor profile
Peanuts — are essential, in my opinion, but omit if you’re dealing with an allergy
Dried red chiles — try using red pepper flakes instead (I haven’t tested this swap though, so I can’t give you an exact amount)
How to Make Kung Pao Chicken
This recipe cooks super quickly, so have everything ready to go before heating up the skillet.
Marinate the chicken. Submerge the diced chicken in a mixture of soy sauce, shao xing cooking wine, and cornstarch.
Make the kung pao sauce. In another bowl, whisk together the sugar, rice vinegar, and water, plus the rest of the soy sauce, shao xing cooking wine, and cornstarch.
Heidi’s Tip: The soy sauce, cooking wine, and cornstarch each do double duty in this recipe. Read the recipe card closely before starting this dish to know how much of each ingredient to use, and when.
Stir-fry the peanuts. Heat a little oil in a wok or large skillet, then toast the peanuts for about 30 seconds. Remove them to a plate so they don’t burn.
Bring it all together. Once the peanuts are out of the skillet, add the white portion of the green onions, along with the dried red chile peppers and garlic. Cook just until fragrant, then add the chicken and stir-fry for 1 to 2 minutes.
Sauce it up. Add the green tops of the onions and the silky kung pao sauce last, cooking just until the sauce thickens (it will take very little time). Stir in the peanuts before serving over a bed of white rice. I like to sprinkle mine with toasted sesame seeds.
FAQs
Is kung pao chicken spicy?
There’s definitely a nice kick of heat in this recipe, but it won’t set your mouth on fire.
If you’re concerned it will be too spicy, use just six dried red chiles in the stir-fry. You can even go the extra mile and remove some of the seeds from the chiles, which is where their heat it stored.
Can I add vegetables to this stir-fry?
Feel free to stir-fry some sliced bell peppers, broccoli, or thinly sliced carrots before adding the chicken and sauce to the skillet.
Can this recipe be made in advance?
This is one dish that’s best eaten right away while the sauce is still glossy. You can definitely meal prep this kung pao chicken though, but you might need to add a splash of water when reheating to loosen up the sauce.
Storage Tips
Let any leftovers cool before transferring to an airtight container. They’ll last up to 5 days in the fridge and can be gently reheated in the microwave or in a lightly oiled skillet.
What to Serve With Kung Pao Chicken
If you make this recipe, please let me know! Leave a ⭐️⭐️⭐️⭐️⭐️ rating below, leave a comment to tell us what you think, and tag me on Instagram @foodiecrush.
Kung Pao Chicken
A delectably spicy, sweet, and savory Asian-inspired sauce clings to every piece of juicy chicken in this easy dish. Kung pao chicken is quicker to make at home than ordering takeout, and it tastes so much better too.
2tablespoonsshao xing cooking wine or sherry,divided
1tablespoon plus 2 teaspoonscornstarch,divided
1tablespoonsugar
2tablespoonsrice vinegar
2teaspoonstoasted sesame oil
½cupwater
2tablespoonscanola or vegetable oil
½cuproasted unsalted peanuts
6-10dried red chiles,roughly chopped
2garlic cloves,pressed or minced
4green onions,cut into ½-inch pieces, white and green parts separated
Instructions
Trim any fat or tendrils from the chicken breast and cut into ½-inch pieces.
In a medium bowl, mix 1 tablespoon of soy sauce, 1 tablespoon of cooking wine or sherry, and 1 tablespoon cornstarch until smooth. Add the chicken and toss to coat.
In a small bowl, combine sugar, vinegar, sesame oil, water, and the remaining 4 tablespoons soy sauce, 1 tablespoon cooking wine or sherry, and 2 teaspoons cornstarch. Whisk until smooth.
In a wok or large frying pan, heat 1 tablespoon oil over high. Add the peanuts and stir-fry until light brown, about 30 seconds. Remove from the pan.
Heat the remaining 1 tablespoon oil. Add chiles, garlic, and white part of the scallions to the pan and cook, stirring, for 30 seconds. Add the chicken with its marinade and cook, stirring, 1 to 2 minutes. Add the soy sauce mixture and scallion tops and simmer until the chicken is just done, about 1 minute longer. Stir in the peanuts and cook to warm through. Serve topped with more chopped green onion and white rice.
We send good emails. Subscribe to FoodieCrush and have each post plus exclusive content only for our subscribers delivered straight to your e-mail box.
As always, thank you for reading and supporting companies I partner with, which allows me to create more unique content and recipes for you. There may be affiliate links in this post of which I receive a small commission. All opinions are always my own.
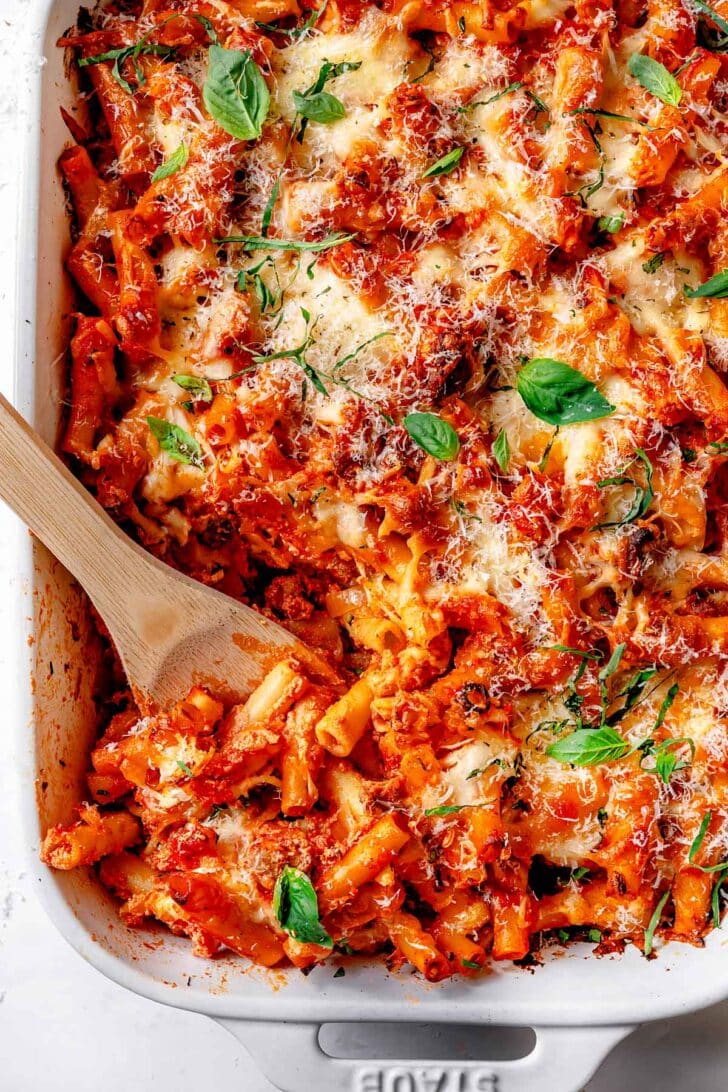
Golden and crusty on top and gooey in the middle, digging into this baked ziti reveals sumptuous layers of pasta, meat sauce, and cheese.
This baked ziti is family-friendly comfort food at its finest.
Al dente ziti pasta is tossed with a simple tomato sauce loaded with sweet Italian sausage and smooth ricotta cheese. The sauce is made from scratch using basic ingredients you likely have lingering in your fridge and pantry.
While the sauce bubbles away (just 20 minutes, don’t fret) the ziti is cooked in a salty pot of water.
And because cheese makes everything better, the saucy ziti is layered with mozzarella and Parmesan to make each bite extra cheesy.
New favorite comfort meal, unlocked.
Heidi’s Tips for Recipe Success
Baked ziti is made extra flavorful with the addition of juicy Italian sausage flavored with herbs and spices. I use Italian pork sausage links and remove the meat from the casings. Choose mild or hot depending on your preference.
Because this recipe transforms a handful of simple ingredients into a show-stopping pasta casserole, always choose bronze-cut, air-dried pasta, DOP-certified whole San Marzano tomatoes, real Parmesan cheese (not the canned stuff), and grate your mozzarella instead of buying shredded.
I prefer whole-fat ricotta cheese. It won’t go watery when baked.
What’s in This Recipe?
The full recipe, with amounts, can be found in the recipe card below.
Italian sausage — use sweet or spicy depending on how hot you like your baked ziti (I used sweet)
Onion and garlic — the flavor foundation for the sausage and tomato sauce
Tomato paste — tricks the tastebuds into thinking the sauce simmered for hours on the stove, when really it was just 20 minutes
Canned tomatoes — don’t skimp on buying good quality tomatoes; pick whole San Marzano tomatoes and crush them with your hands
Herbs — a blend of dried oregano and fresh basil adds tons of flavor
Ziti pasta — the straw-like shape of this pasta makes it the perfect vehicle for soaking up the meat sauce
Ricotta cheese — choose whole milk ricotta for maximum creaminess; using a lower-fat alternative can create a watery baked ziti
Parmesan — buy a block and grate it yourself using a box grater for optimum meltiness
Melting cheese — shredded mozzarella or sliced Provolone become ultra gooey when baked between the layers of ziti
Ingredient Swaps and Substitutions
Pasta — replace the ziti with another short and sturdy pasta shape, like rigatoni or penne. You may also use your favorite gluten-free pasta or a whole wheat version.
Italian sausage — if using ground beef, increase the amount of herbs and spices to prevent the sauce from tasting bland.
How to Make Baked Ziti
Brown the sausage. Cook the Italian sausage over medium-high heat until it’s no longer pink. Then, remove to a plate.
Heidi’s Tip: Don’t add oil to the pot when browning the Italian sausage. It will release a good amount of fat on its own, which will prevent it from sticking.
Make the sauce. Working in the same pot you cooked the sausage in, sauté the onion and garlic until softened. Then, add the tomato paste and cook for a couple minutes. Then, in goes the rest of the sauce ingredients, plus the cooked sausage.
Heidi’s Tip: Tomato paste should be always be cooked for a minute or two. The sugars in the concentrated paste will start to caramelize, which helps to deepen the flavor of the sauce.
Simmer until thickened. Let the sauce bubble away for about 20 minutes. Meanwhile …
Boil the ziti. Cook the ziti for 2 minutes LESS than the package instructs. Undercooking it slightly will help the pasta soak up more of the sauce as it bakes.
Assemble the casserole. Add the drained ziti and ricotta to the meat sauce, then transfer HALF of the mixture to a 9×13-inch baking dish. Top with half of the mozzarella (or provolone), then repeat this process once more. Sprinkle with Parm just before baking.
Bake until bubbly. You’re looking for the cheese on top to be a tantalizing golden brown and for the edges to be bubbling. Let the ricotta and sausage baked ziti stand for 5 minutes before serving.
FAQs
Can this recipe be made with ground beef?
I prefer making my baked ziti with Italian sausage because the sausage is already packed with spices, making for a more flavorful sauce.
Ground beef may be used, but you’ll need to amp up the herbs and spices to mimic the flavor of the sausage. Consider adding extra dried oregano, fresh basil, and even a pinch of red pepper flakes.
Or, replace the sauce with my mom’s meat sauce recipe. (It takes longer to prepare, but can be made months in advance and frozen for using later in recipes like this.)
Can baked ziti be assembled in advance?
Yes, assemble the baked ziti as instructed, then cover it tightly with foil and pop it into the fridge. Bake within 2 days.
If assembling this recipe in advance, it’s important to cook the ziti for 2 to 3 minutes less than the package instructs. As the ziti sits in the meat sauce, it will soak up the extra moisture and you don’t want it to become soggy.
Can baked ziti be frozen?
That should be fine, but you’ll want to let the dish cool completely before freezing. Reheat the ziti from frozen, covered, for 1 hour in a 350ºF oven.
Storage Tips
Leftovers can be stored airtight in the fridge for up to 5 days. Or, freeze them for up to 2 months in an oven- and freezer-safe dish for easy reheating.
What to Serve With Baked Ziti
If you make this recipe, please let me know! Leave a ⭐️⭐️⭐️⭐️⭐️ rating below, leave a comment to tell us what you think, and tag me on Instagram @foodiecrush.
Sausage Baked Ziti
Golden and crusty on top and gooey in the middle, digging into this baked ziti reveals sumptuous layers of pasta, meat sauce, and cheese.
1 28-ouncecan whole peeled San Marzano tomatoes,with purée
1teaspoondried oregano
2sprigs fresh basil leaves,roughly torn, plus more basil for garnish
16ouncesziti pasta,or other tubular pasta
2cupswhole-milk ricotta cheese
½cupfreshly grated Parmesan cheese
1 ½cupsshredded mozzarella or provolone cheese
Instructions
Preheat the oven to 400°F. Lightly oil a 9 X 13-inch baking dish.
In a large Dutch oven or saucepan, add the sausage and cook over medium-high, breaking it up with a wooden spoon, until no longer pink, about 10 minutes. Use a slotted spoon to transfer to a plate.
To the same saucepan, heat the olive oil and add onion and garlic, and cook, stirring every couple of minutes, until soft and fragrant, 3-5 minutes. Stir in tomato paste, and cook for 1-2 minutes.
Use your fingers to break up the whole tomatoes into smaller chunks. Add tomatoes with their puree to the onion mixture along with oregano, and basil, and reserved sausage. Bring to a boil then reduce to medium-low and simmer until thickened, about 20 minutes.
Meanwhile, bring a large pot of salted water to a boil over high. Add the ziti and stir occasionally until the water returns to a boil. Cook for 2 minutes less than the package directions. The ziti should not be cooked through, as it will finish cooking in the oven. Drain well but do not rinse.
Add cooked ziti and ricotta cheese to the sauce, and stir until combined. Spread half of the pasta mixture in the prepared baking dish and sprinkle with half of the mozzarella or provolone cheese. Top with the rest of the pasta mixture, sprinkle with the grated Parmesan, and shredded mozzarella or provolone cheese.
Bake until the cheese is golden and the sauce is bubbly, about 20-25 minutes. Let stand for 5 minutes, then serve.
We send good emails. Subscribe to FoodieCrush and have each post plus exclusive content only for our subscribers delivered straight to your e-mail box.
As always, thank you for reading and supporting companies I partner with, which allows me to create more unique content and recipes for you. There may be affiliate links in this post of which I receive a small commission. All opinions are always my own.
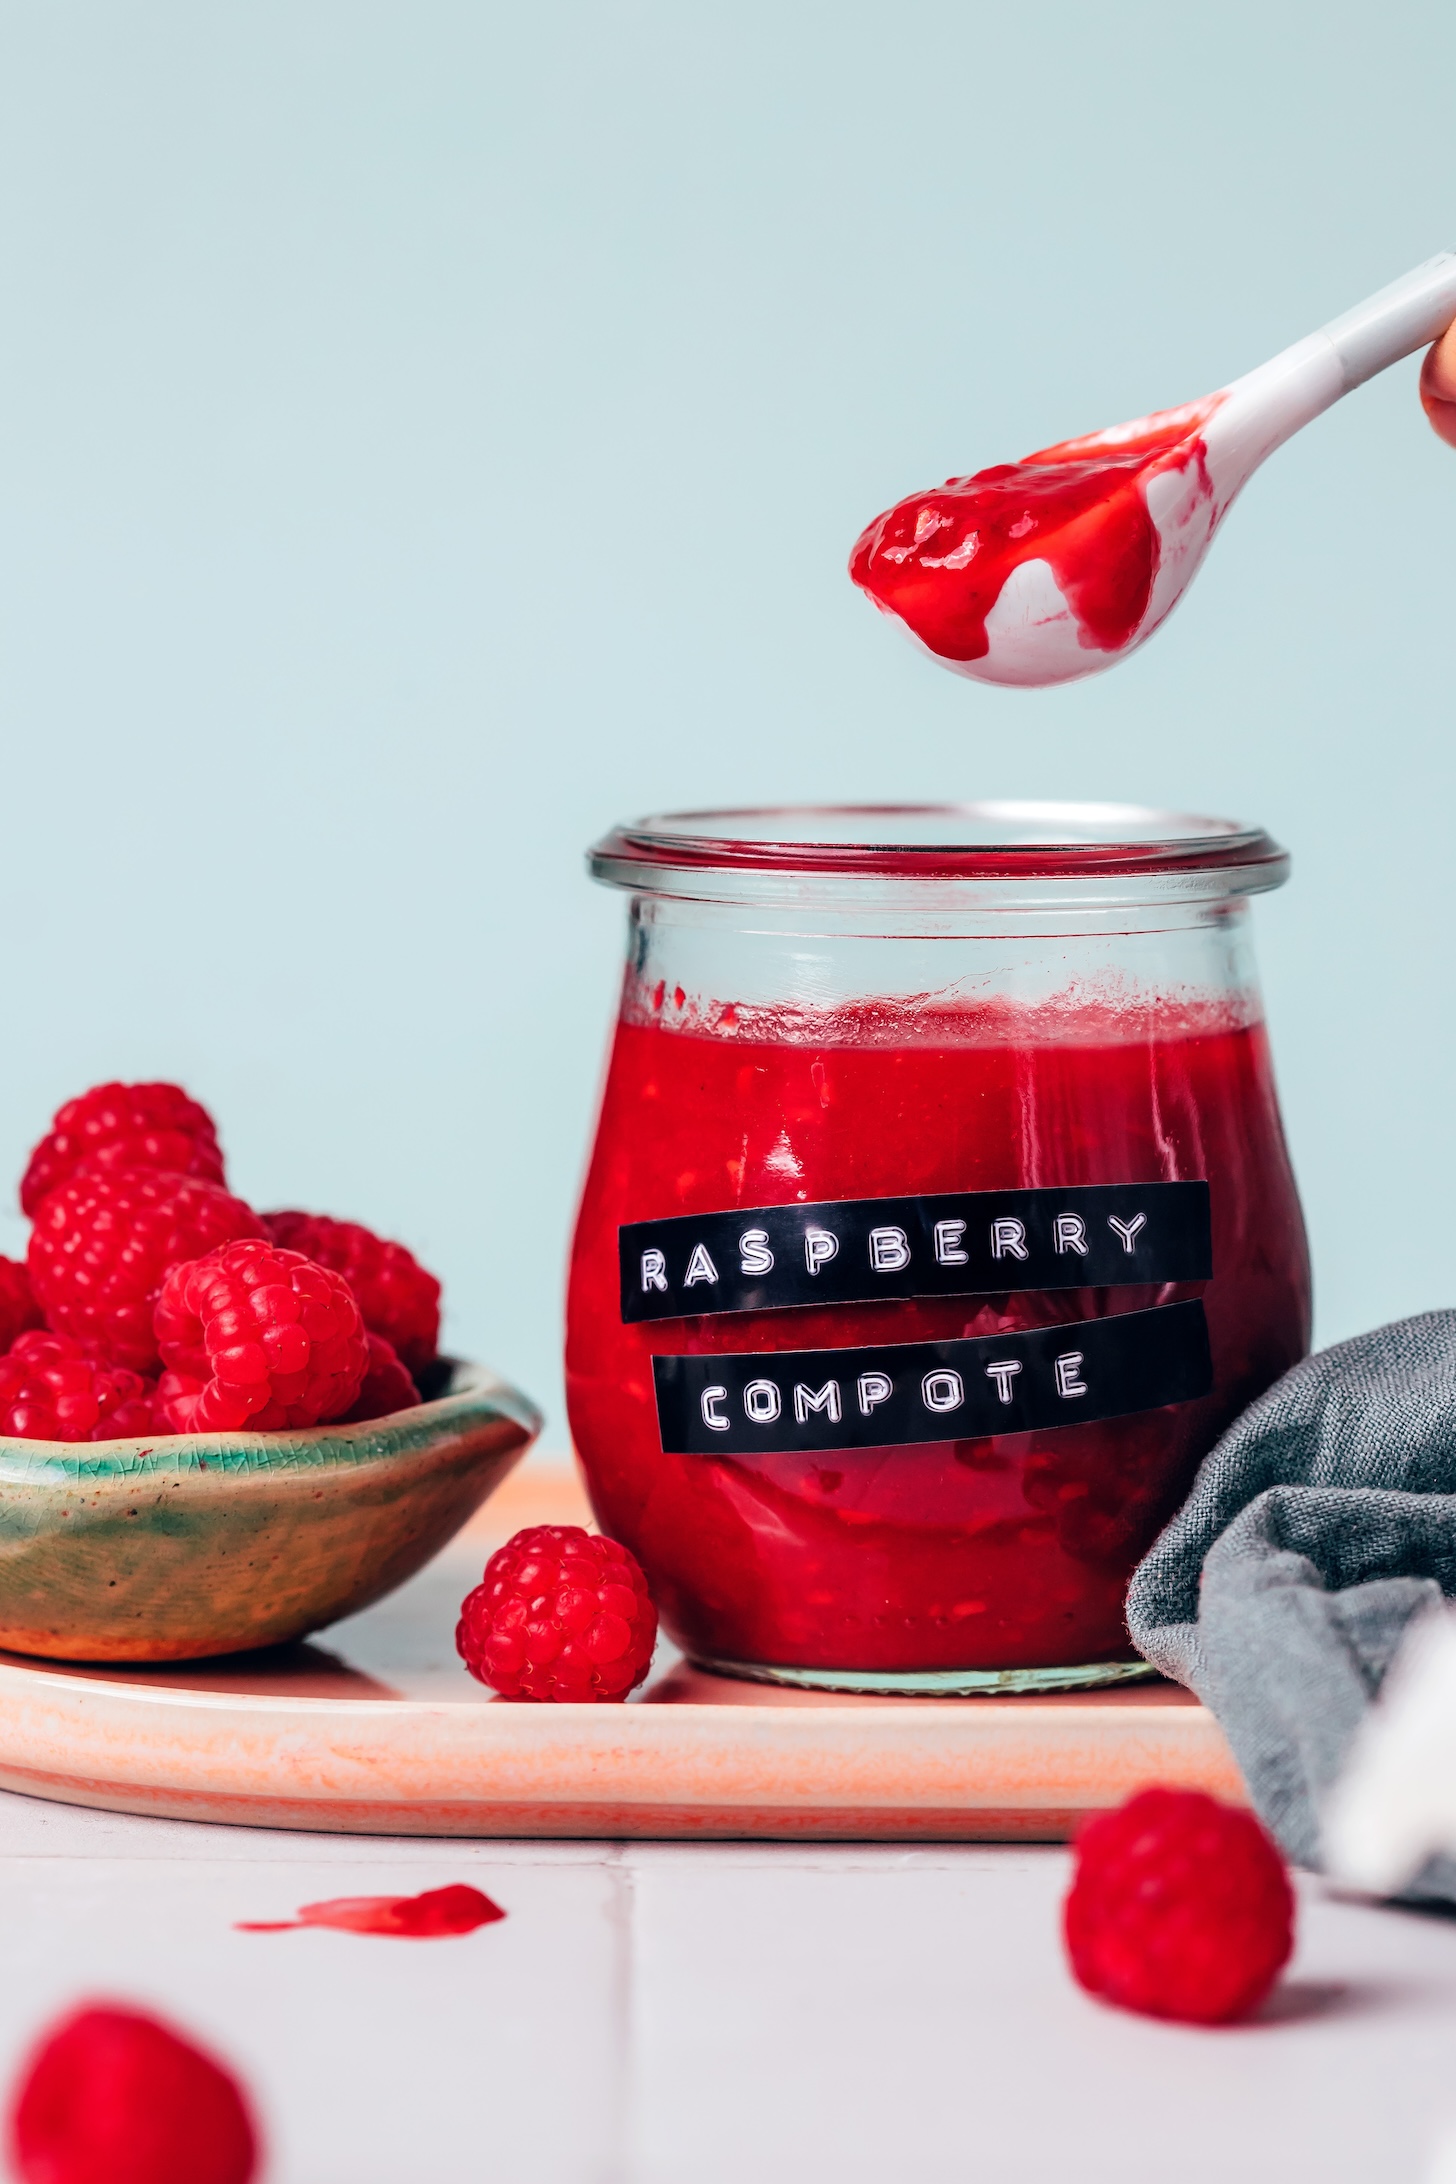
Looking to add a burst of flavor to your favorite breakfasts and desserts? Say hello to Raspberry Compote! This simple, 2-ingredient, 15-minute berry sauce adds delicious, tart-sweet flavor to everything from cheesecakes to pancakes & waffles, crepes, ice cream, and so much more.
Whether you have an abundance of fresh raspberries or want to make a warm sauce with frozen berries during the cooler months, this recipe has you covered. Let’s dive in and make some raspberry magic!
What is Compote?
Compote (the French word for stewed fruit) refers to fruit that’s been cooked until it’s warm and tender. It originated in medieval Europe and was traditionally made by cooking down fruit with water, sweetener, and spices.
Our inspired, naturally sweetened version is made with raspberries and is about as simple as it gets! It results in a similarly thick stewed fruit mixture in which the raspberry flavor shines.
How to Make Raspberry Compote
This EASY raspberry compote requires just 2 ingredients: raspberries (fresh or frozen) and maple syrup. There’s no need to add water to this compote since the maple syrup provides just enough liquid to get things bubbling.
The raspberries and maple syrup are heated in a saucepan and mashed with a spoon or potato masher, causing the berries to begin releasing their liquid.
After simmering for about 10 minutes, the mixture becomes thicker with an intensified raspberry flavor. A pinch of salt is optional at this point for subtle flavor balance.
The final steps thicken the compote even more! While it thickens as it cools, we like to make it even thicker (and free from seeds) by passing some (or all) of it through a fine mesh strainer.
For cheesecakes, a fully smooth and strained compote is nice. For pancakes and waffles, we prefer to strain just half!
If you try this recipe, let us know! Leave a comment, rate it, and don’t forget to tag a photo @minimalistbaker on Instagram. Cheers, friends!
Prep Time 5 minutesminutes
Cook Time 10 minutesminutes
Total Time 15 minutesminutes
Servings 8(2-Tbsp servings)
Course Condiment, Sauce
Cuisine Gluten-Free, Oil-Free, Vegan
Freezer Friendly 1 month
Does it keep? 1 Week
Prevent your screen from going dark
3cupsraspberries(fresh or frozen)
1/4cupmaple syrup
1pinchsea salt(optional)
Place raspberries and maple syrup in a small saucepan and bring to medium heat.
Once bubbling, reduce heat slightly and use a wooden spoon or potato masher to muddle and mash the fruit.
Continue cooking over medium-low heat (uncovered) for 10-12 minutes, mashing occasionally to combine until the volume is reduced to about half and it’s slightly thickened. Turn off the heat and adjust the flavor as needed, adding more maple syrup for sweetness and the optional pinch of salt to balance the flavor and reduce any bitterness.
Remove from the heat and let cool slightly. It will thicken more as it cools, but it can be enjoyed warm or at room temperature. If you prefer your compote without seeds, you can strain it after cooling. We like straining half of the compote (it minimizes the crunch from the seeds but ensures the compote is thick with a noticeable raspberry appearance). To strain, set a fine mesh strainer over a bowl, pour the compote into the strainer, and stir with a spoon to encourage it to move through the strainer.
Enjoy with oats, pancakes, waffles, crepes, French toast, cheesecake, and more! Leftover compote will keep in the refrigerator for 1 week or in the freezer for 1 month. We like to freeze in an ice cube tray to make it easy to defrost small amounts. When ready to use, reheat in the microwave or on the stovetop until warm.
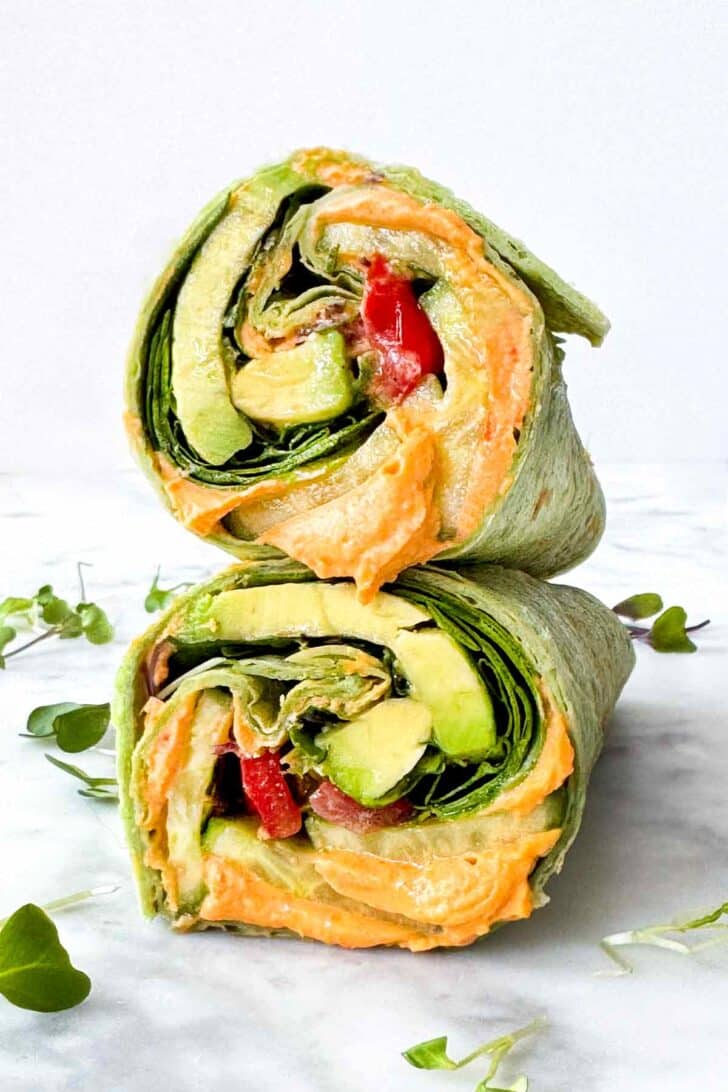
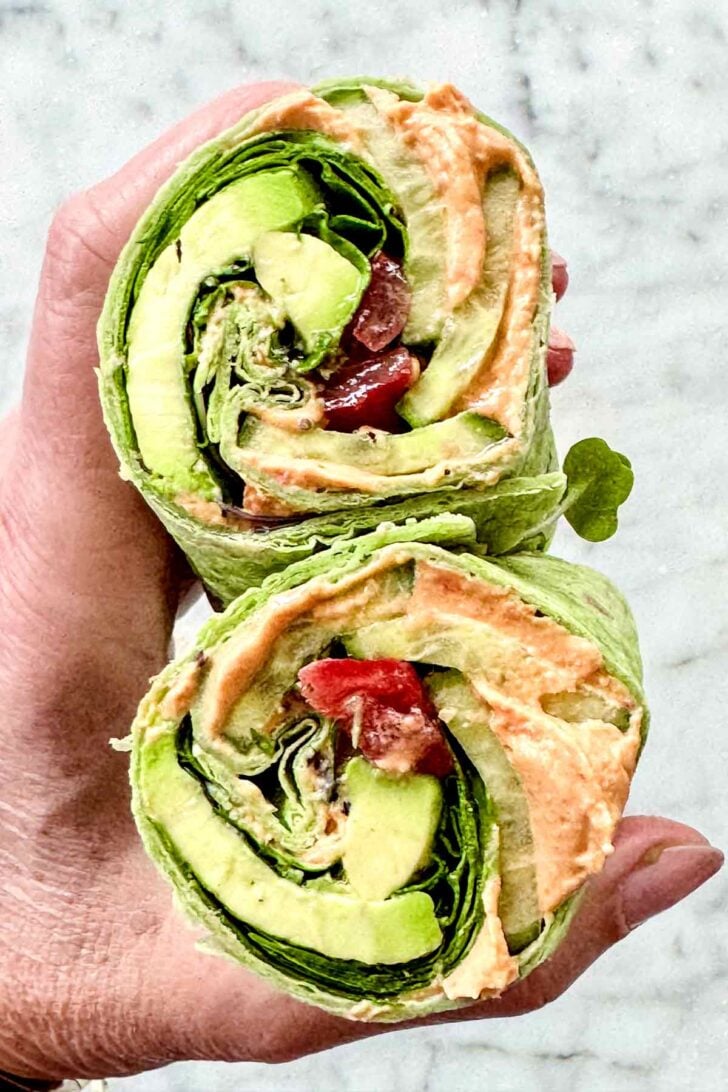
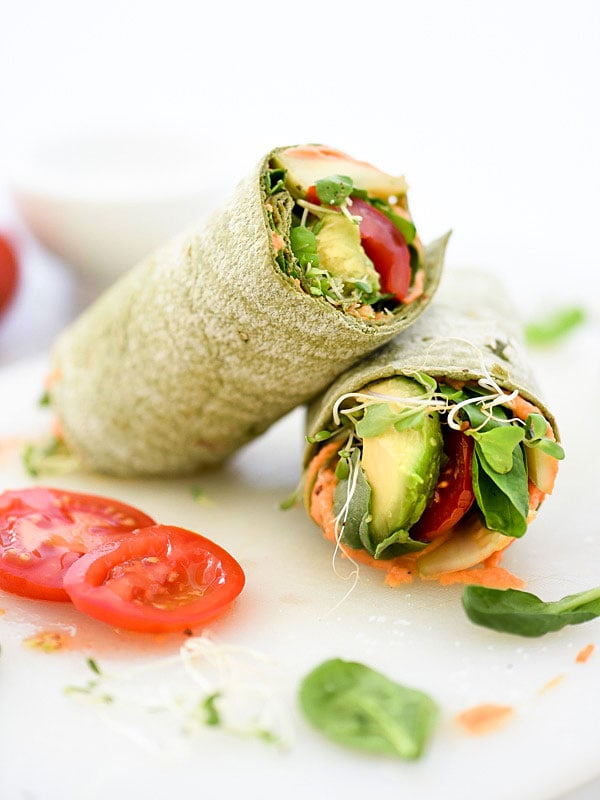
These simple veggie wraps are fast, fresh, and easy to assemble. Use any flavor of hummus you like, and mix and match the vegetables to use up whatever’s in your produce drawer.
This veggie wrap recipe is one of those “recipes” that seems more like the assembly of pre-made ingredients rather than an actual recipe. But because it’s become my standard lunch, I deemed it in need of a share.
To make the wrap, a soft and pliable tortilla is slathered with creamy hummus before being piled with thinly sliced cucumber and tomato, spinach, avocado, and sprouts.
Go crazy with the veggies or pare back this recipe based on your personal tastes. It’s a cinch to customize, so get creative by switching up the type of wrap, hummus, and veggies you use.
Heidi’s Tips for Recipe Success
Hummus and veggie wraps are a quick yet filling vegetarian lunch. Customize the how you like using any vegetables in your produce drawer.
This recipe can be made low-carb by swapping the tortilla for a lower-carb alternative.
These wraps are not only vegetarian, but they’re accidentally vegan too!
Slice the cucumber lengthwise in thin planks so the slices run all the way across the tortilla and don’t fall out when cut.
What’s in This Recipe?
The full recipe, with amounts, can be found in the recipe card below.
Tortilla — I used a spinach flavored wrap and there are so many others on the market that you can really have fun creating flavor combos. Sun-dried tomato, jalapeño, garlic, whole wheat…the list goes on and on. Use a standard (or flavored) tortilla if you prefer.
Cucumber — is sliced thinly, skins and seeds and all. I halve the cucumber instead of slicing it in rounds, then slice it lengthwise so it’s one less veggie chunk to escape out the sides with each bite.
Spinach — is an easy way to add extra greens to this meal, plus fresh spinach is easy to squish down in a loaded veggie wrap like this.
Tomato — avoid using cherry or grape tomatoes since they tend to fall out of wraps.
Avocado — adds an extra layer of creaminess.
Sprouts — provide a fresh flavor and bite of texture to a veg heavy wrap like this.
Microgreens — have a more concentrated flavor than their fully-grown counterparts. Omit if desired.
Ingredient Swaps and Substitutions
Tortilla — use any flavor you like, and choose a gluten-free variety if needed.
Veggies — swap the spinach, tomato, and cucumber with any combination of vegetables you like.
How to Make Veggie Wraps
Slather on the hummus. Contain the hummus to the bottom half of the tortilla, leaving about half an inch of space from the very bottom of the wrap and more on top.
Add the veggies. Layer on the veggies, trying to leave some room around the edges of the wrap (this makes for easier rolling).
Roll it up, burrito-style. Tuck the edges into the wrap first, then roll it into a log to secure all the veggies.
Storage and Meal Prep Tips
These hummus veggie wraps are best enjoyed the day they’re made, as they tend to get soggy over time.
To meal prep them, I recommend slicing the veggies on a Sunday night so you can quickly assemble wraps for lunches throughout the week.
Warm up the tortilla. If your tortillas are a little stale or are cracking when rolled, wrap them in a damp paper towel and gently warm in the microwave for 15 to 20 seconds. This should make them more pliable.
Separate the ingredients until ready to roll. The tortillas soften quickly once layered with hummus and veggies, so keep everything separate until you’re ready to assemble and eat.
What to Serve with Veggie Wraps
If you make this recipe, please let me know! Leave a comment below or take a photo and tag me on Instagram or Twitter with #foodiecrusheats.
Hummus Veggie Wrap
These simple veggie wraps are fast, fresh, and easy to assemble. Use any flavor of hummus you like, and mix and match the vegetables to use up whatever’s in your produce drawer.
Spread the hummus on the bottom ⅓ of the wrap, about ½ inch from the bottom edge but spreading out the the side edges.
Layer the cucumber, spinach leaves, tomato slices, avocado slices, spouts, and microgreens.
Fold the wrap tightly, as you would a burrito, tucking in all of the veggies with the first roll then rolling firmly to the end. Cut in half and enjoy.
We send good emails. Subscribe to FoodieCrush and have each post plus exclusive content only for our subscribers delivered straight to your e-mail box.
As always, thank you for reading and supporting companies I partner with, which allows me to create more unique content and recipes for you. There are affiliate links in this post of which I receive a small commission. All opinions are always my own.