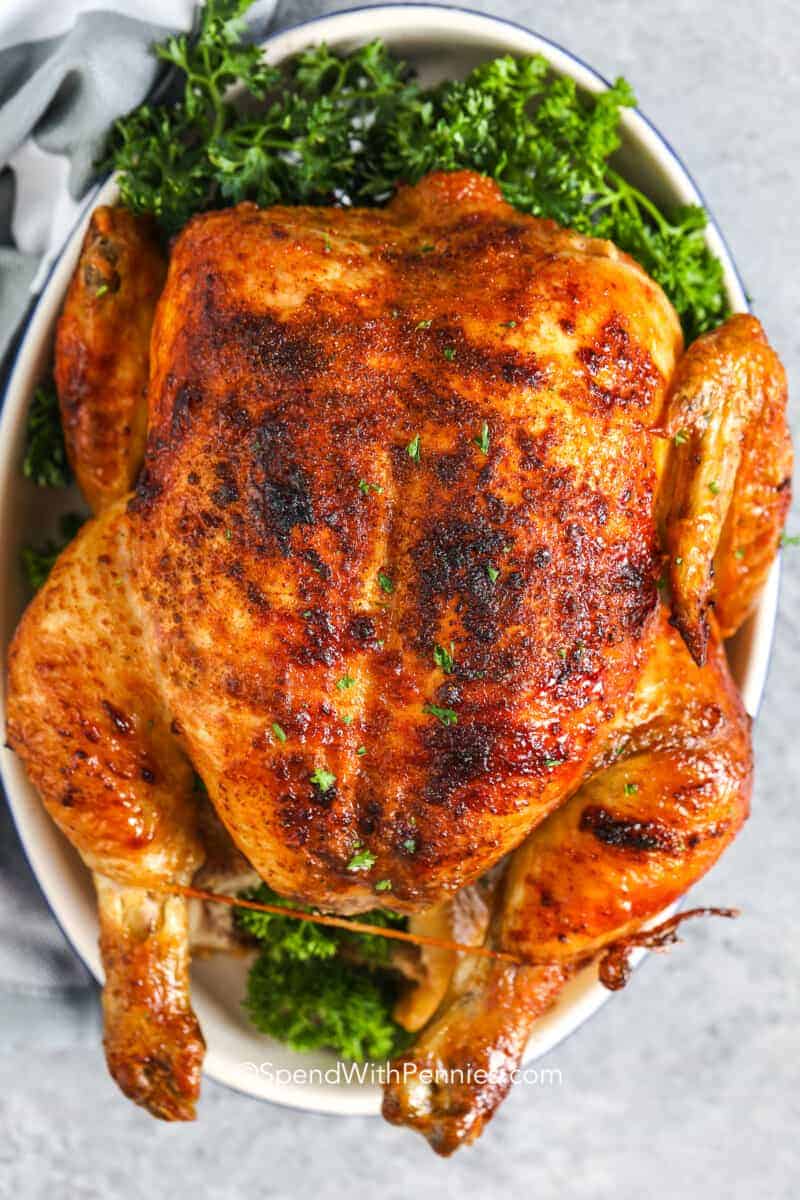
Rotisserie chicken is easy and versatile with crisp skin and juicy meat! This recipe can be cooked on a rotisserie spit, in the oven, or the air fryer.
Flavor: Juicy and tender with a smoky, savory seasoning and crispy skin.
Technique: Dry the skin well, season all over, and tie the legs for even cooking.
Time-Saving Tip: Mix the seasoning ahead of time and store it in a jar for a quick grab-and-go rub.
Freezing: You can freeze leftover cooked chicken for up to 3 months. Perfect for soups or casseroles later!
Ingredient Tips For Rotisserie Chicken
Chicken: Choose a whole chicken about 3.5 to 4 pounds with the skin intact. If cooking in an air fryer, be sure the whole chicken will fit.
Oil: A little oil helps the seasonings cling to the skin, making it extra crispy. Any oil or cooking spray works. Melted bacon grease will give rotisserie chicken a smoky flavor.
Seasonings: Use your favorite seasoning blend, my chicken seasoning, or keep it simple with seasoned salt.
Cutting Rotisserie Chicken
Always let rotisserie chicken rest after cooking so the juices can recirculate into the meat. Chicken should reach an internal temperature of 165°F before carving.
Storage and Leftovers
The best way to store leftover rotisserie chicken is to remove the meat from the carcass. Keep it in a covered container in the refrigerator for up to 4 days or frozen for up to 4 months.
Did you enjoy this easy Rotisserie Chicken? Leave a rating and a comment below!
5 from 80 votes↑ Click stars to rate now! Or to leave a comment, click here!
Rotisserie Chicken
This easy rotisserie chicken recipe uses simple spices and a whole chicken to create juicy, flavorful meat with crispy skin—perfect for meals all week long.
Prep Time 15 minutesminutes
Cook Time 1 hourhour12 minutesminutes
Resting Time 10 minutesminutes
Total Time 1 hourhour37 minutesminutes
Prevent your screen from going dark
In a small bowl, combine paprika, smoked paprika, garlic powder, onion powder. Add 1 teaspoon salt and ½ teaspoon pepper (more or less to taste) and mix well.
To prepare the chicken, dab the skin dry with paper towels.
Rub the outside of the chicken with olive oil and season generously with the spice mixture.
Gently fold the wings behind the chicken. Using kitchen twine, tie the legs together. Ensure the cavity is empty.
To Cook on a Rotisserie
Center the chicken on a rotisserie spit. If using a grill rotisserie, preheat to medium heat, 350°F. (see notes for oven directions).
Cook chicken for 18-22 minutes per pound, or until the chicken reaches 165°F on a meat thermometer. A 3.5lb chicken will cook for 60-80 minutes.
Once the chicken has reached the right temperature, turn off the heat and allow the chicken to rotate for 15 minutes without heat.
Remove from the rotisserie and serve.
To Roast in the Oven
Preheat oven to 450°F. Place chicken, breast-side up, in a cast iron skillet or in a small dish.
Roast 12 minutes, reduce heat to 350°F and cook an additional 60-70 minutes or until chicken reaches 165°F.
Rest 15 minutes before carving.
Air Fryer: To cook the chicken in the air fryer, season as directed above and follow our air fryer whole chicken recipe. Seasoning: Chicken can be seasoned with any spice mixture. You can cook more than one chicken at a time, just ensure chickens are not touching. Note: Read the directions for your exact rotisserie equipment for mounting directions. Electric rotisserie machines do not require preheating. Cooking Time: Cooking time can vary based on the size of the chicken and the cooking method (oven/rotisserie). Most small-sized chickens will cook in approximately an hour. For best results, use an instant-read thermometer and cook until chicken reaches 165°F. Leftover chicken can be stored in the fridge in an airtight container for up to 4 days.
Published: · Modified: by Lucy · This post may contain affiliate links · 1 Comment
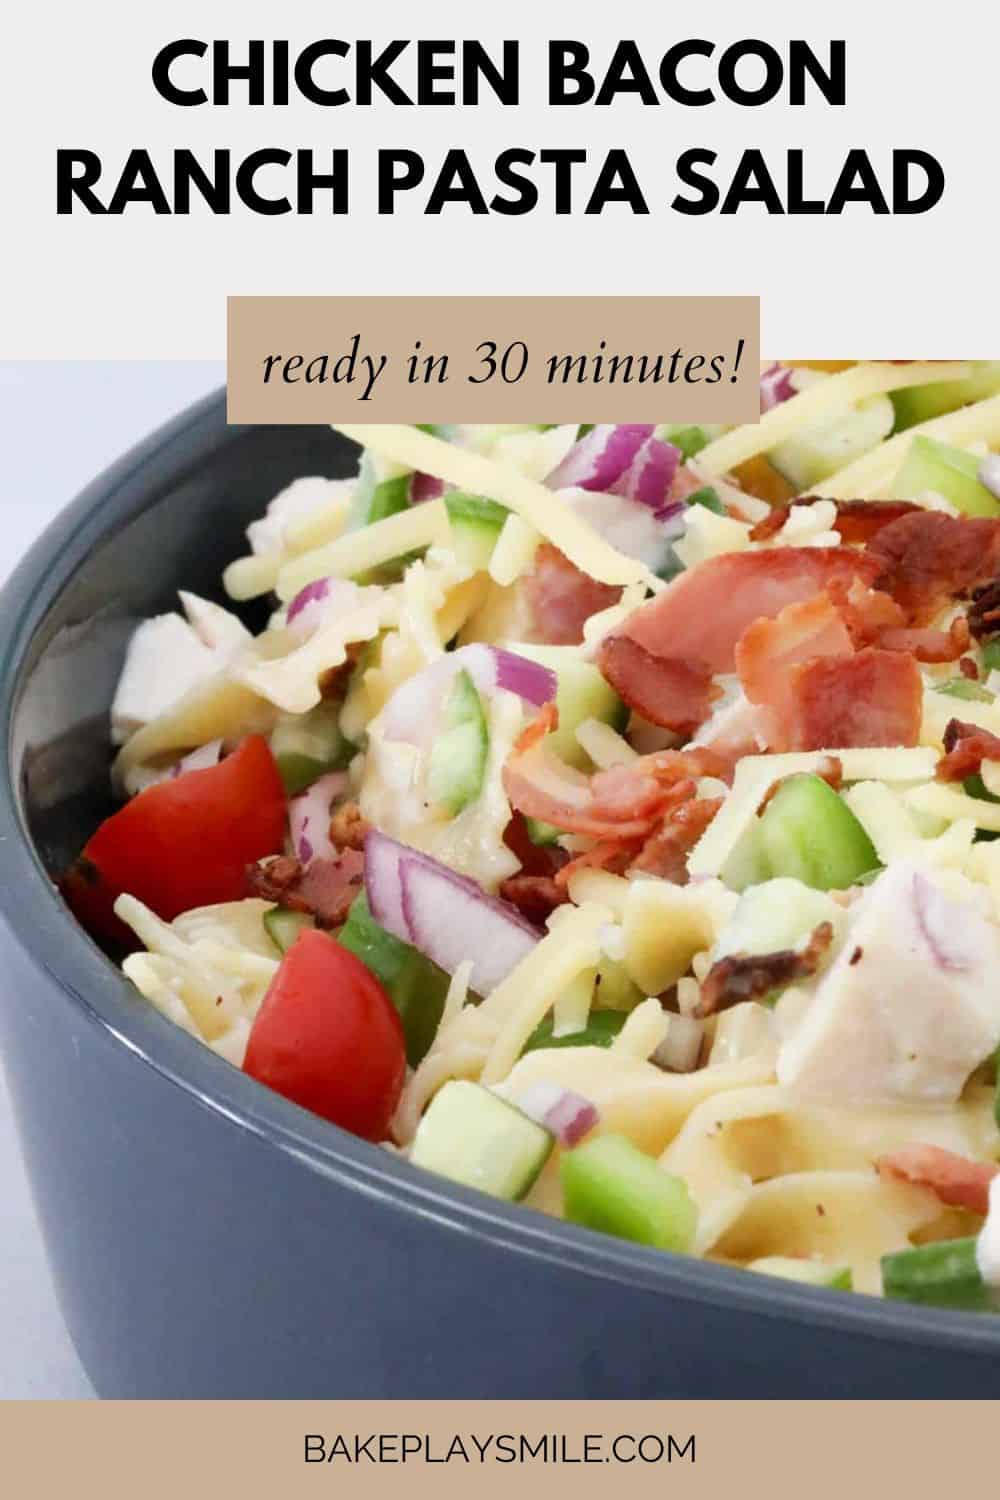
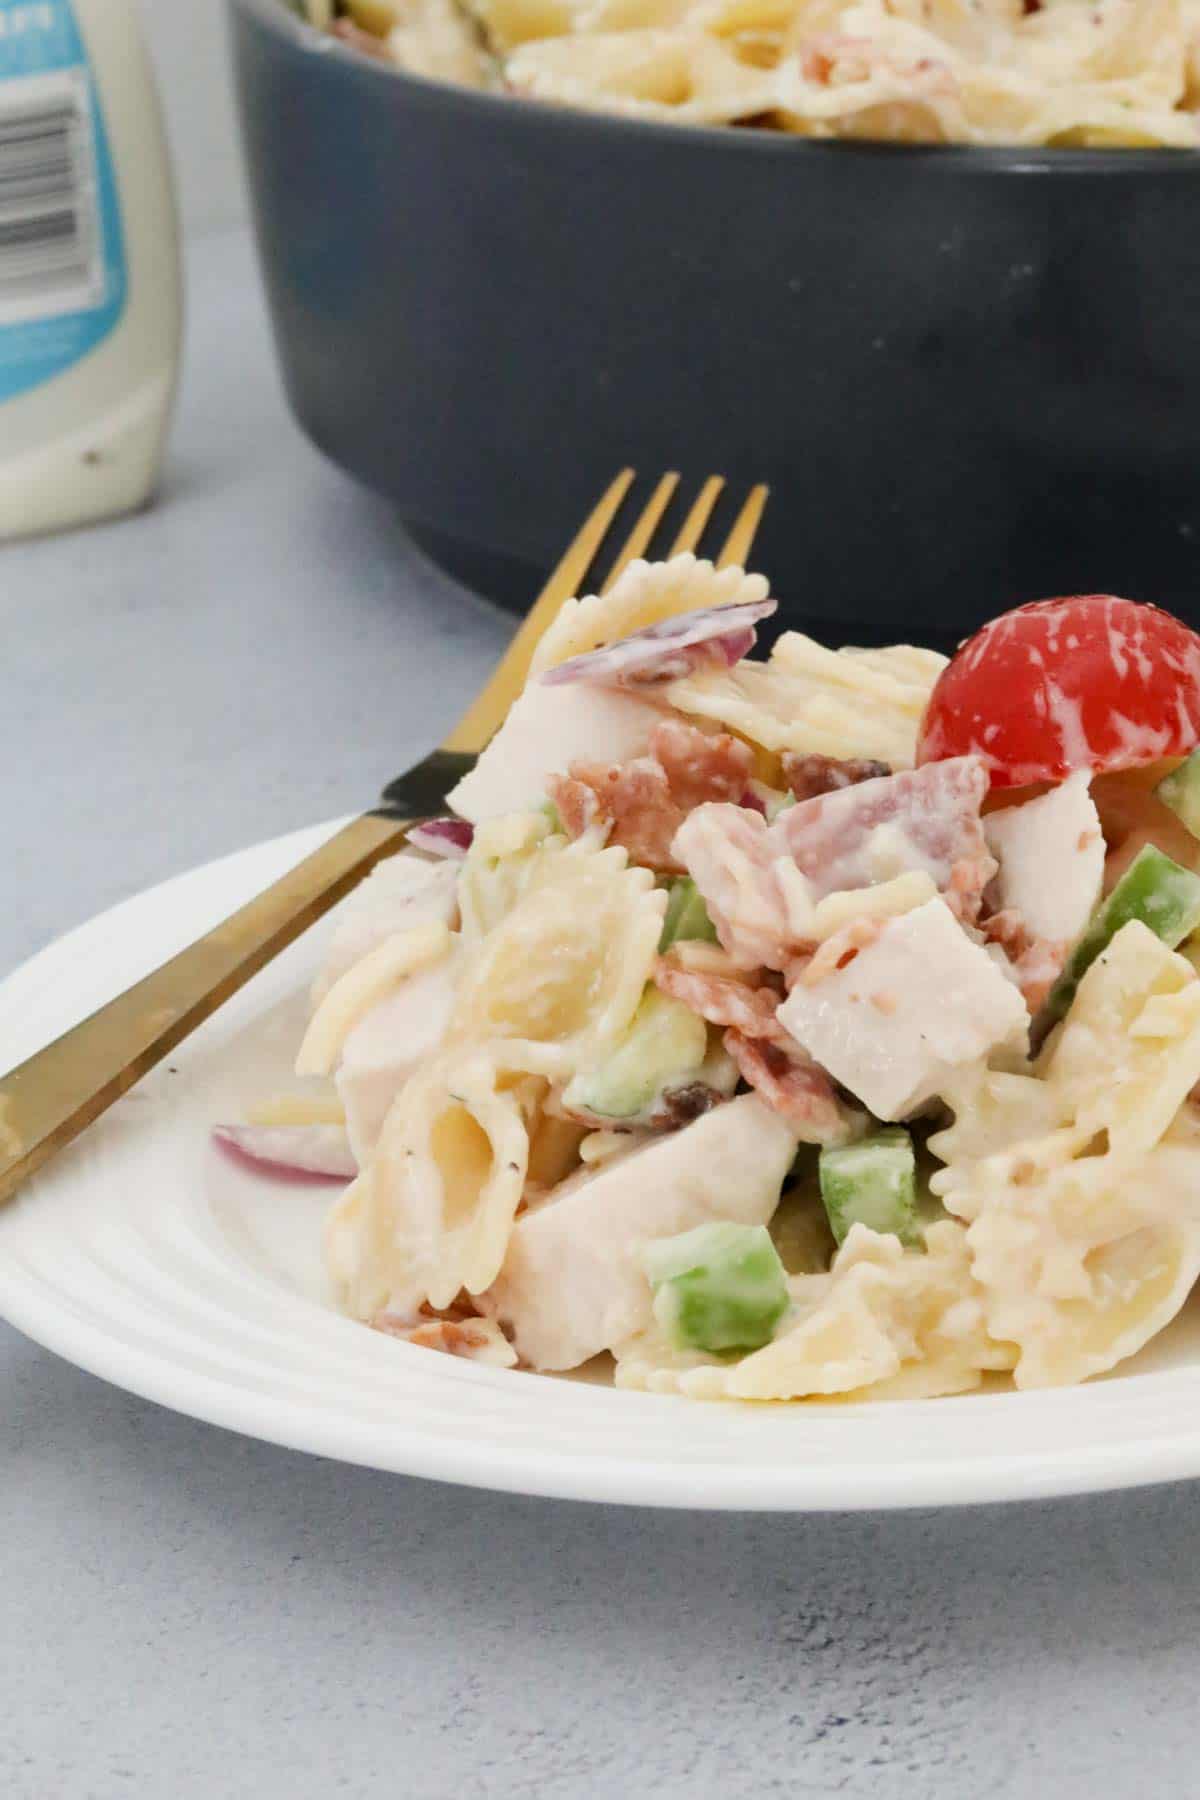
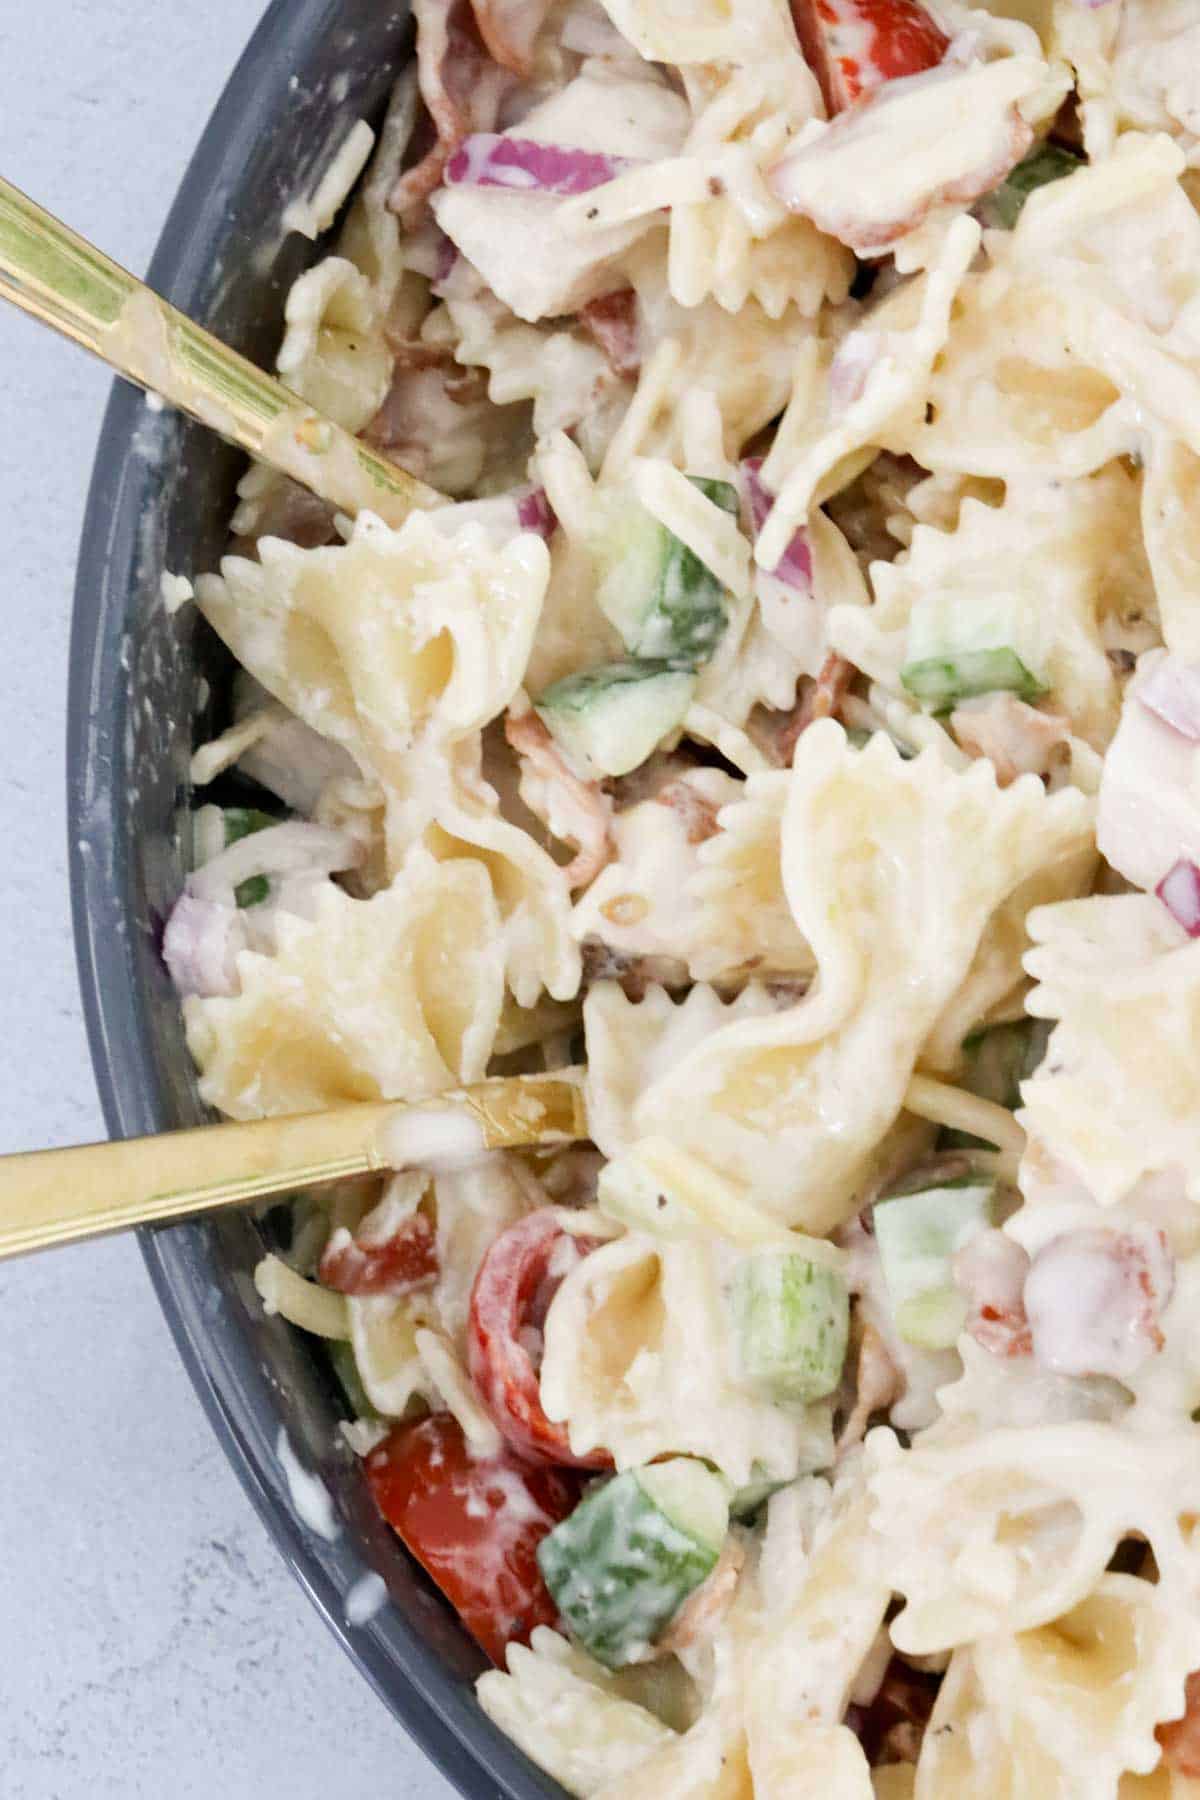
A delicious and creamy Chicken Bacon Ranch Pasta Salad packed full of flavour! This easy-to-make recipe is a perfect side dish for BBQs, family gatherings, or a quick midweek meal.
It’s a guaranteed crowd-pleaser, loaded with tender chicken, crispy bacon, fresh vegetables, and a creamy ranch dressing.
The beauty of this pasta salad recipe is that you can prepare many of the ingredients ahead of time. Then, you can simply combine the salad and dress it prior to serving.
Quick & Easy – Ready in just 25 minutes, this easy pasta salad recipe is a great option for those busy days when you need something tasty but fuss-free.
Full of Flavour – The smoky bacon, juicy chicken, and creamy ranch dressing make every bite a delight.
Great for Meal Prep – Make it ahead of time and store it in the fridge for an easy grab-and-go meal.
Versatile – Easily adaptable to suit your preferences with different veggies or protein options.
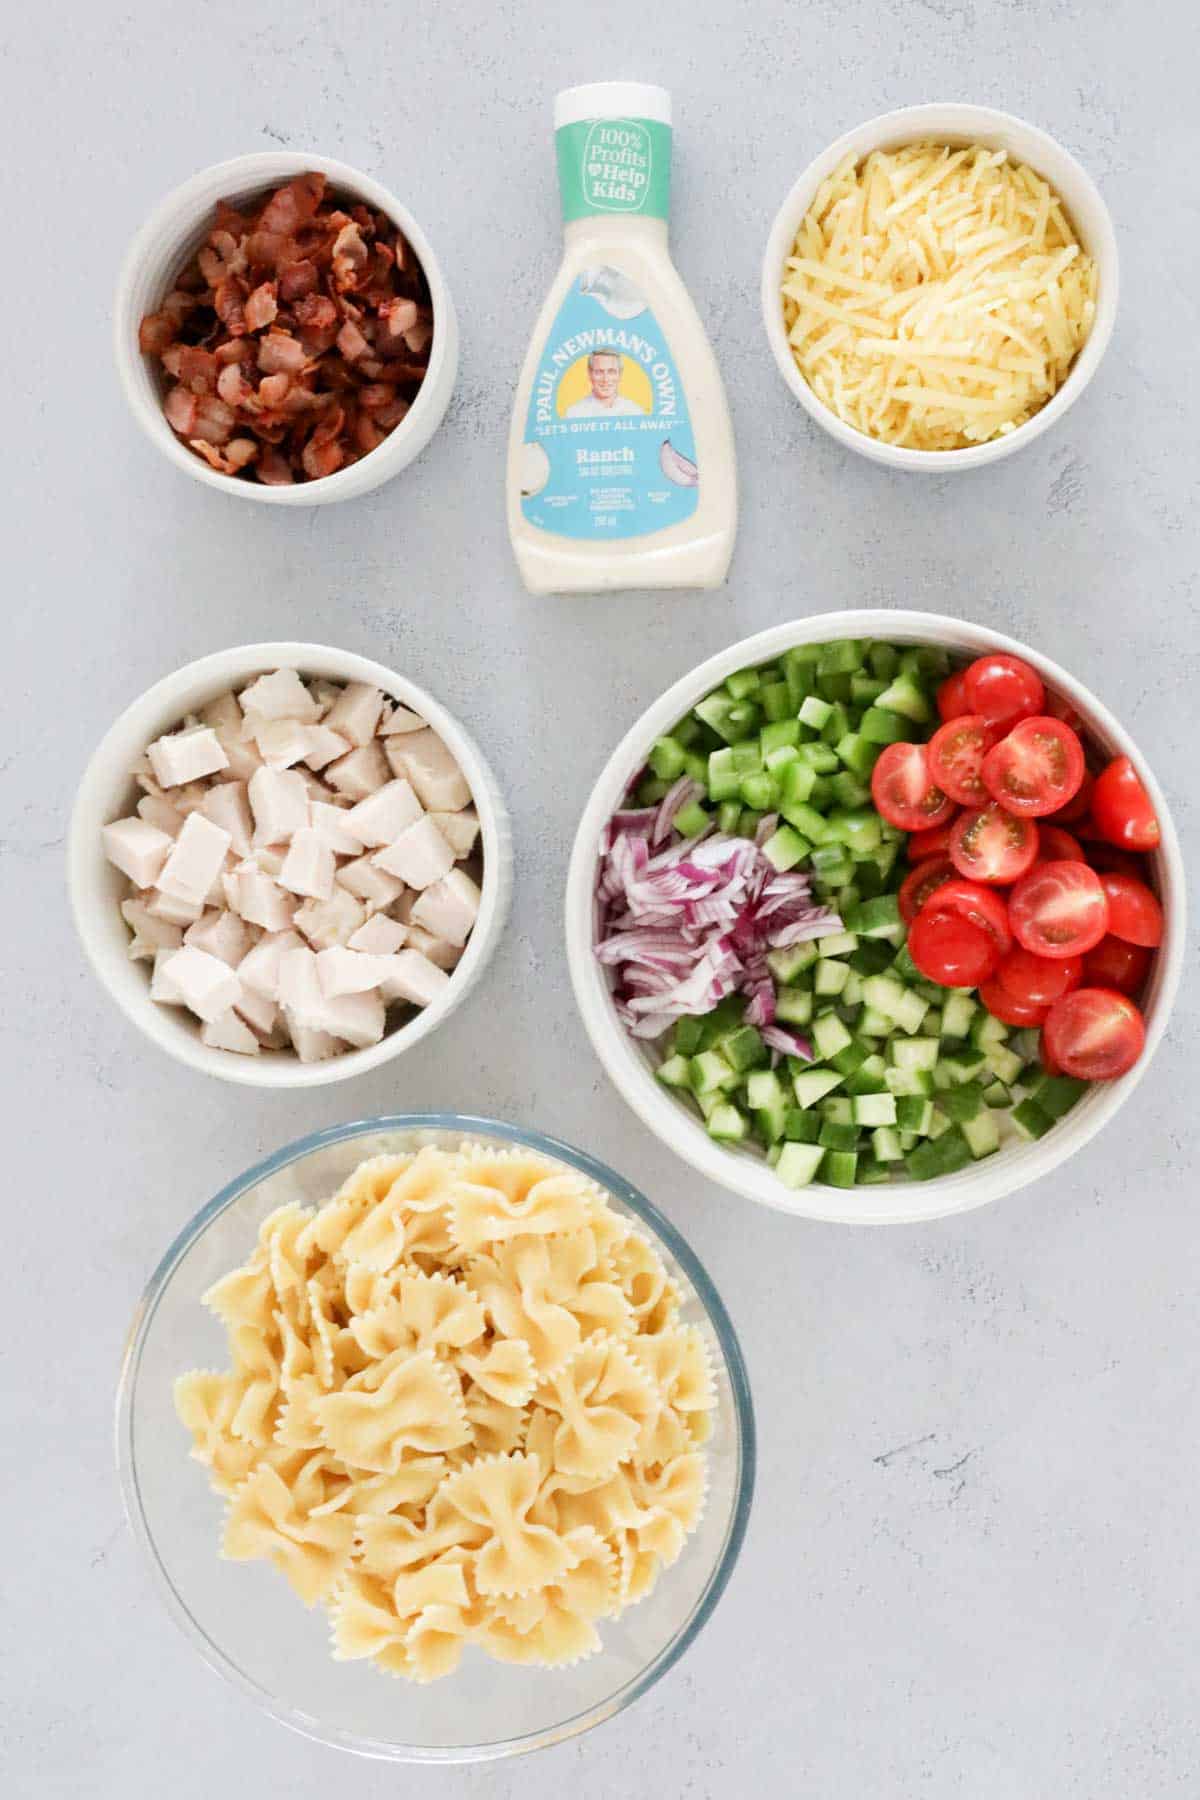
What You Need
Note: Scroll to the recipe card at the bottom for the ingredients quantities and full detailed method.
Ingredients
Uncooked pasta – Bow-tie or spirals work best as they hold the dressing well and add a great texture.
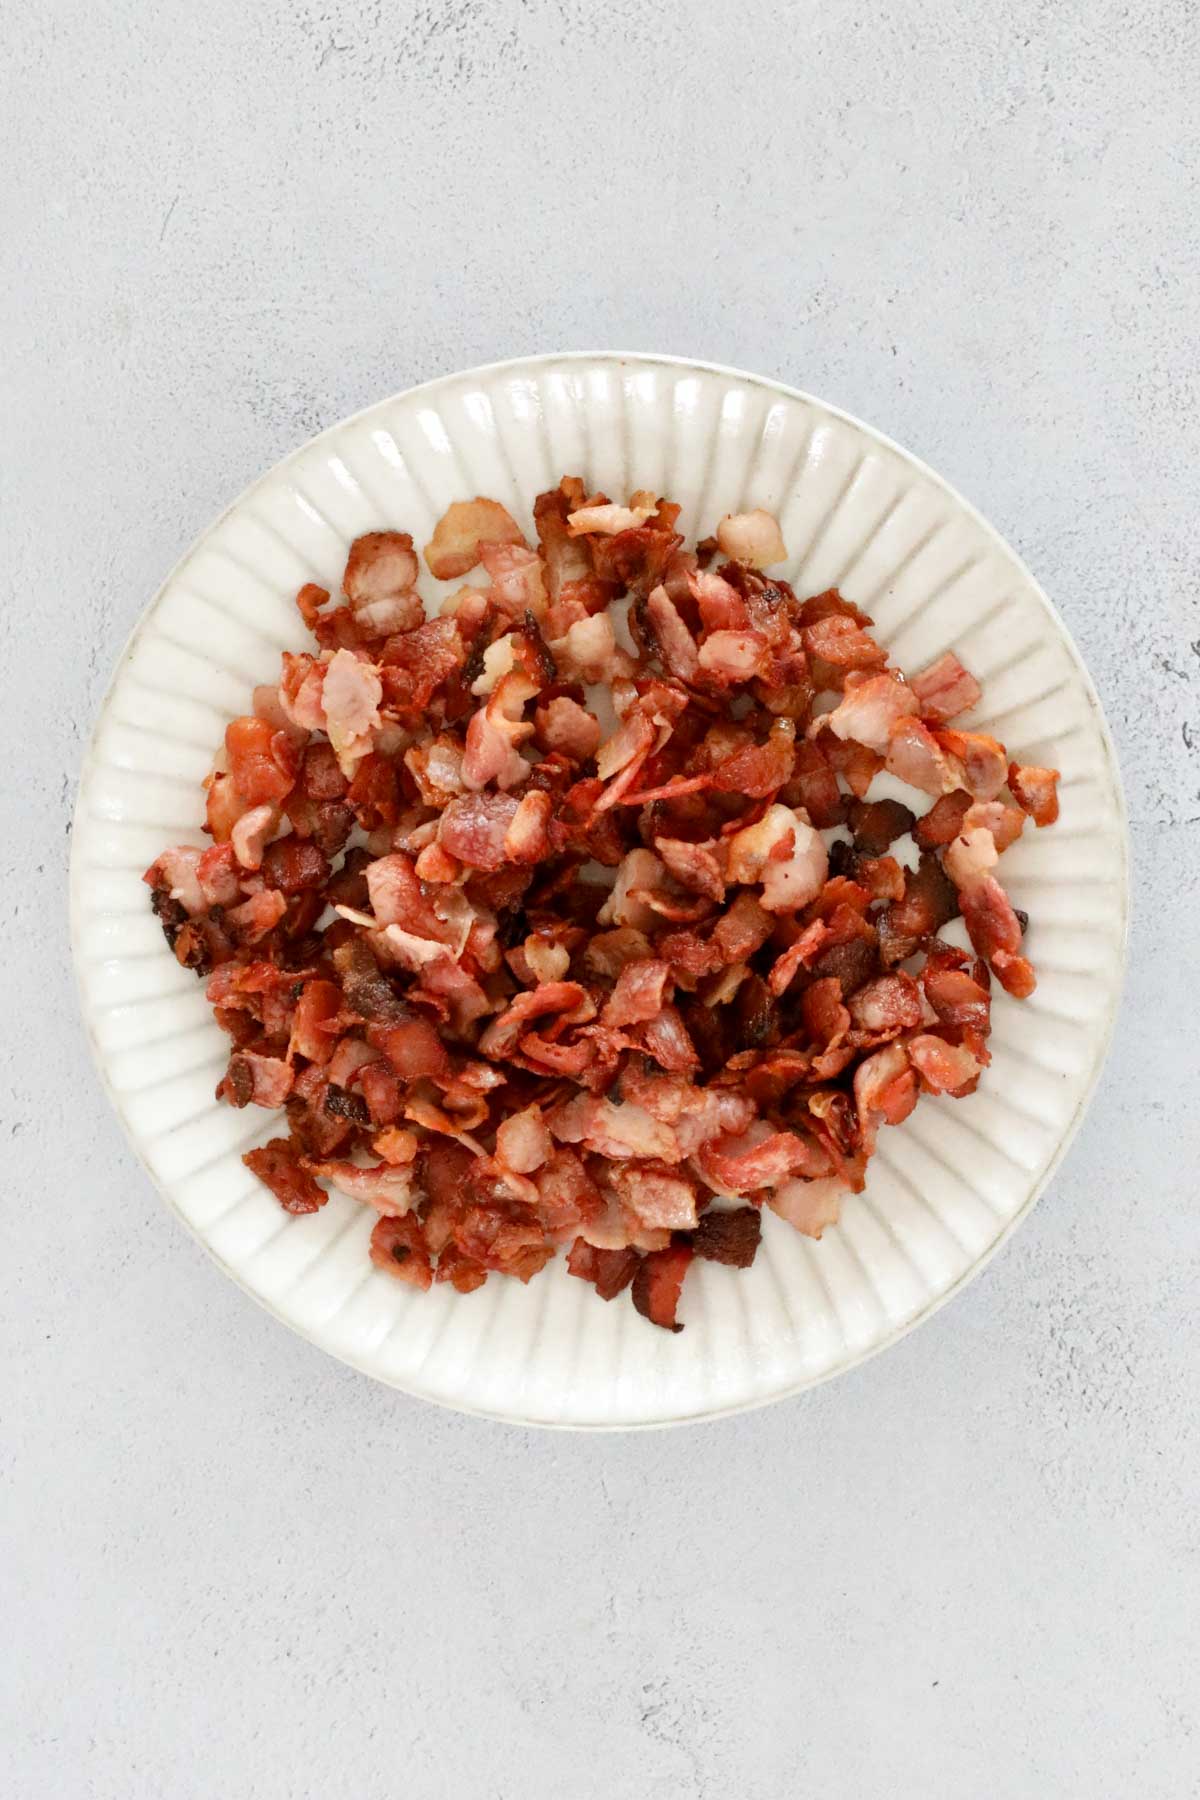
Streaky bacon – Crispy bacon adds a delicious smoky, savoury crunch to the salad.
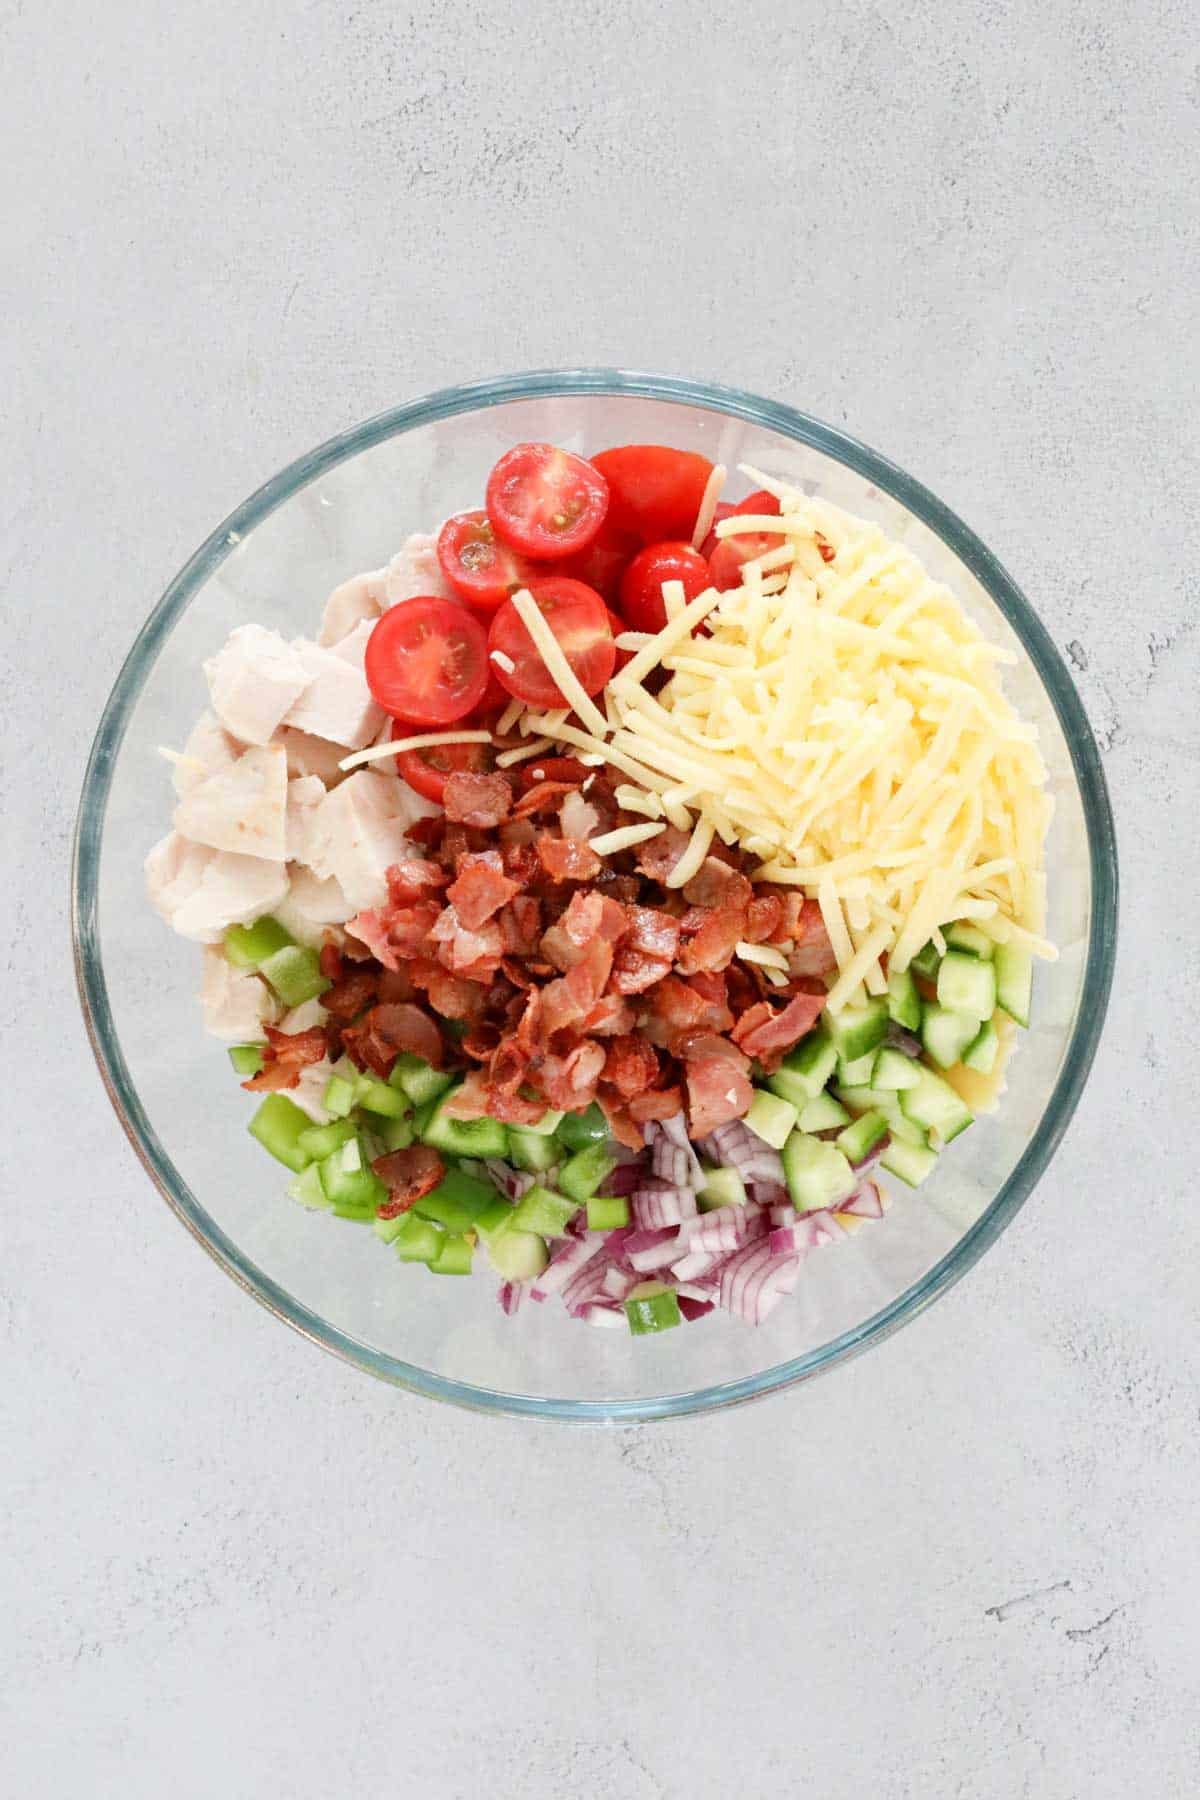
Cooked chicken breast or thigh – A great way to use leftover chicken or BBQ rotisserie chicken for extra convenience.
Red onion – Adds a mild bite and a touch of colour to the salad. You could substitute with spring onions / green onions too.
Cherry tomatoes – These juicy, sweet tomatoes balance out the savoury elements perfectly.
Cucumber – Fresh and crunchy, cucumber helps to keep the salad light and refreshing.
Green capsicum – Adds a subtle sweetness and crisp texture. Capsicums are also known as bell peppers in the US.
Grated cheddar or tasty cheese – A rich and creamy element that ties the dish together.
Ranch dressing—The star of the dish, store-bought ranch dressing adds creaminess and flavour to every bite. Alternatively, you could make your own ranch dressing using sour cream, mayonnaise, herbs, and seasonings.
Salt and pepper – To taste, season, and enhance all the flavours.
Equipment Required
To make this recipe, you’ll need:
A large pot for cooking the pasta
A colander for draining the pasta
A frying pan for cooking the bacon
A sharp knife and chopping board for prepping the ingredients
A large bowl for combining everything
A spoon or spatula for mixing the salad.
Step-by-Step Instructions
Note: Scroll to the recipe card at the bottom for the ingredients quantities and full detailed method.
Step 1: Prepare The Pasta
Start by bringing a large pot of salted water to a boil. Cook the pasta according to the packet instructions until it’s just al dente. Drain the cooked pasta and rinse it under cold water to cool it down and prevent sticking. Set aside.
Step 2: Cook The Bacon
Heat a frying pan over medium heat and add the diced bacon. Cook until crispy and golden brown, stirring occasionally to ensure even cooking. Once done, transfer the bacon to a plate lined with paper towels to drain any excess oil.
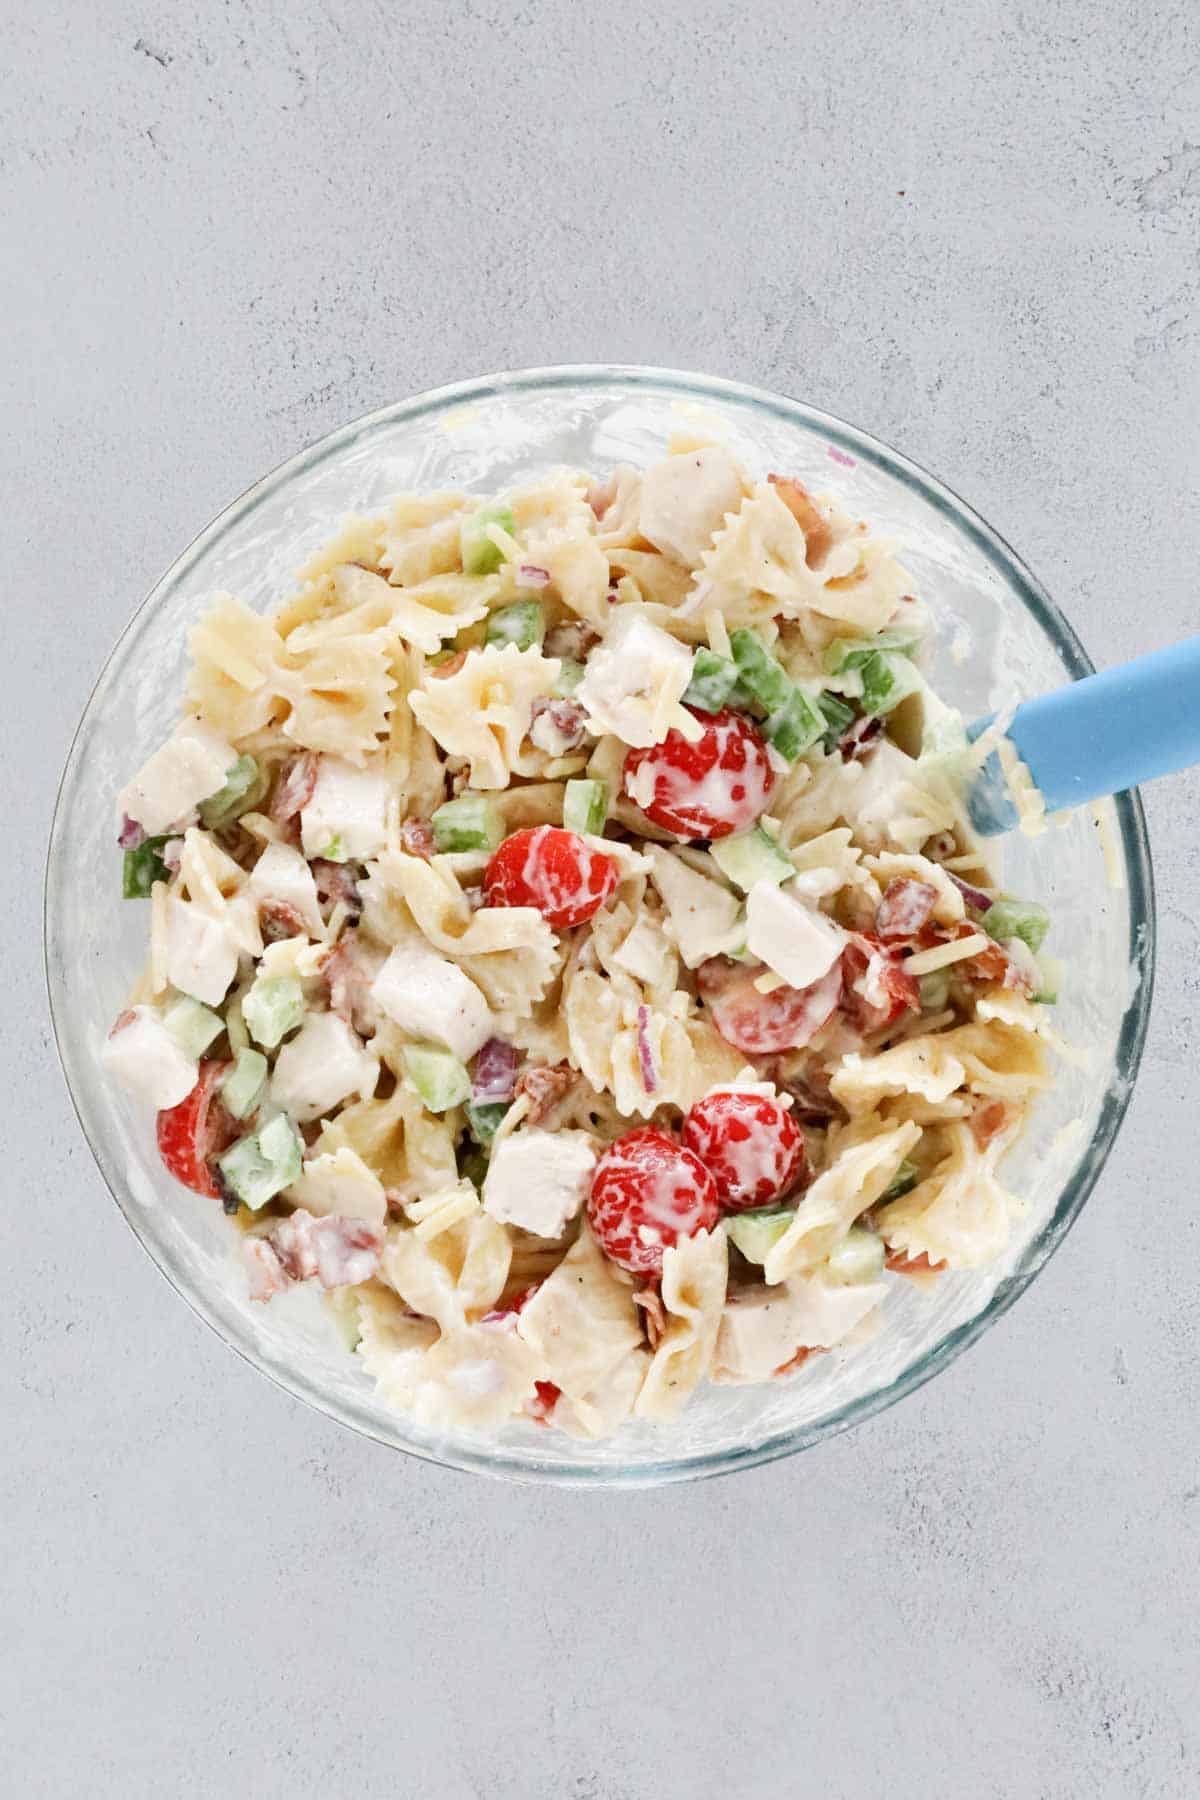
Step 3: Mix The Ingredients
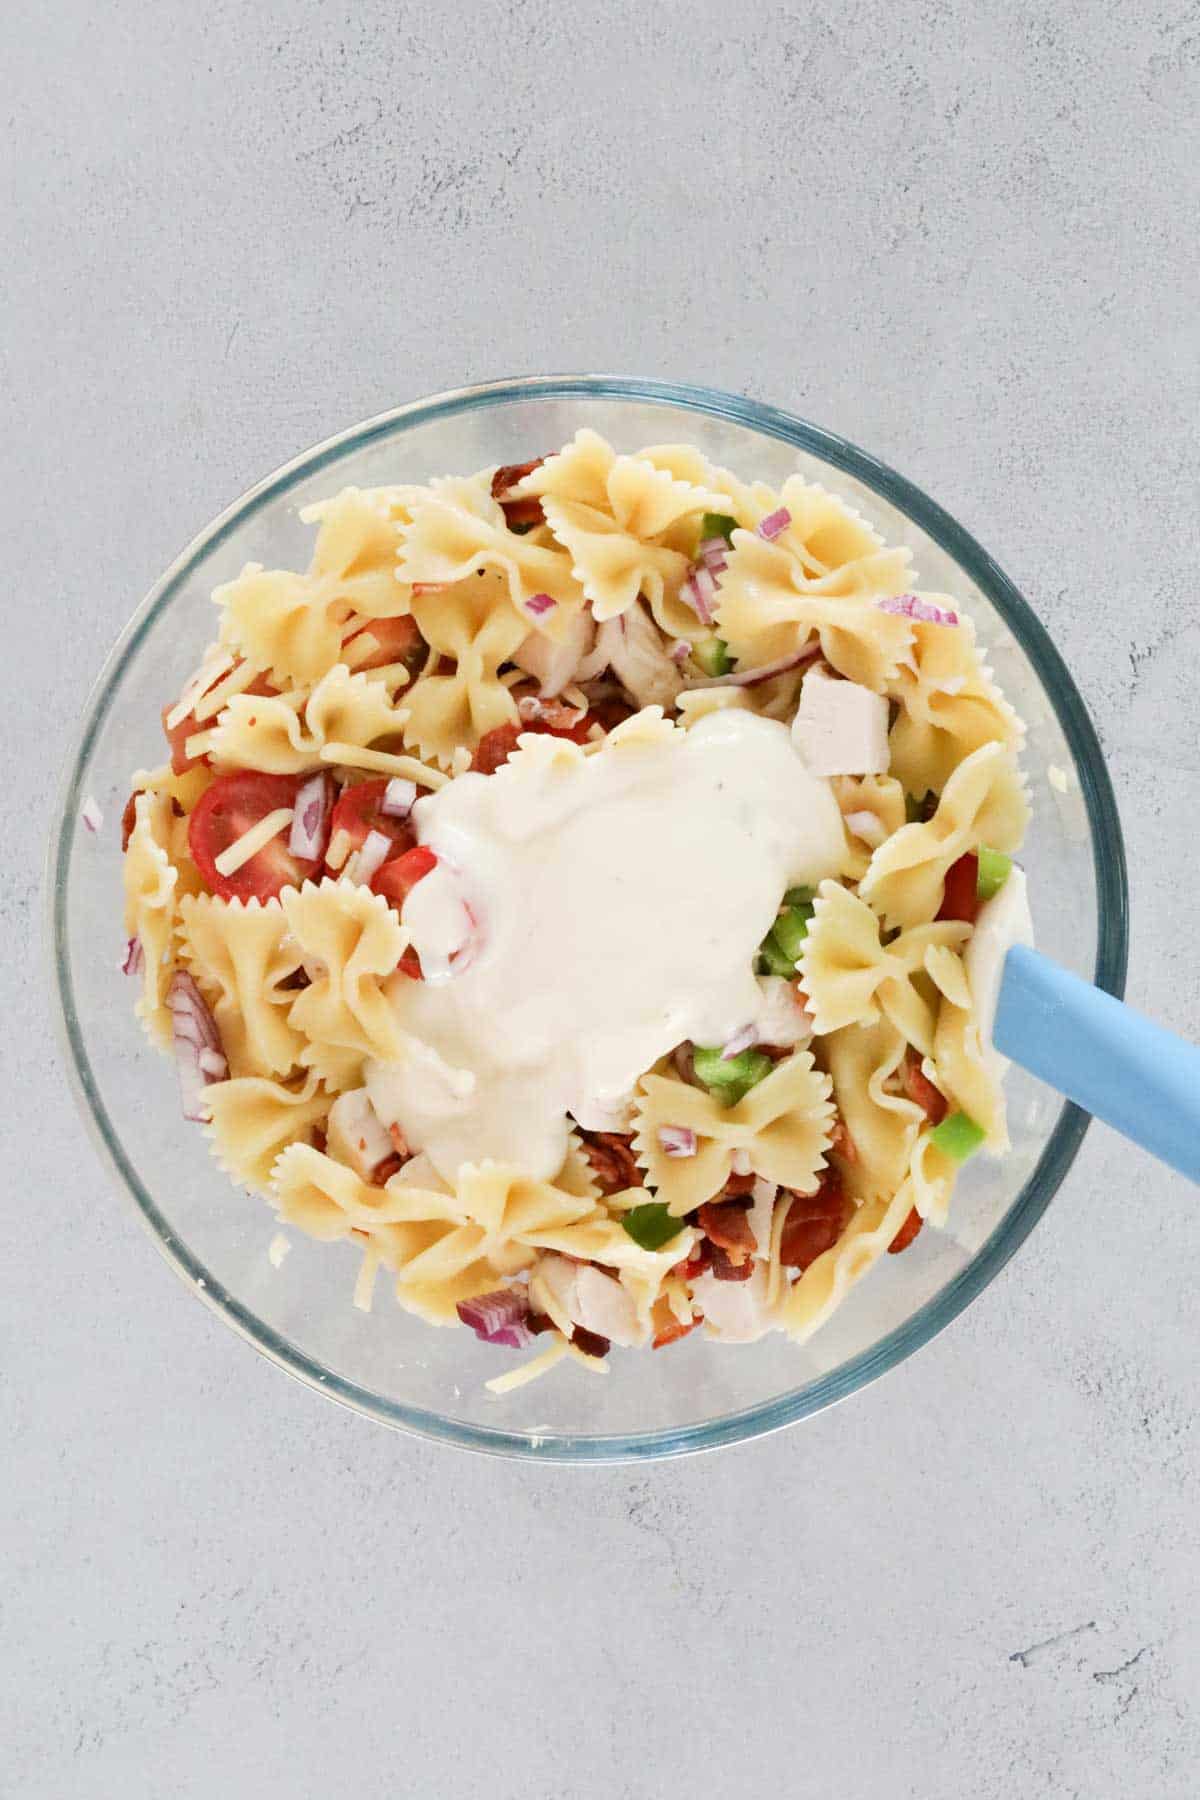
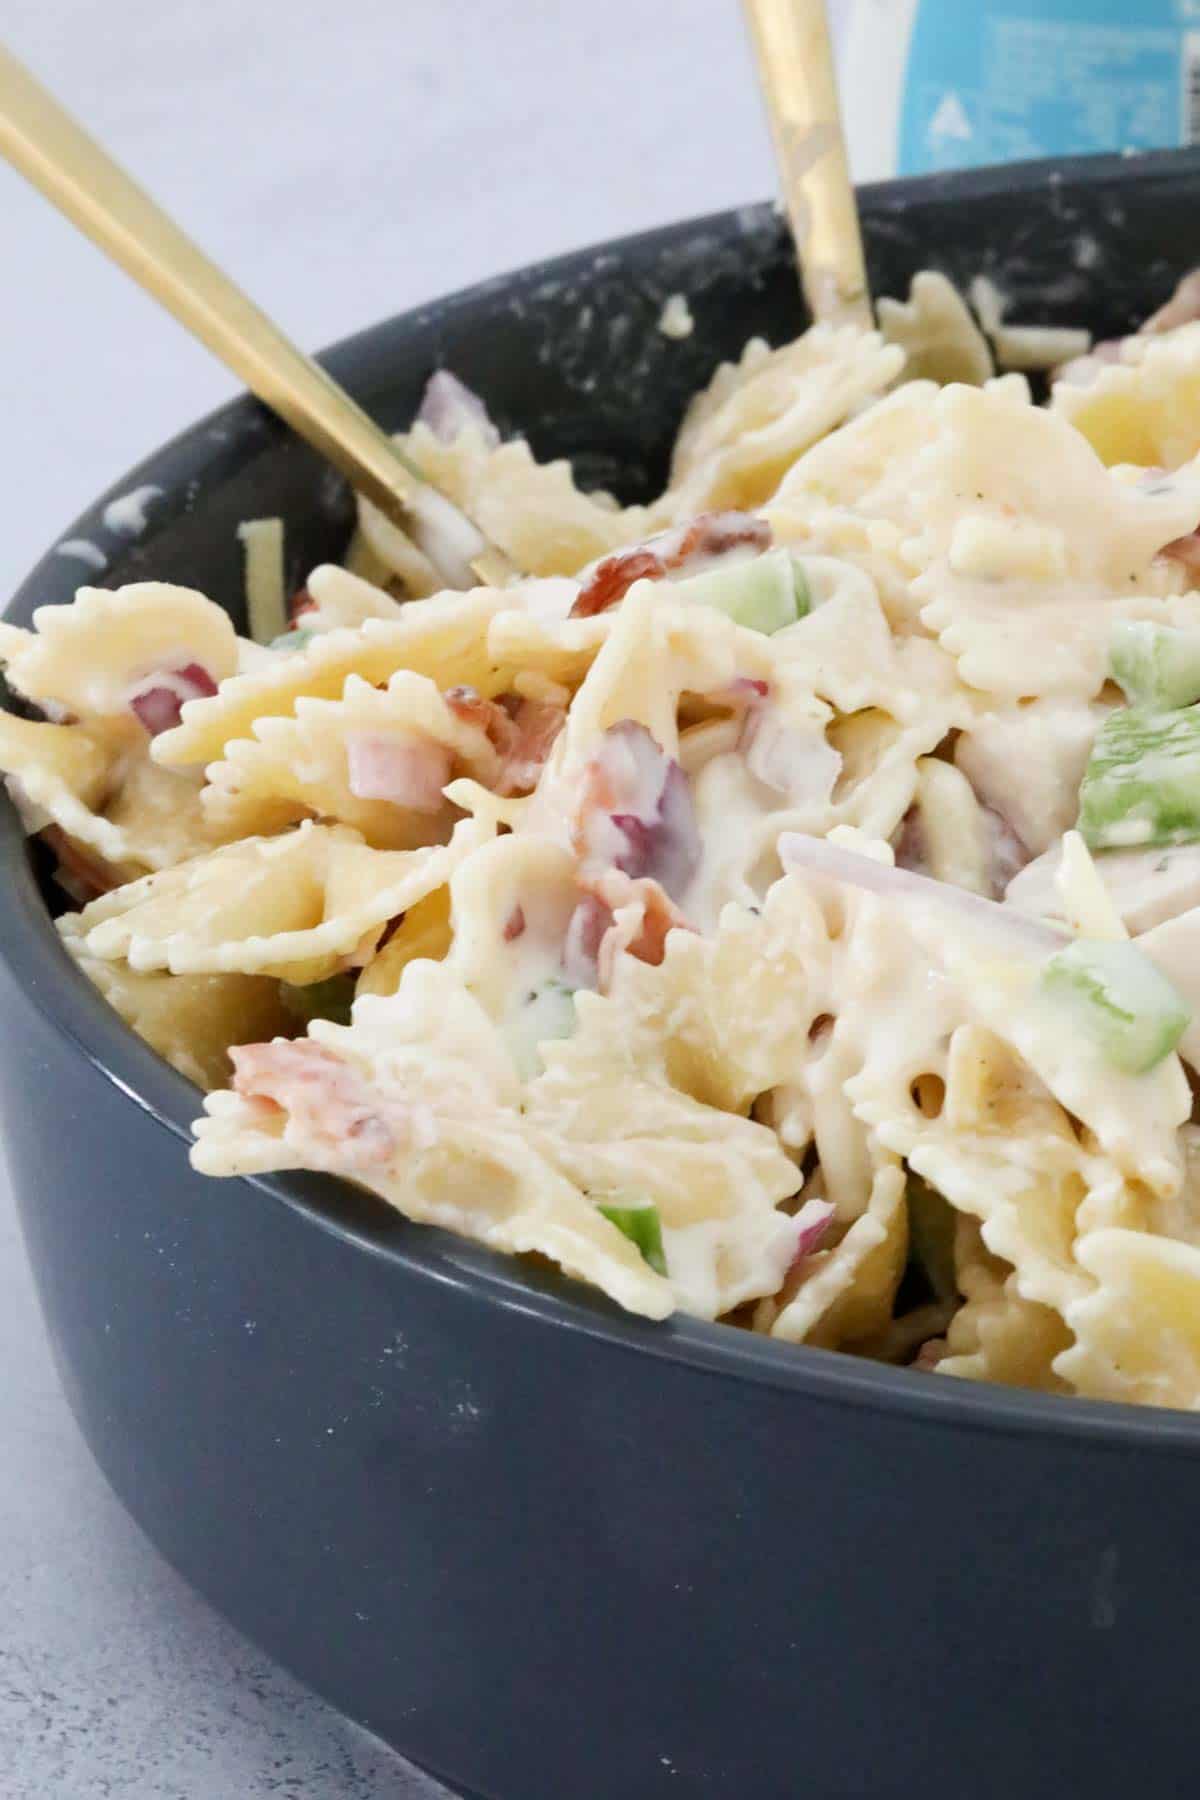
In a large mixing bowl, combine the cooled pasta with the crispy bacon, diced chicken, red onion, cherry tomatoes, cucumber, green capsicum, and grated cheese.
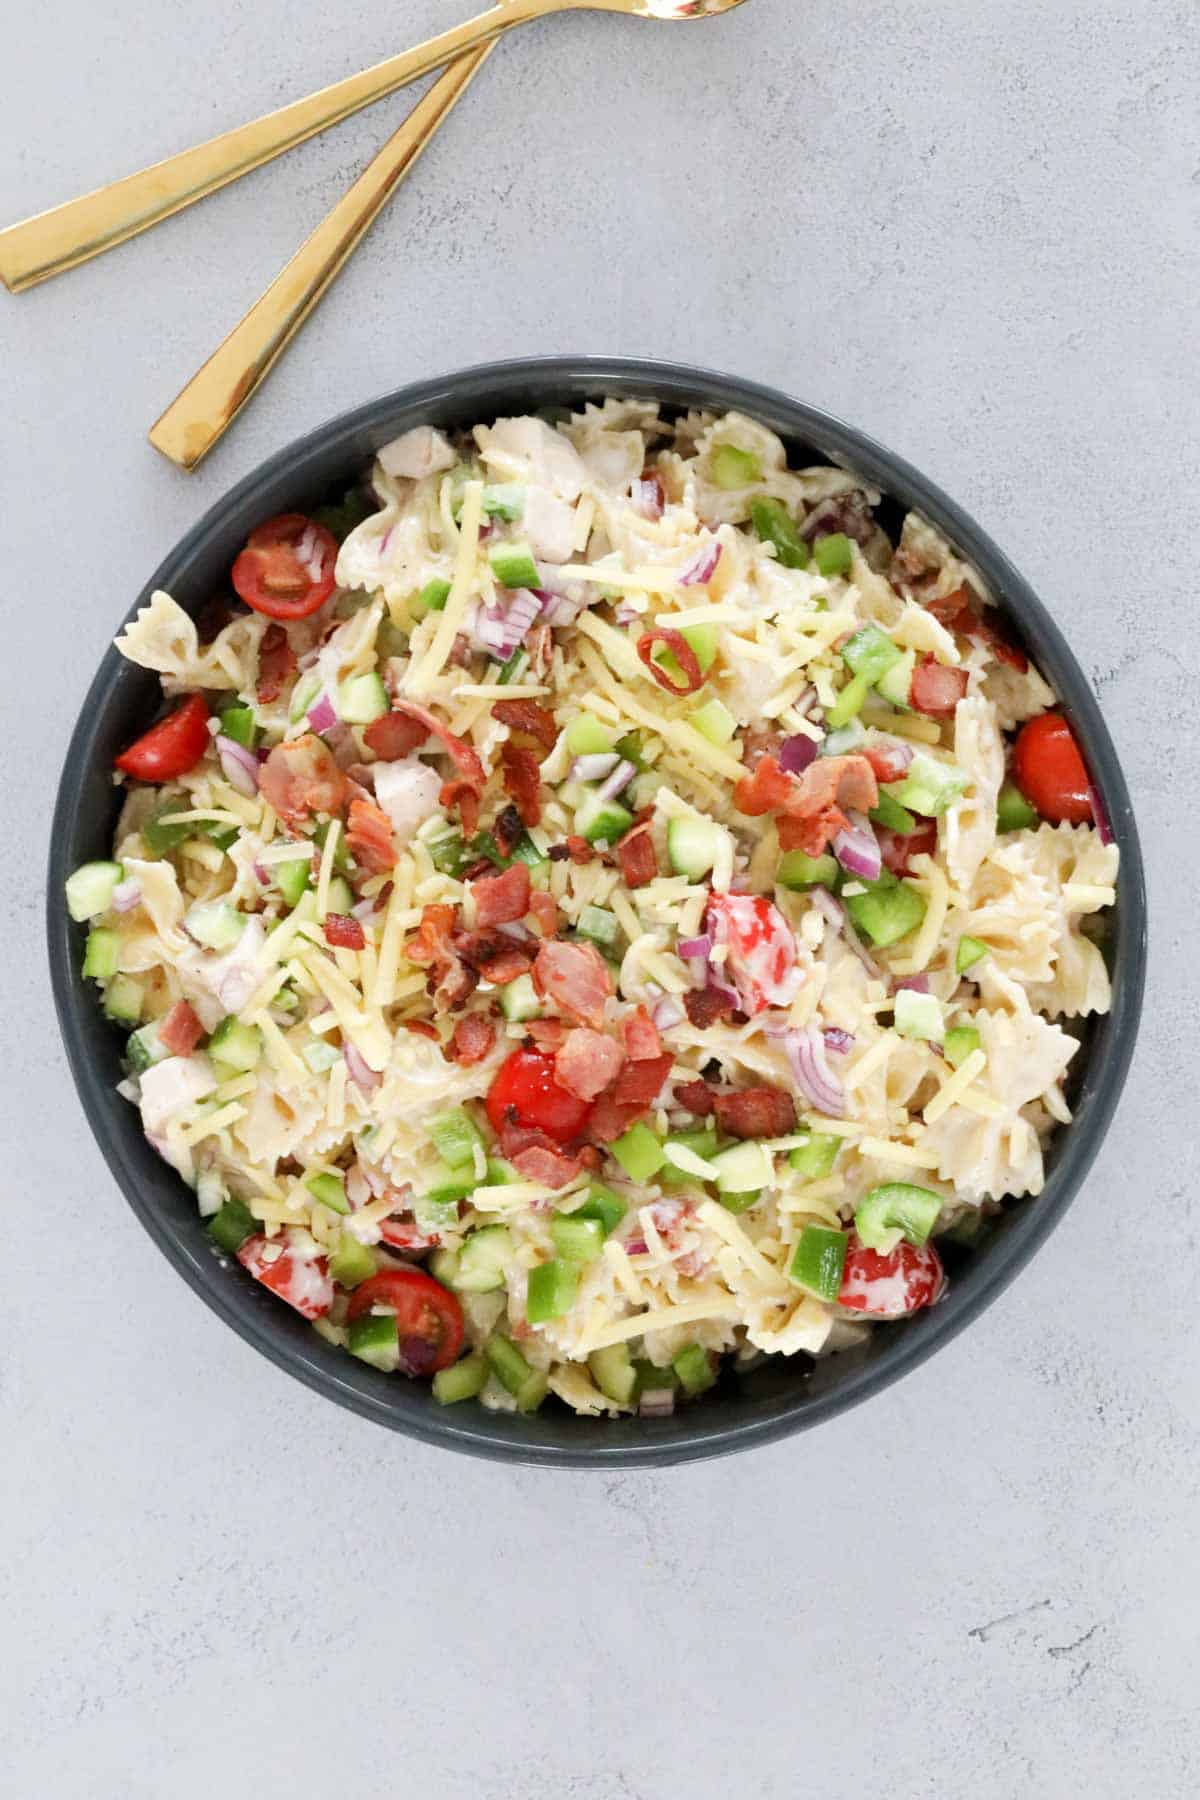
Toss all ingredients to evenly distribute, reserving a little cooked bacon and grated cheese to sprinkle over the top.
Step 4: Add Dressing
Drizzle three-quarters of the ranch dressing over the salad and gently mix until everything is well coated.
Taste and add extra dressing if needed. Season your chicken pasta salad with salt and pepper to your liking.
Finally, sprinkle the reserved bacon and cheese on top.
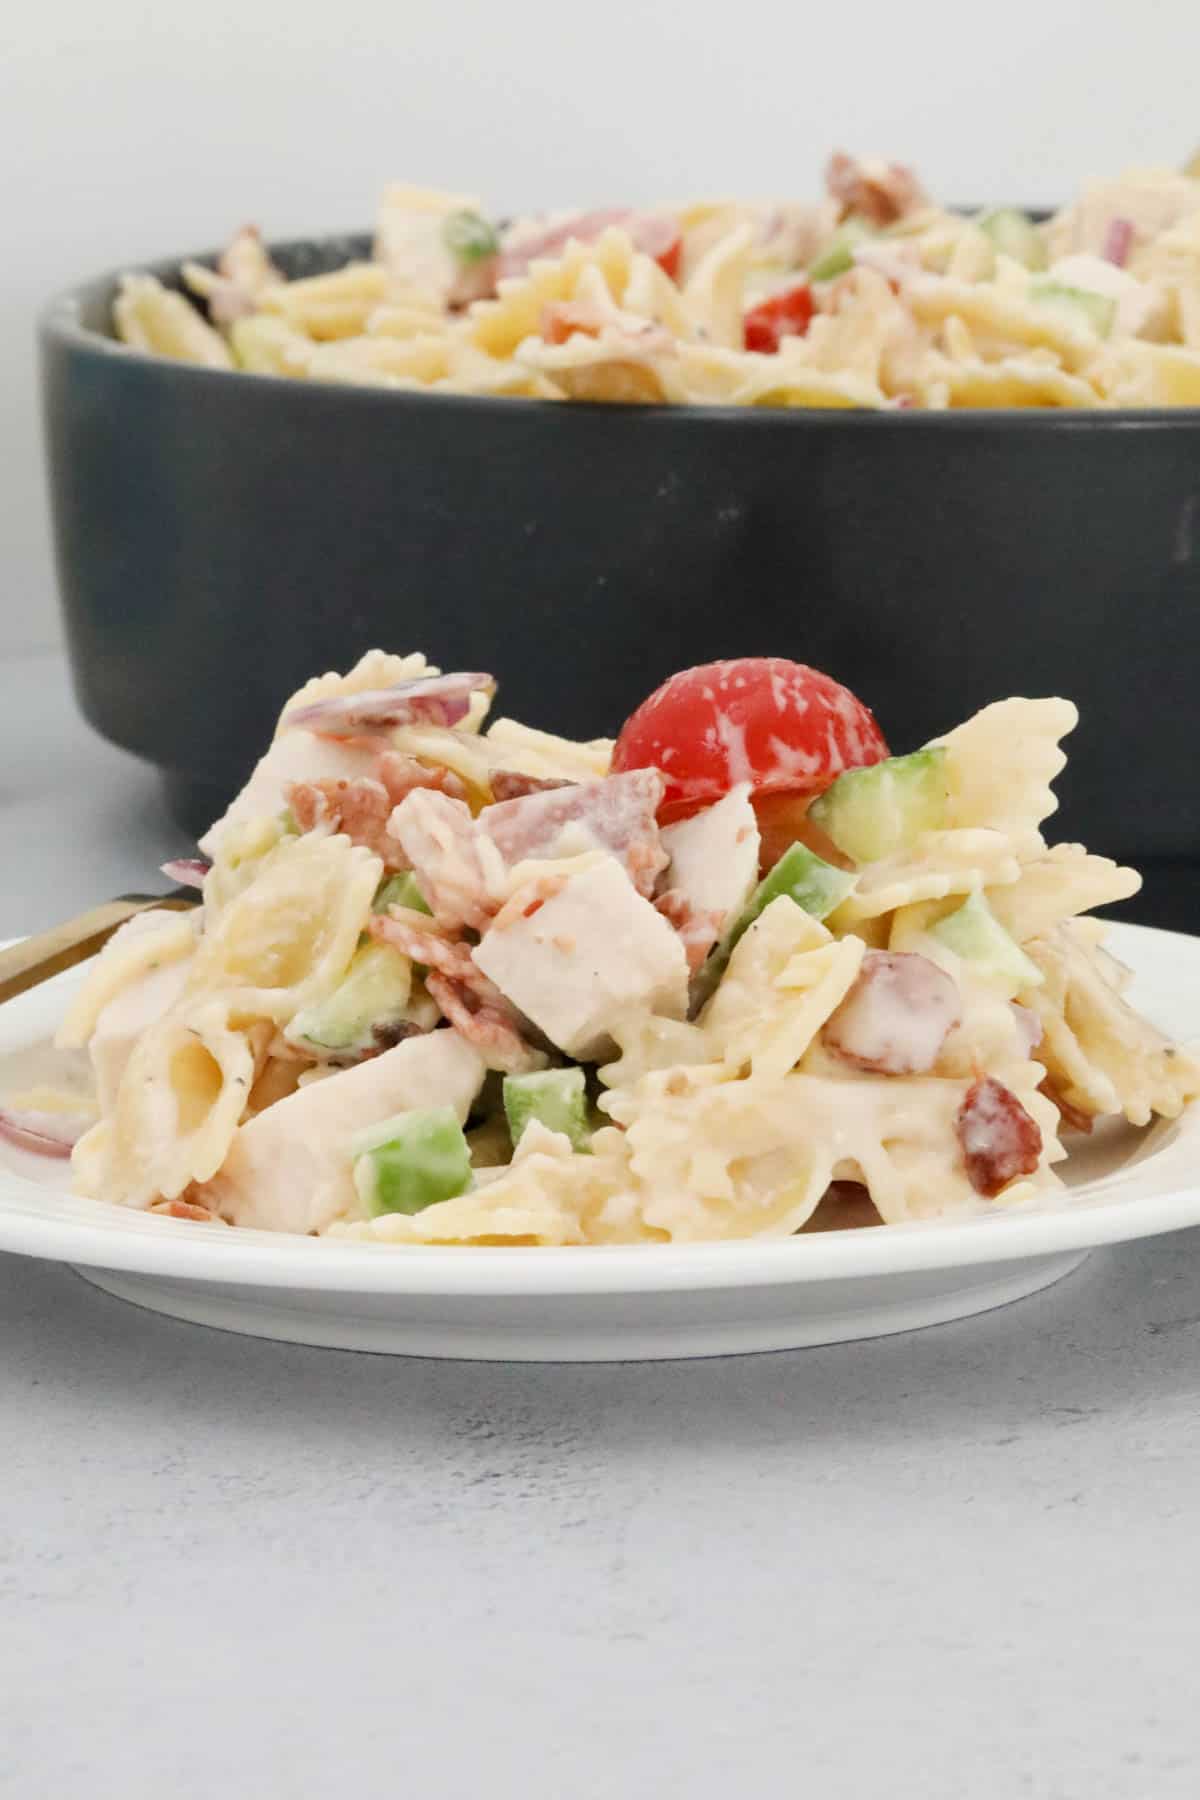
Step 5: Serve And Enjoy
This delicious pasta salad is best enjoyed at room temperature for the best flavour and texture. If you’ve prepared it beforehand, allow it to sit out for a few minutes before serving.
Recipe Tips & Variations
Type of Pasta: Bow-tie (farfalle) or spirals work well, but penne or macaroni are great alternatives. Be sure not to overcook the pasta to keep it tender yet firm.
Chicken Options: Use leftover roast chicken, rotisserie chicken, or quickly pan-fry some chicken breasts or chicken strips for this recipe.
Extra Add-Ins: For extra flavour and texture, try adding avocado, black olives, shredded lettuce, or even corn.
Make It Lighter: Swap out the full-fat ranch for a light version, or mix half ranch and half Greek yogurt for a healthier dressing or for personal preference.
Cheese Options: Swap cheddar for mozzarella, parmesan cheese, or feta for a different flavour twist.
FAQs
Can I make chicken bacon ranch pasta salad ahead of time?
Yes! You can prepare all the ingredients in advance and store them separately in the fridge. Mix everything together with the dressing just before serving to keep it fresh.
How long does this pasta salad last in the fridge?
This salad can be stored in an airtight container in the fridge for up to 2 days. Just stir it the next day before serving.
Can I use a different dressing instead of ranch?
Absolutely! Caesar dressing, honey mustard, or a simple homemade vinaigrette are great alternatives if you want to switch things up.
What other vegetables can I add?
You can mix in whatever veggies you like! Add diced avocado, shredded carrots, corn, or even spinach or rocket for extra colour and nutrition.
Can I serve chicken bacon pasta salad warm?
Yes, while it’s traditionally served at room temperature or chilled, you can serve it slightly warm if preferred. Just add the pasta salad dressing last to keep the flavours balanced.
Storage & Meal Prep
Refrigeration: Store leftovers in an airtight container in the fridge for up to 2 days.
Freezing: Not suitable for freezing as the texture of the pasta and dressing changes.
Make Ahead: Prepare everything ahead, but add the dressing just before serving for the best texture.
Serving Suggestions
Serve as a standalone main course for lunch or dinner.
Pair with a crusty bread roll for a more substantial meal.
Enjoy as a side dish at your next BBQ, picnic, or family gathering.
This Chicken Bacon Ranch Pasta Salad is guaranteed to be a huge hit with the whole family! Creamy and savoury, with tender pasta and full of fresh ingredients, this easy pasta salad recipe is the ultimate meal that everyone will love. Enjoy!
For more easy salad recipes, check out these tasty summer salads, which are always popular. Any leftover pasta salad makes a fabulous lunch the next day, too!
Cook the pasta according to the packet directions until just al dente. Run the pasta under cold water and strain well.
Cook the bacon in a frying pan until crispy. Set aside on paper towel to remove any excess oil.
Place the pasta into a large mixing bowl.
Add the crispy bacon, diced chicken, red onion, cherry tomatoes, cucumber, green capsicum and grated cheese. Mix until well combined.
Pour over ¾ cup of the ranch dressing and mix to combine.Taste the salad and add the remaining dressing if desired.Season with salt and pepper.
Notes
RECIPE NOTES & TIPS
Pasta – I like to use bow-tie pasta. However, spirals or penne also work well. Cook the pasta until just al dente (do not overcook).
Chicken – This recipe is a great way to use up leftover cooked chicken! Alternatively, you can use a cooked rotisserie chicken or pre-cooked chicken breast.
Versatile – Mix and match with your favourite vegetables! Try substituting the red onion with spring onion, add some diced avocado, shredded lettuce or black olives, or use a different coloured capsicum (peppers).
Make it look even more impressive by reserving a small amount of bacon, cheese, tomatoes, cucumber and red onion to sprinkle over the top!
Serve at room temperature – This salad is best served at room temperature as the dressing remains creamy. If storing in the fridge, bring the salad to room temperature before serving.
Store – Store the salad in an airtight container in the fridge for up to two days.
Freezing – This salad is not suitable for freezing.
This post may contain affiliate links. Please read my disclosure policy.
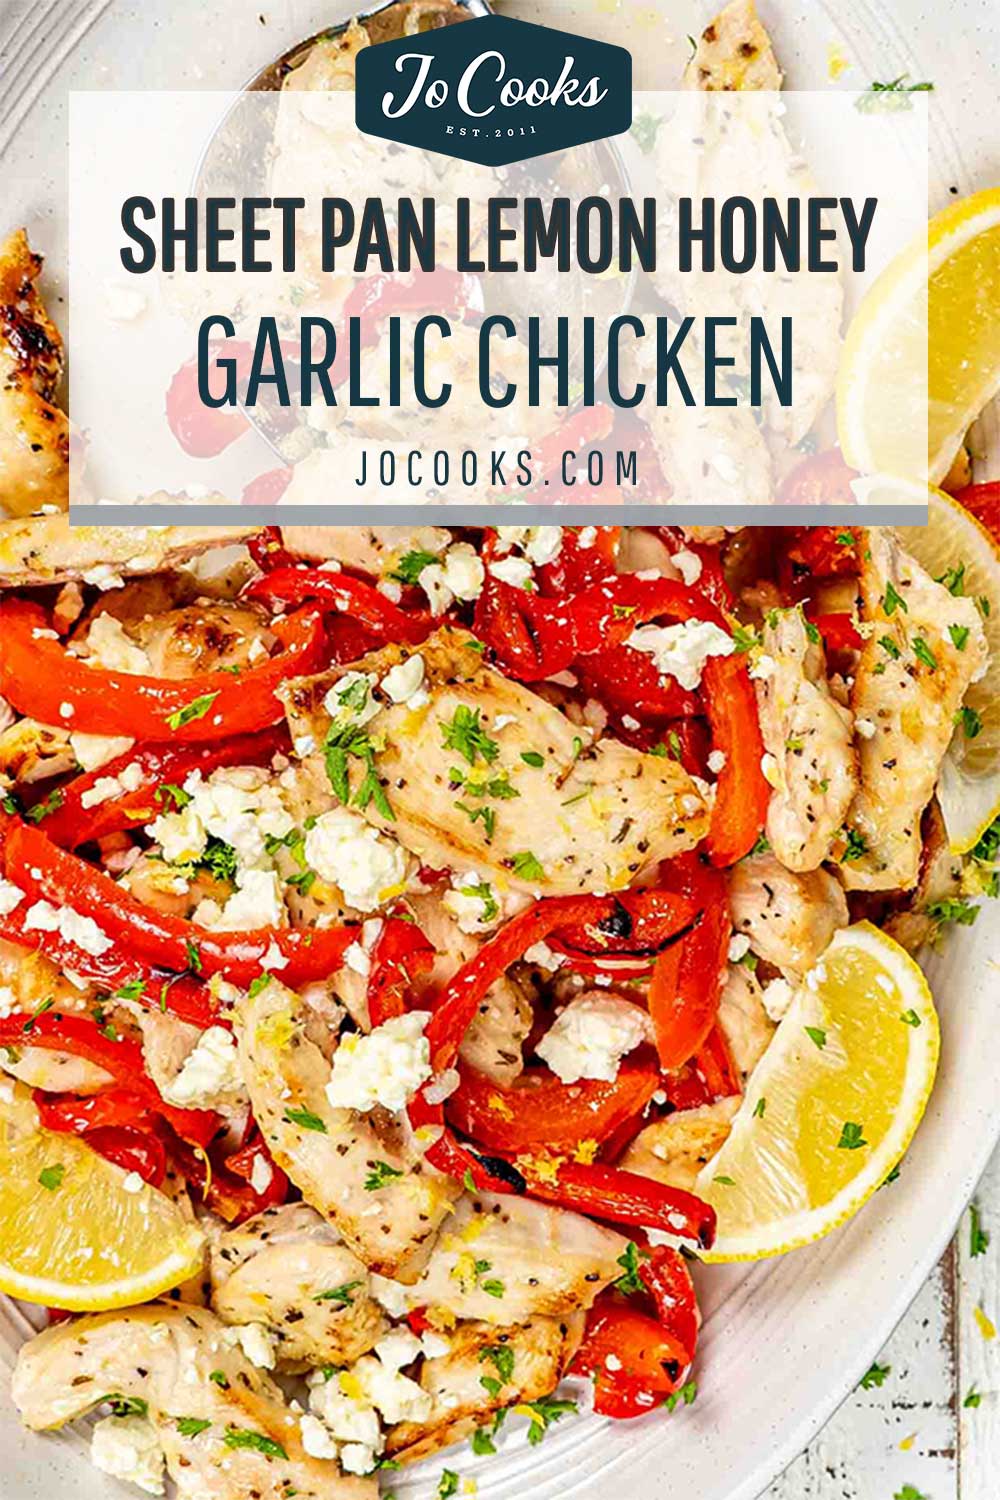
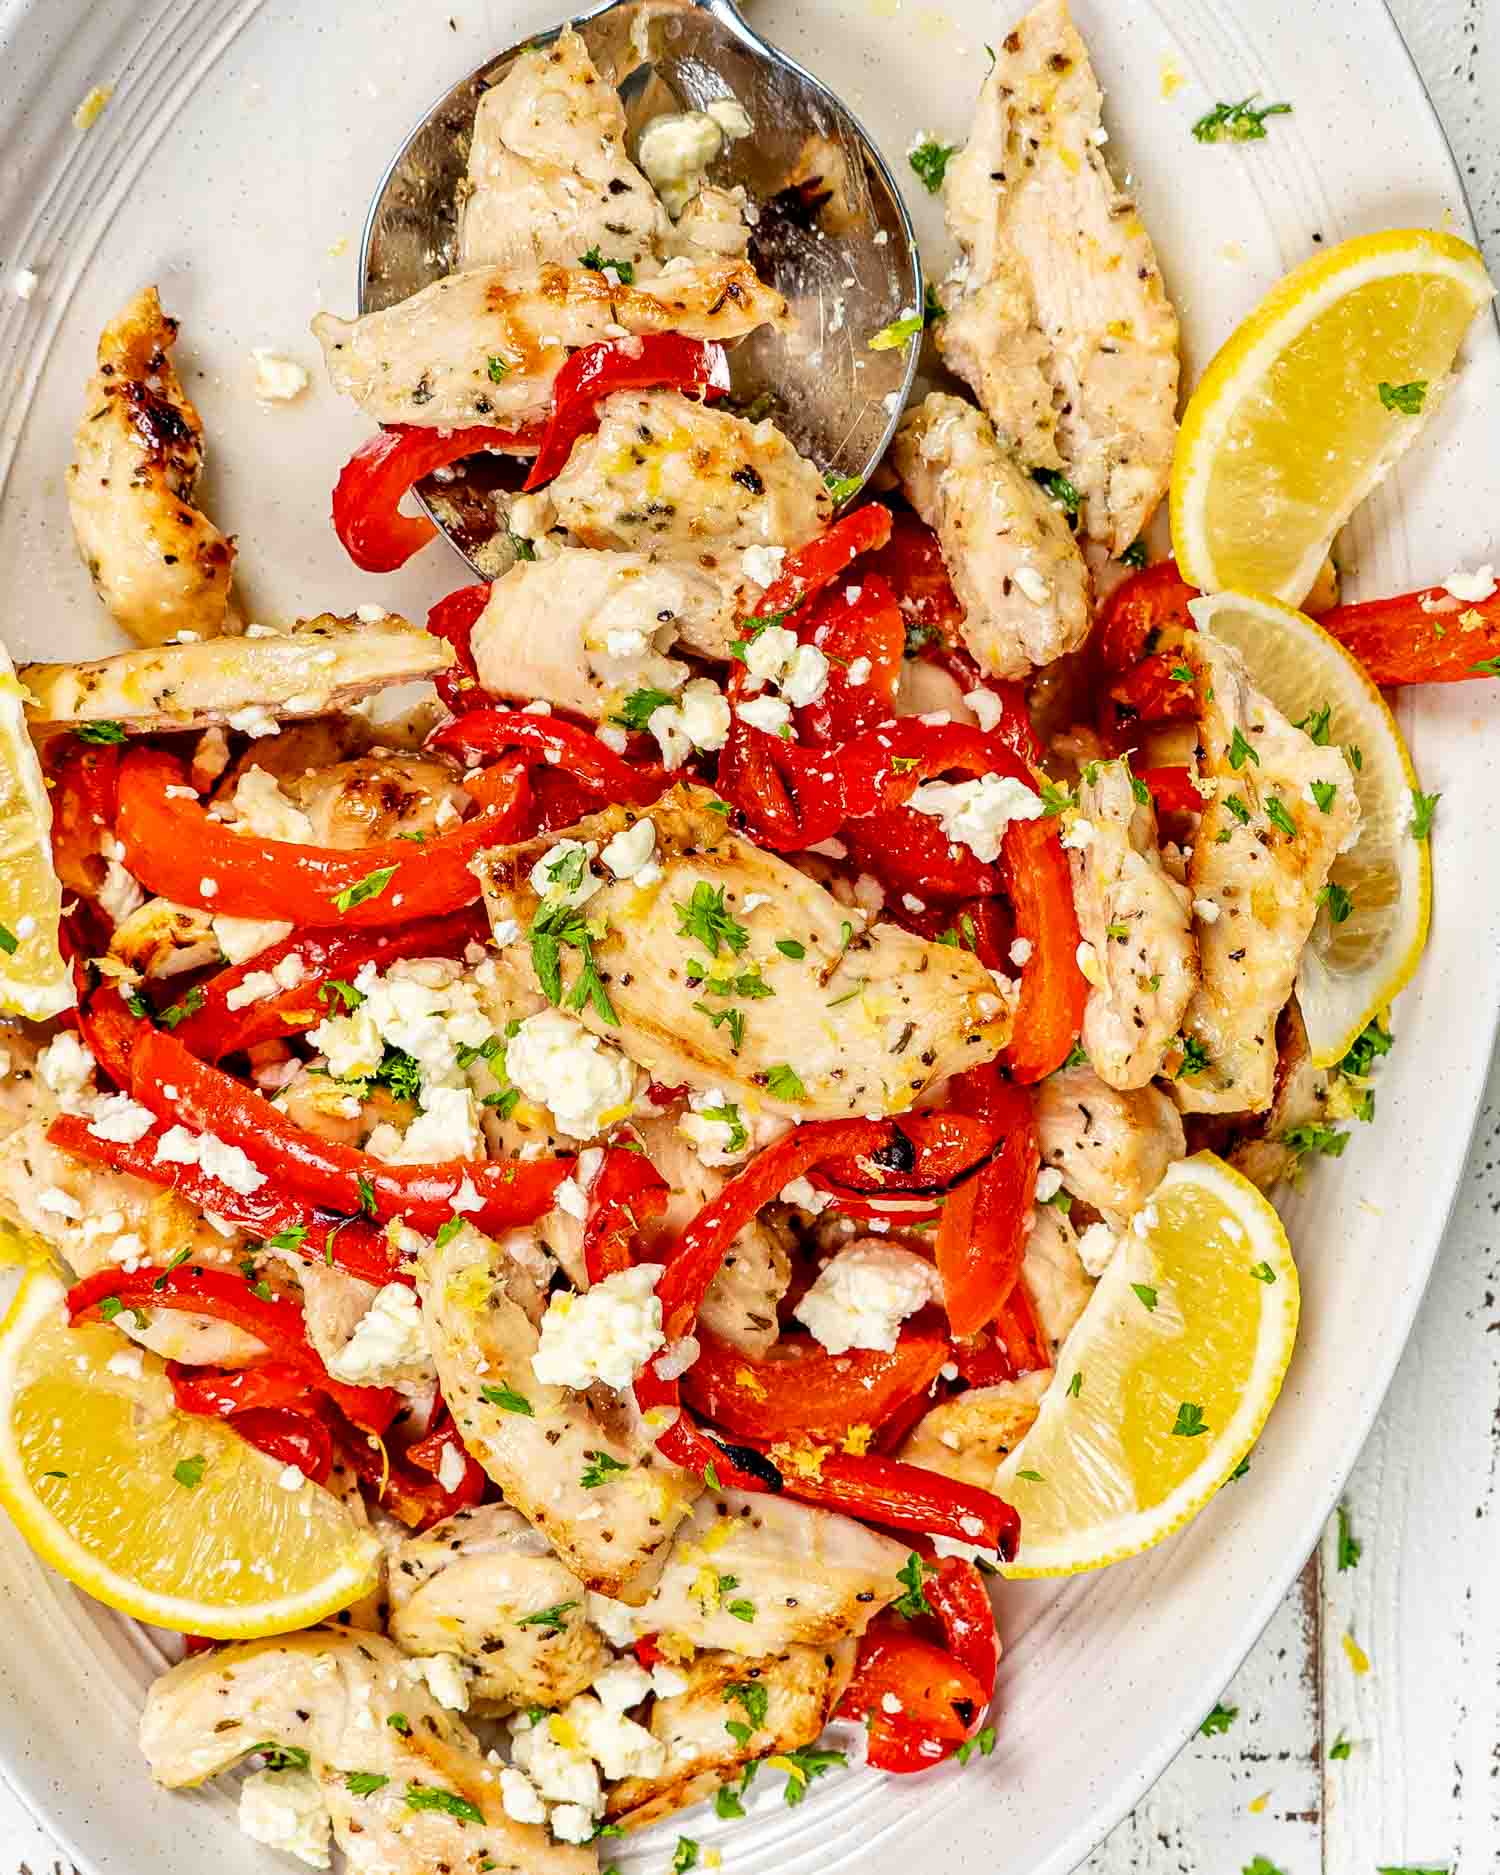
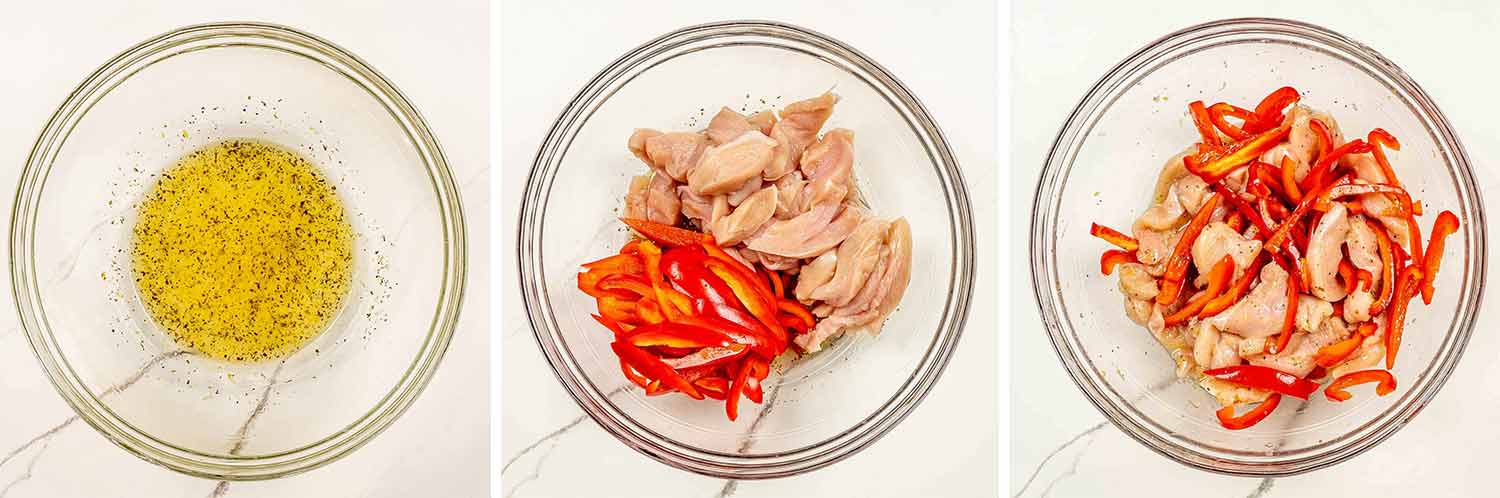
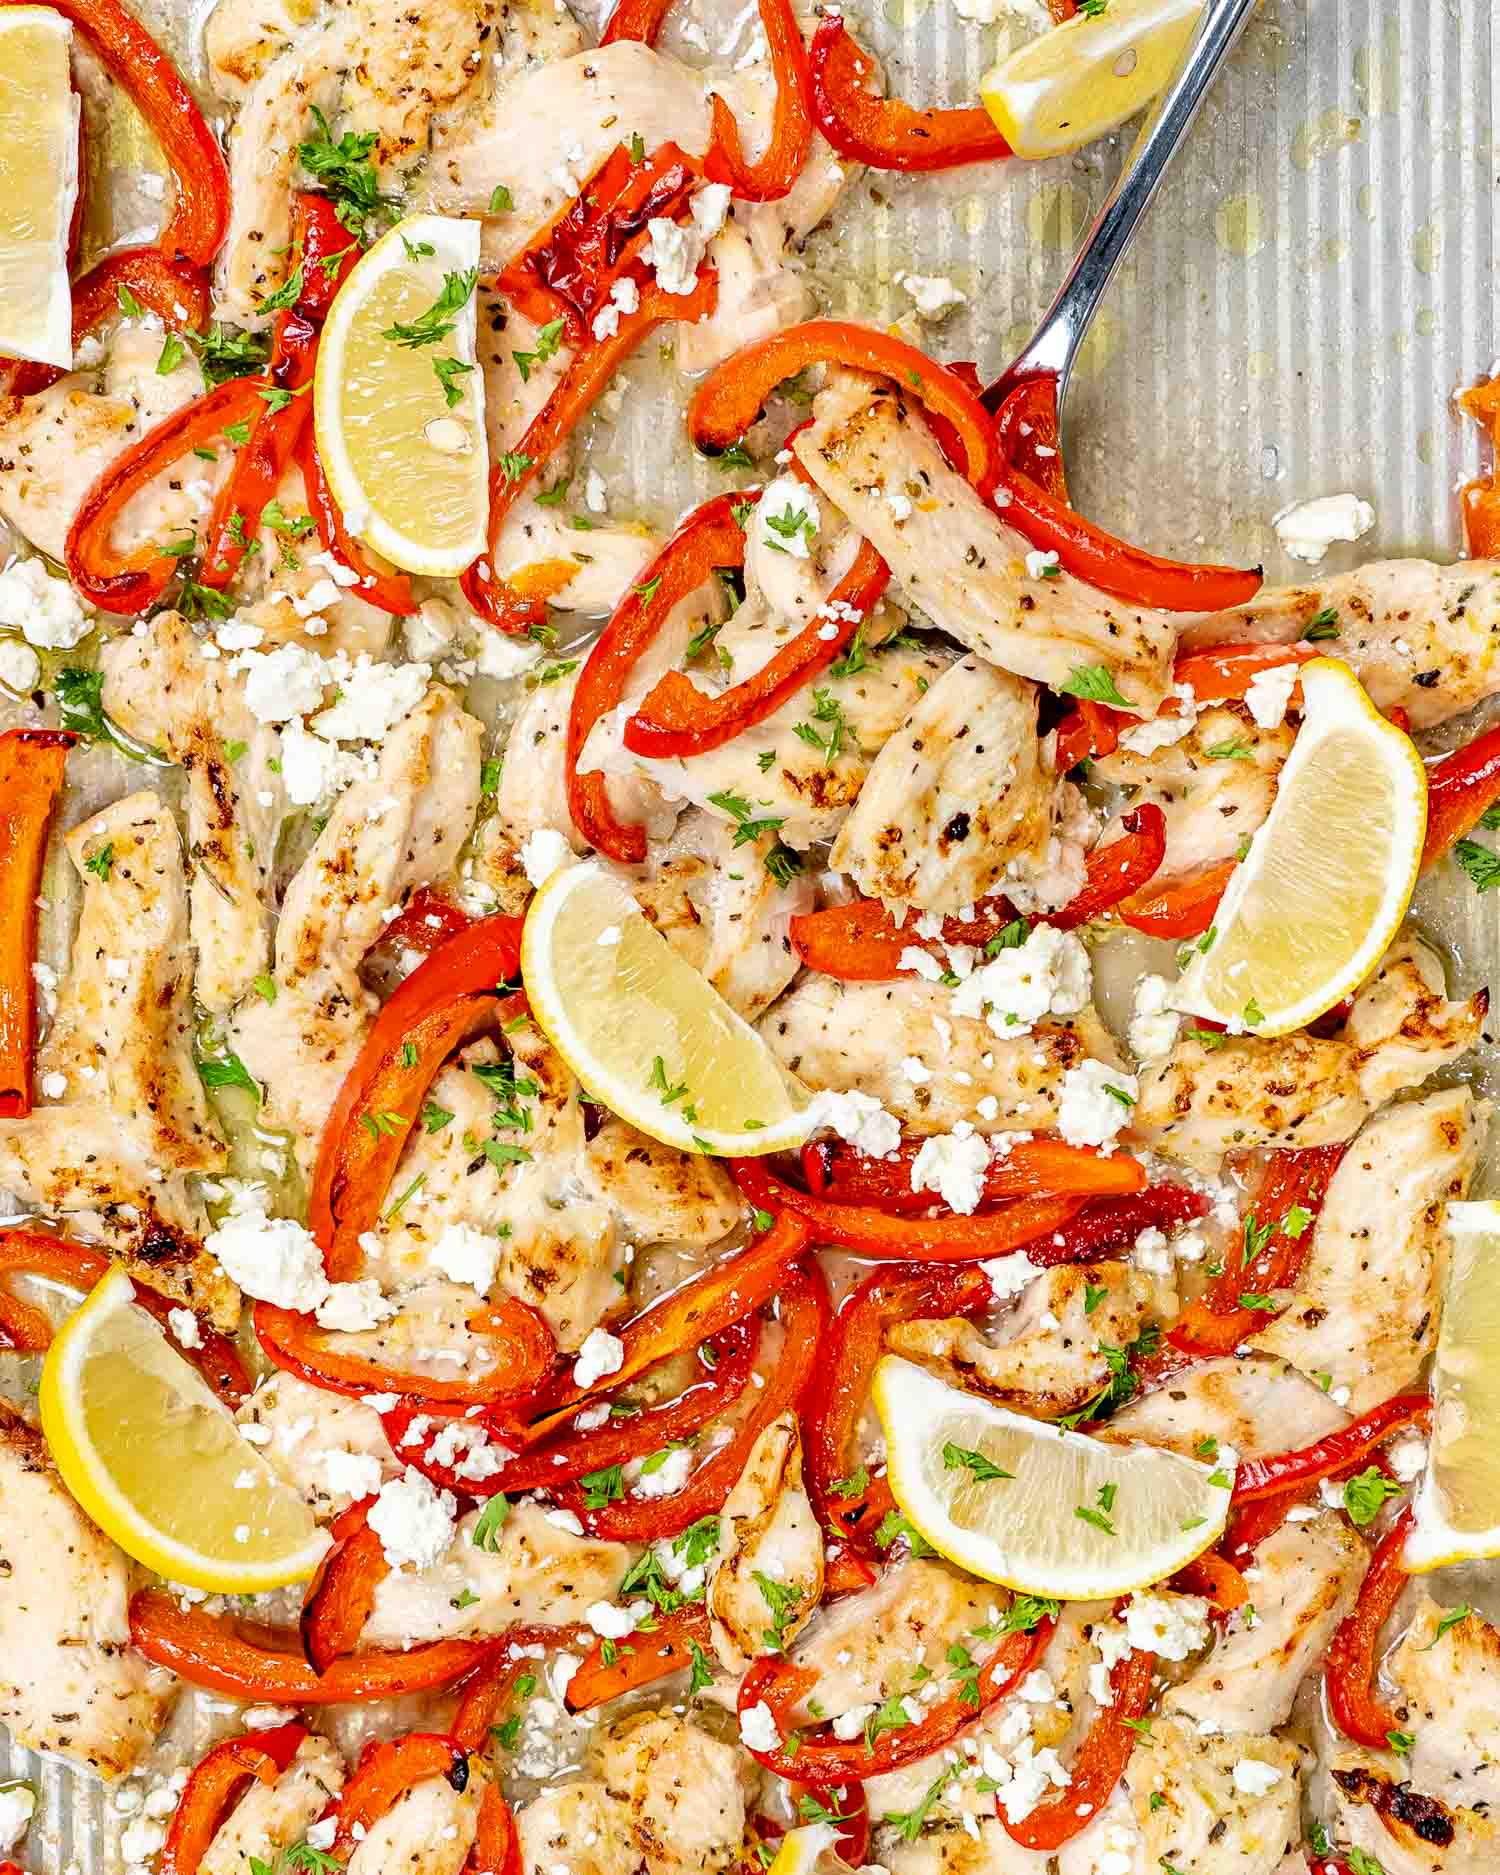
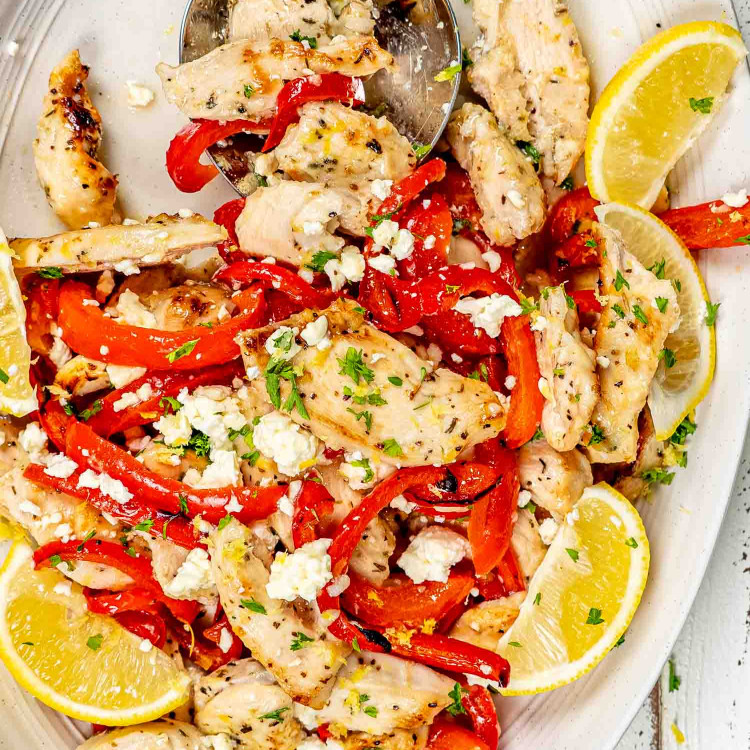
Sheet Pan Lemon Honey Garlic Chicken — juicy strips of chicken, caramelized peppers, sticky-sweet honey garlic sauce… and only one pan to clean. Weeknight win.
There are days I feel like cooking… and then there are days I open the fridge, see chicken, and immediately regret not ordering takeout. This recipe was born on one of those nights. One pan. Zero thinking. Big flavor. And almost no cleanup.
It’s sweet from the honey, garlicky in the best way, a little tangy from the lemon, and just fancy enough that you can sprinkle feta on top and pretend you planned it. I’ve made it more times than I can count lately, mostly when I’m too tired to be impressive, but still want dinner to taste like I tried.
Why You’ll Love This Lemon Honey Garlic Chicken
Because dishes are the enemy. One sheet pan. That’s it. Toss everything on there and call it a day.
The sauce is ridiculous. Honey, garlic, lemon, it bakes into this sticky, golden glaze that makes plain chicken feel like a main event.
It looks like you tried. Add some crumbled feta and lemon wedges and suddenly people think you’re fancy. You don’t need to correct them.
Zero brain power required. If you can whisk a bowl of sauce and spread things on a pan, you’re good.
Works with what you’ve got. Swap the peppers, skip the feta, use thighs, it forgives just about anything except overcooking.
Before You Start: Tips & Ingredient Notes
Cut the chicken into strips. Yes, strips. Not chunks, not cubes. Strips cook fast, soak up more sauce, and give you those golden edges we love. Bonus: they look like you did something fancy.
Use what you’ve got. No red bell pepper? Use yellow, green, or whatever’s hiding in the veggie drawer. This recipe isn’t precious, it’s flexible. Mushrooms, zucchini, even thin green beans all work.
Fresh lemon > bottled. I know you’ve got that plastic lemon in the fridge door. Put it down. The zest alone is worth using a real lemon. It makes the whole dish pop.
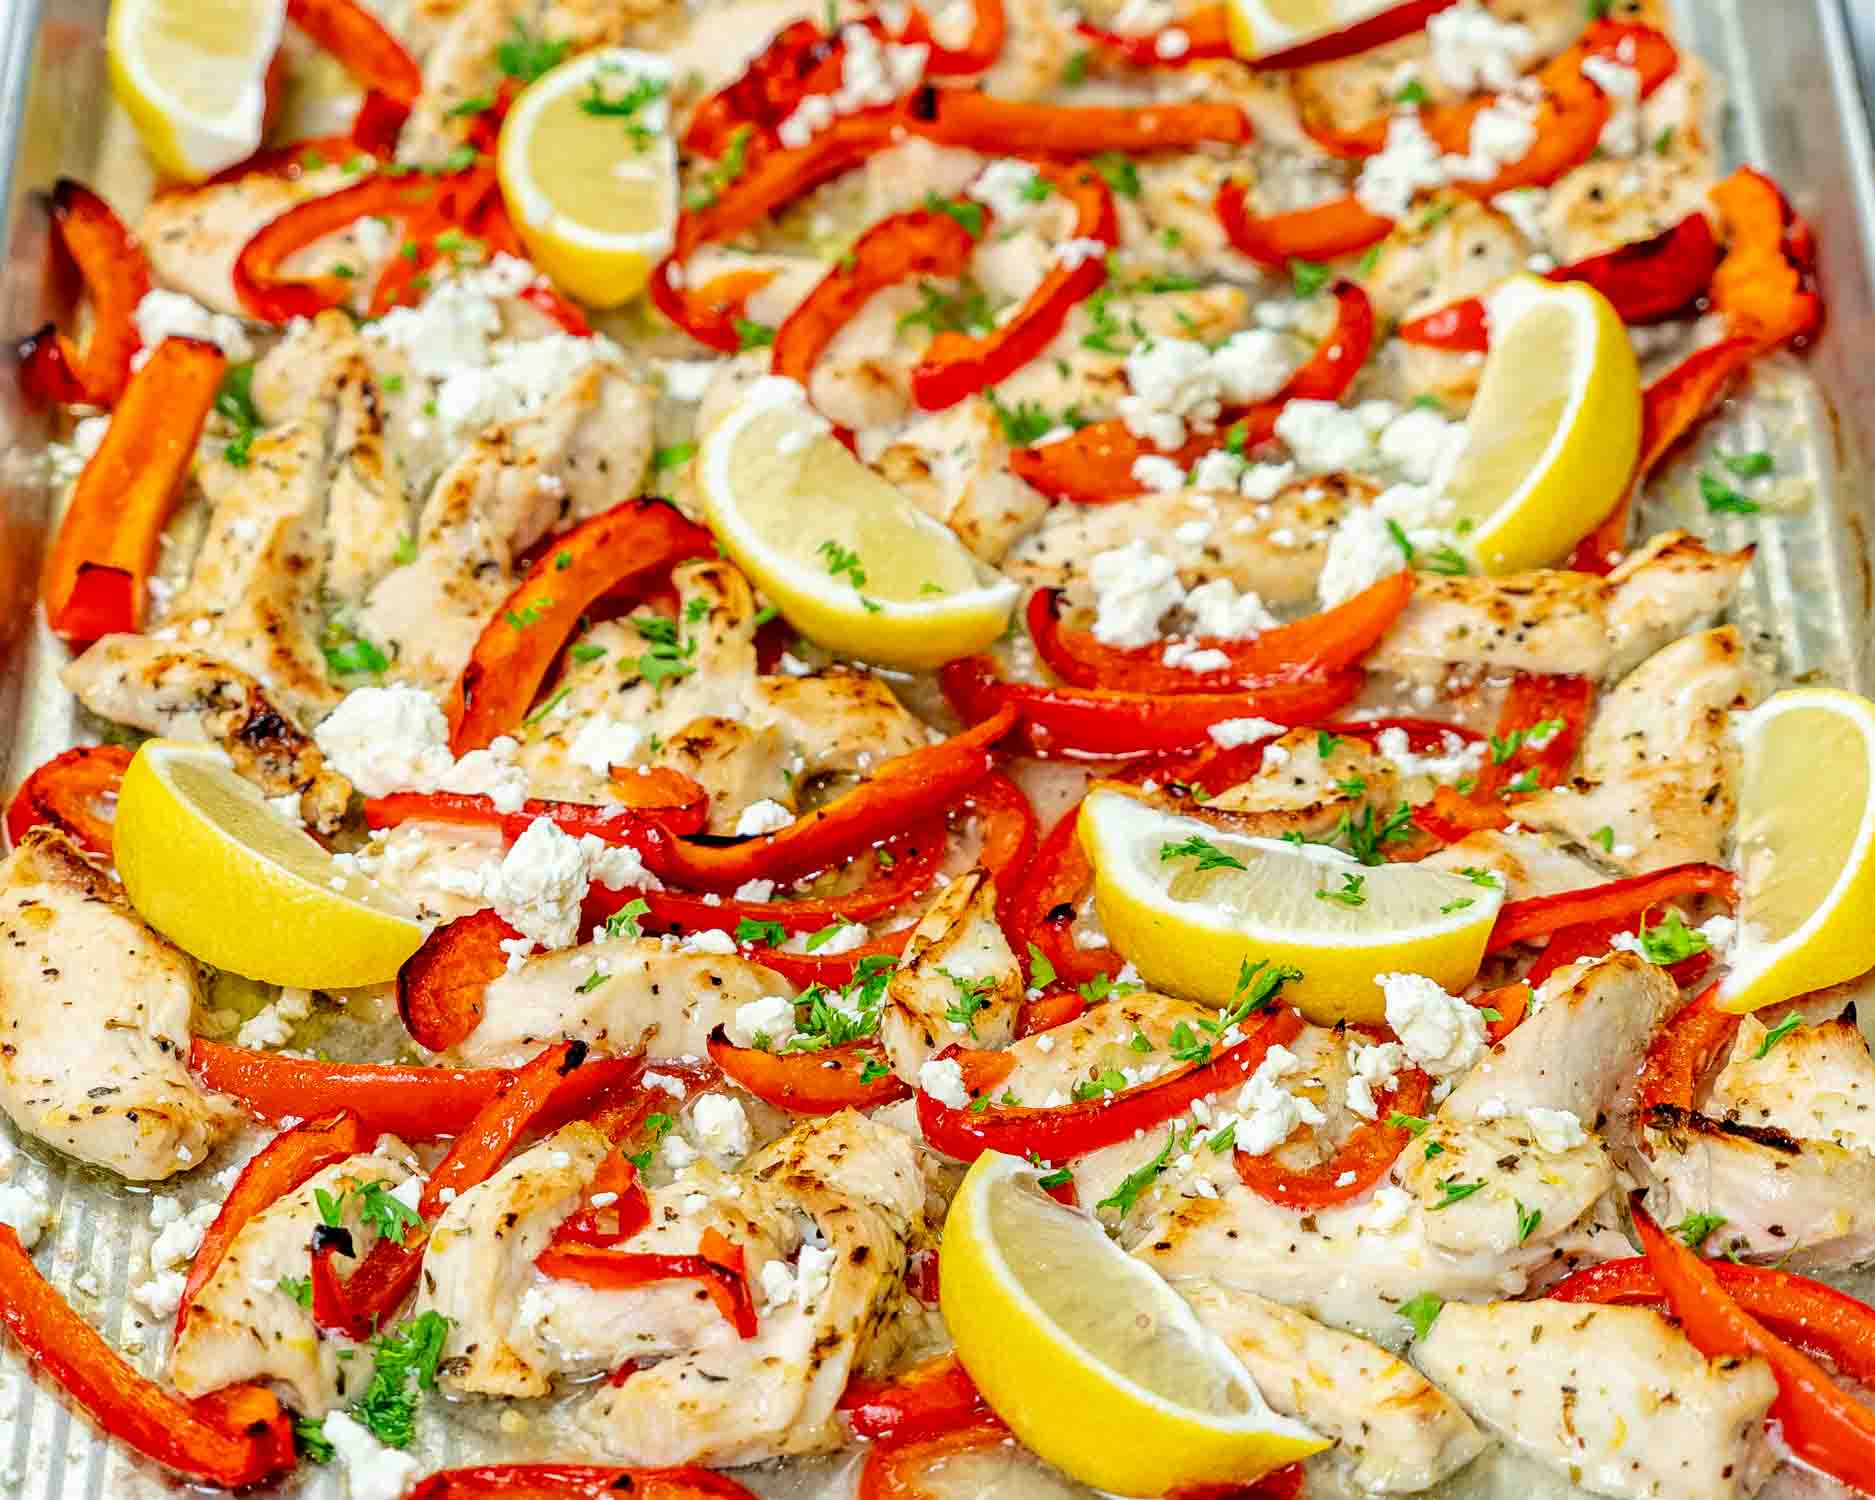
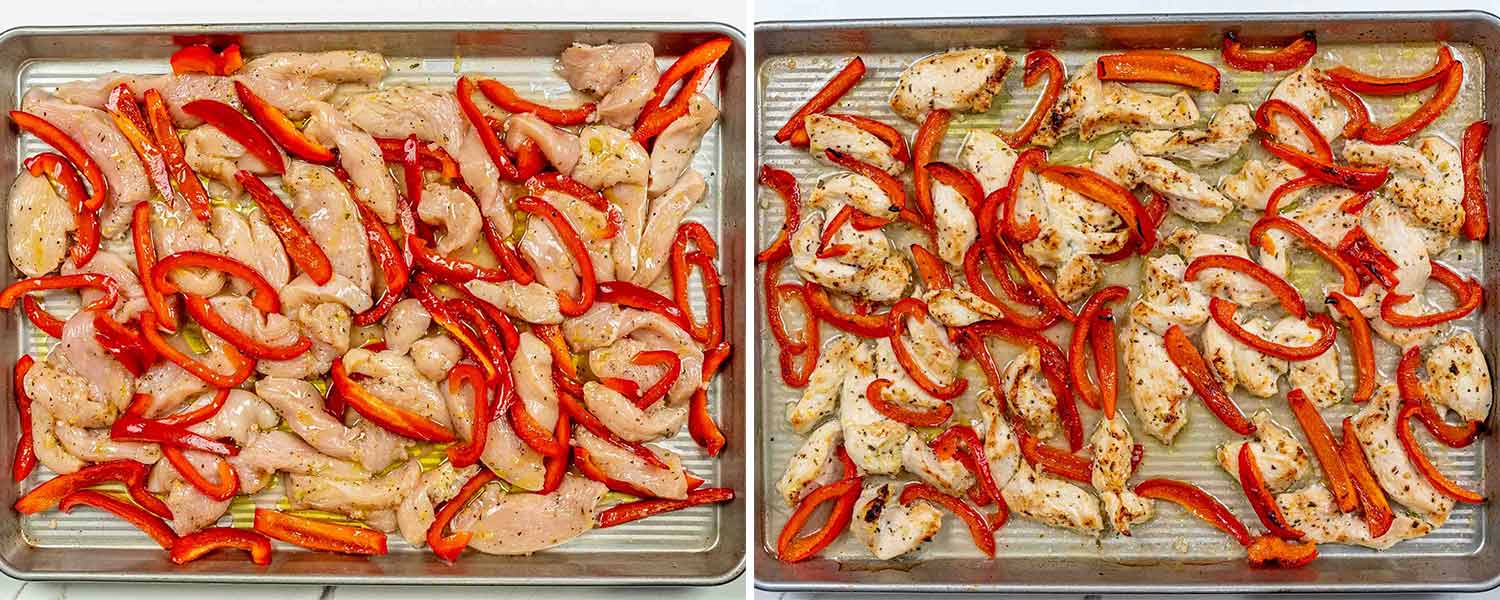
Don’t overcrowd the pan. If everything’s piled on top of each other, you’ll end up steaming the chicken instead of roasting it. Give it space to crisp up and caramelize. No one likes soggy sheet pan dinners.
Feta on top = salty magic. Don’t mix it in before baking. Crumble it over at the end so it stays tangy and creamy. You’re welcome.
How To Make Sheet Pan Lemon Honey Garlic Chicken
Here’s how I make it:
Crank it to 400°F (200°C) and line a baking sheet with parchment paper so cleanup doesn’t ruin your night.
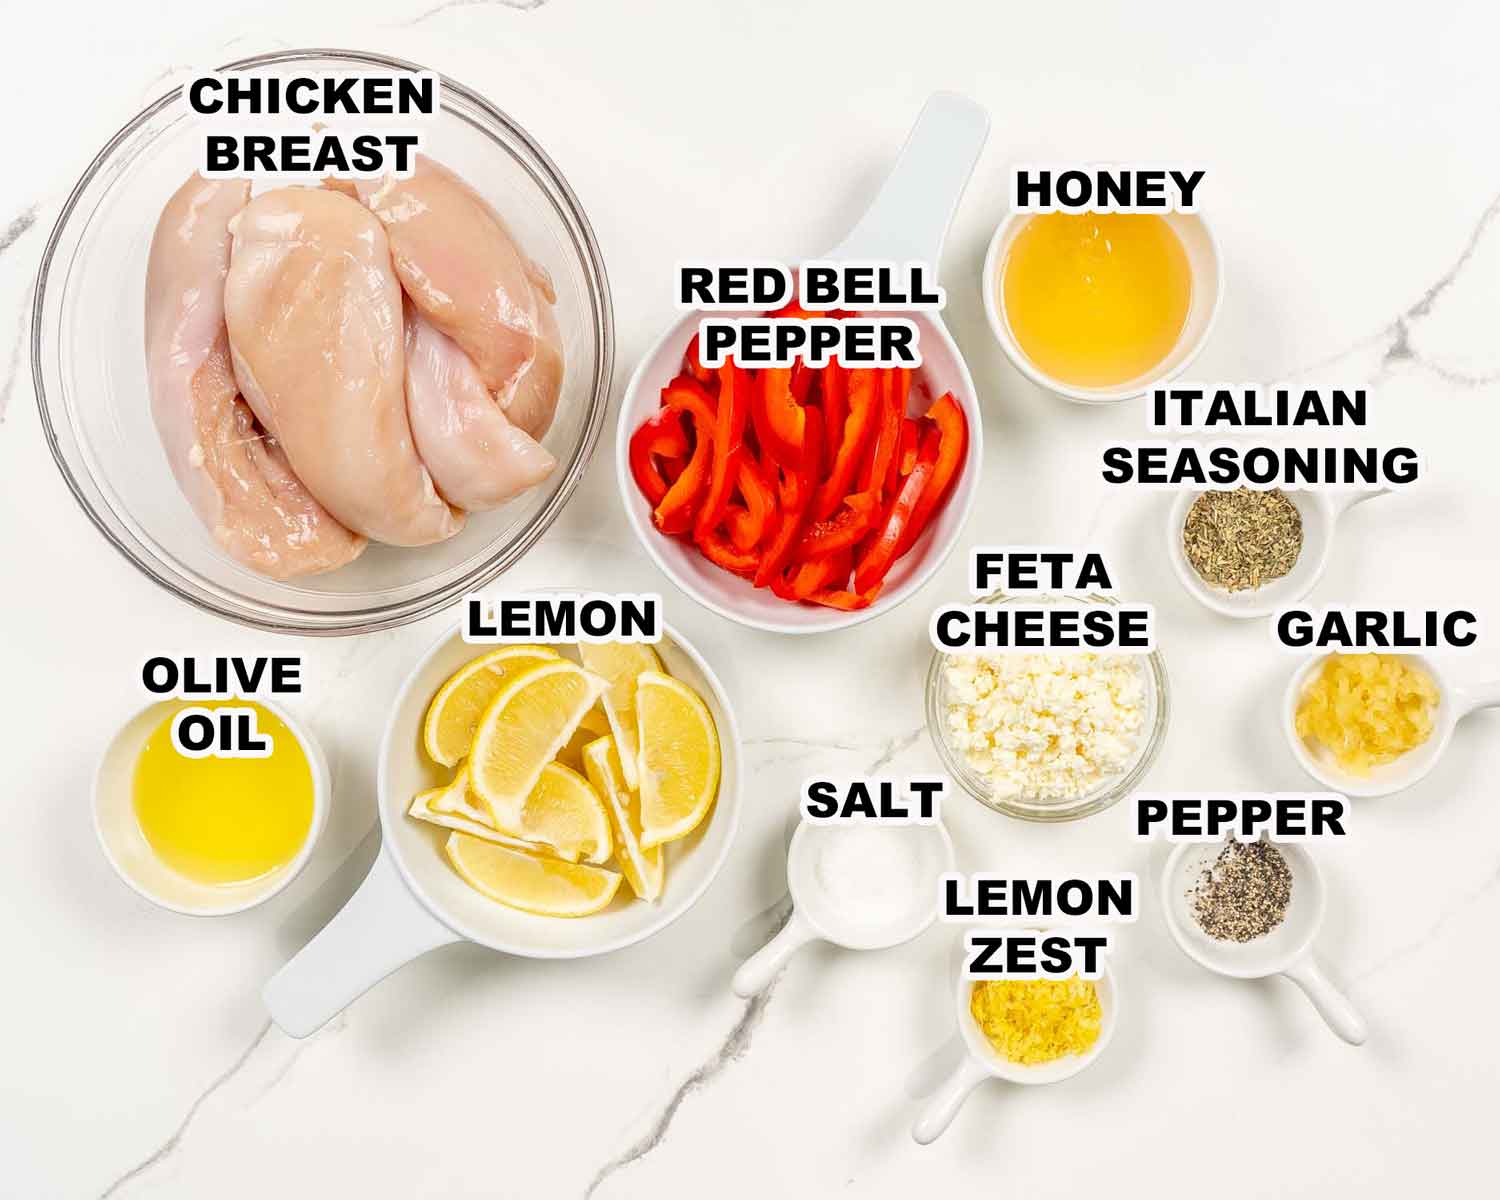
In a big bowl, whisk together the olive oil, honey, minced garlic, lemon zest, Italian seasoning, salt, and pepper. It should smell like you know what you’re doing, because you do. Add the chicken strips and bell peppers to the bowl. Give everything a good toss so it’s coated in that glossy, sticky marinade. You want every bite to taste like flavor, not just the first one.
Spread it all out on your sheet pan. No overlapping, this isn’t a chicken pile. Bake for 20–25 minutes, or until the chicken hits 165°F (75°C) and the edges start to caramelize. That’s when the magic happens.
Let it sit for 5 minutes, it keeps the chicken juicy and gives you a second to feel proud of yourself. Then crumble feta over the top and serve it with lemon wedges. Boom. Dinner.
This one’s become a regular in our dinner rotation, because it just works. Easy, quick, and that sweet lemon-garlic glaze? Still gets me every time. If it didn’t hold up, it wouldn’t be on the blog. Simple as that.
How To Serve It
This chicken is all about that sticky-sweet glaze, so you’ll want something to soak it up:
Absolutely. Boneless, skinless thighs work great and stay super juicy. Just cut them into strips like the recipe calls for and you’re good to go.
What vegetables can I swap in?
Whatever you’ve got. Zucchini, mushrooms, onions, broccoli, cherry tomatoes, this is a clean-out-the-fridge kind of dish. Just make sure everything’s cut to cook evenly with the chicken.
I don’t like feta. Can I skip it?
I mean… you can, but I’ll silently judge you. Feta adds that salty, creamy, tangy magic that pulls the whole thing together. But hey, if you must, swap in goat cheese or Parmesan. Just know the feta is doing a lot of the heavy lifting here.
Can I make it ahead of time?
Totally. You can mix the marinade and chicken the night before and keep it in the fridge. Just dump it all on a sheet pan and bake when you’re ready.
How spicy is it?
Not at all, as written, it’s kid-and spice-wimp friendly. Want heat? Add red pepper flakes or a drizzle of chili oil.
Storage + Reheating
Fridge:
Leftovers? Lucky you. Store them in an airtight container for up to 3 days.
Freezer:
Yes, you can freeze it. Just let it cool completely, then stash it in a freezer-safe container. It’ll keep for up to 3 months, just don’t forget about it back there.
To Reheat:
Microwave works fine for a quick fix, but if you want that roasted edge back? Pop it in a 350°F (175°C) oven for 10–12 minutes. Add a fresh squeeze of lemon and pretend it’s Day 1.
Try These Sheet Pan Dinners Next
Before You Begin! If you make this, please leave a review and rating letting us know how you liked this recipe! This helps our business thrive & continue providing free recipes.
Sheet Pan Lemon Honey Garlic Chicken
Prep 15 minutesminutes
Cook 25 minutesminutes
Total 40 minutesminutes
Sweet, sticky, zesty, and ready in under 40, this sheet pan lemon honey garlic chicken is a weeknight lifesaver. Juicy chicken strips roasted with red peppers in a garlicky honey-lemon glaze, finished with a salty hit of feta. One pan, big flavor, almost no cleanup.
Before You Begin! If you make this, please leave a review and rating letting us know how you liked this recipe! This helps our business thrive & continue providing free recipes.
Instructions
Preheat the oven to 400°F (200°C) and line a baking sheet with parchment paper.
In a large bowl, whisk together olive oil, honey, minced garlic, lemon zest, Italian seasoning, salt, and black pepper until well combined.
Add the chicken breasts and peppers to the bowl and toss everything well, making sure to coat everything evenly.
Spread the chicken and veggies on the prepared baking sheet. Transfer the baking sheet to the oven and bake for 20-25 minutes or until the chicken is cooked through and the internal temperature reaches 165°F (75°C).
Once the chicken is done, remove the baking sheet from the oven and let it rest for 5 minutes.
Sprinkle crumbled feta cheese over the top of the chicken and red bell peppers.
Serve the chicken and red bell peppers with lemon wedges.
Notes
Chicken strips cook faster and stay juicier. Just make sure they’re roughly the same size so everything roasts evenly.
Don’t crowd the pan. Overlapping chicken = steaming, not roasting. Give everything space to caramelize.
Use fresh lemon. The zest and juice make the whole thing sing, skip the bottled stuff.
Add more veggies. Mushrooms, zucchini, red onion, whatever’s in the fridge works.
Feta is not optional. OK, technically it is… but I love it so much I almost put it in bold. That salty finish? It makes the dish.
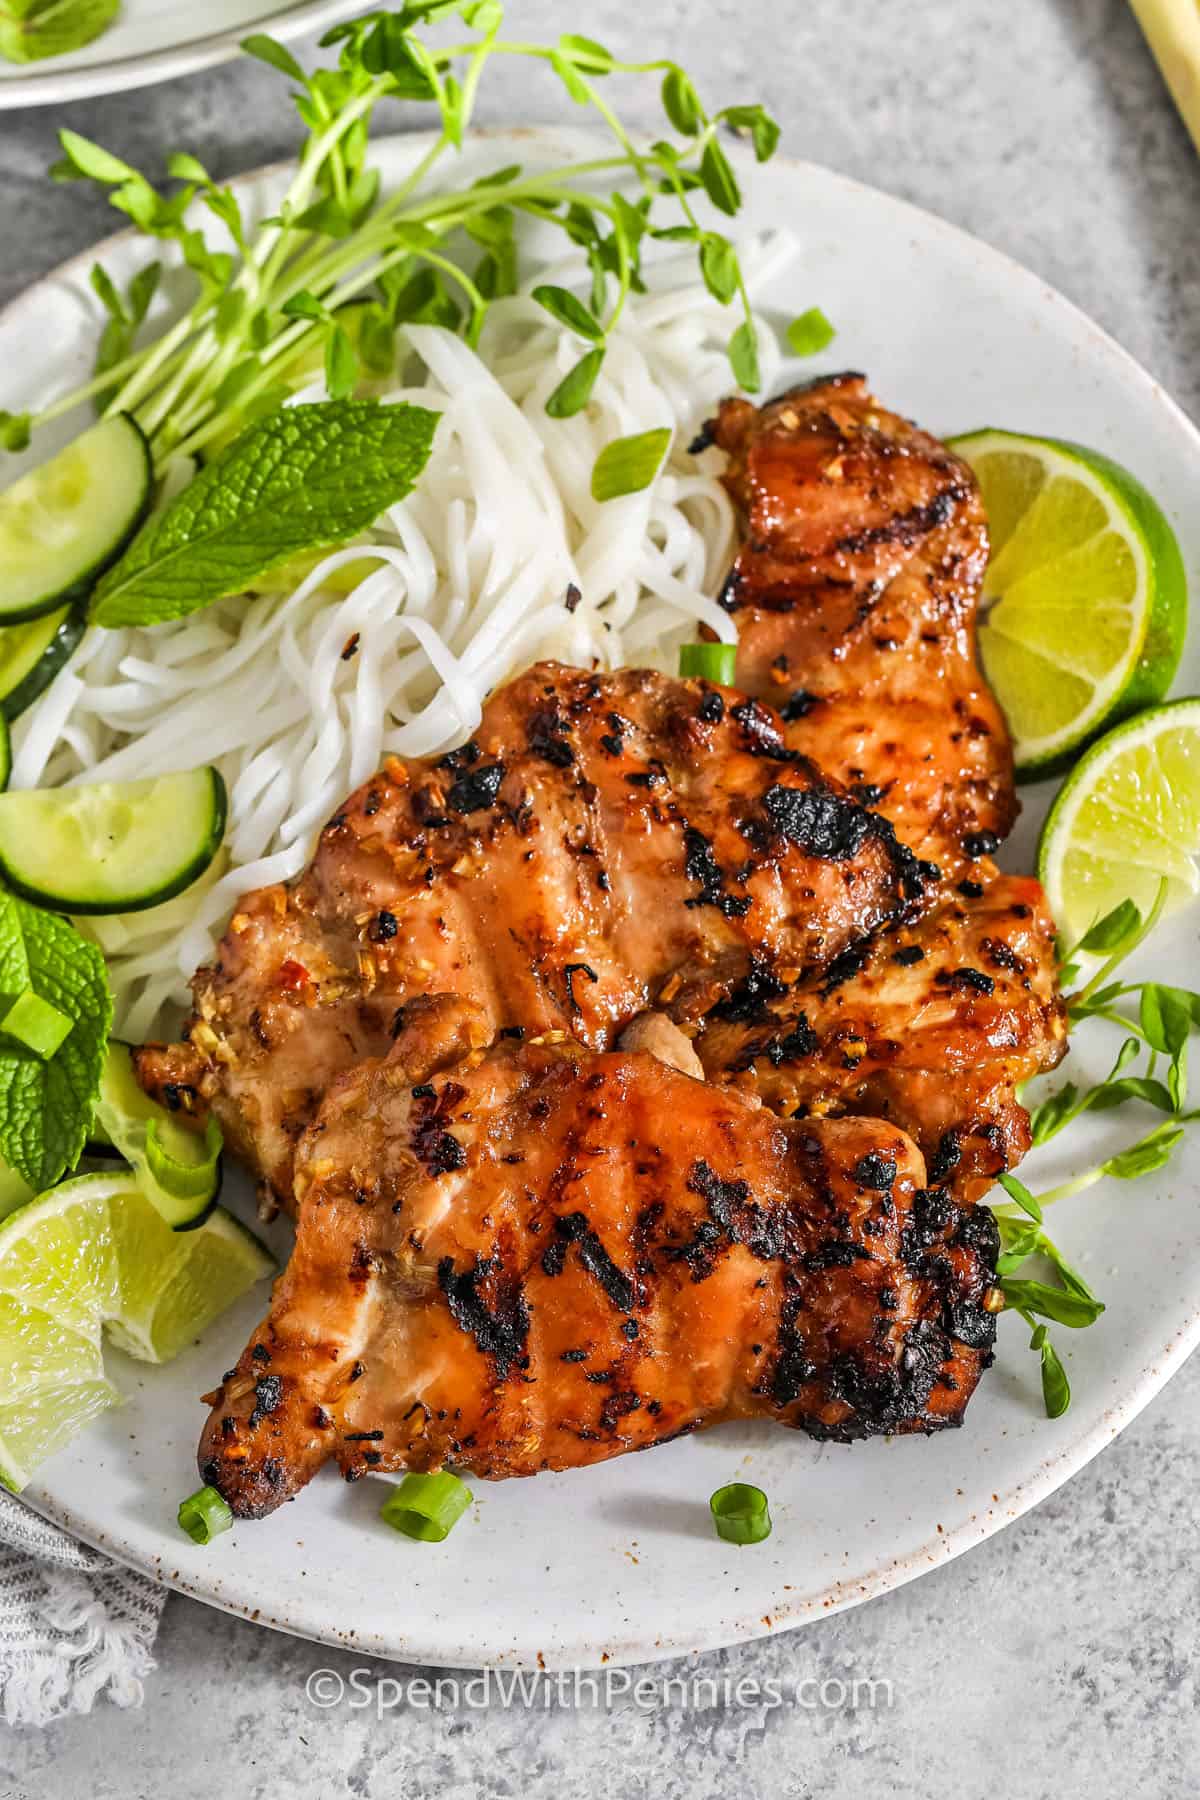
This lemongrass chicken recipe is easy to make. Chicken thighs are coasted ina flavorful lemongrass marinade and grilled until juicy and tender.
What is Lemongrass Chicken?
Lemongrass chicken is popular in Thai and Vietnamese cuisine, among many others. This dish is reminiscent of a favorite I enjoy at a local Vietnamese restaurant; it’s flavorful and pairs well with almost any fresh side.
Lemongrass itself is an herb with a light lemon scent and adds great flavor to marinades. Most grocery stores carry stalks of lemongrass near the other fresh herbs. You can also replace it with a lemongrass paste if you’d prefer.
To prepare lemongrass, peel off the tough outer layers and finely chop or mince the tender center. More details on preparation below!
Ingredient Tips for Lemongrass Chicken
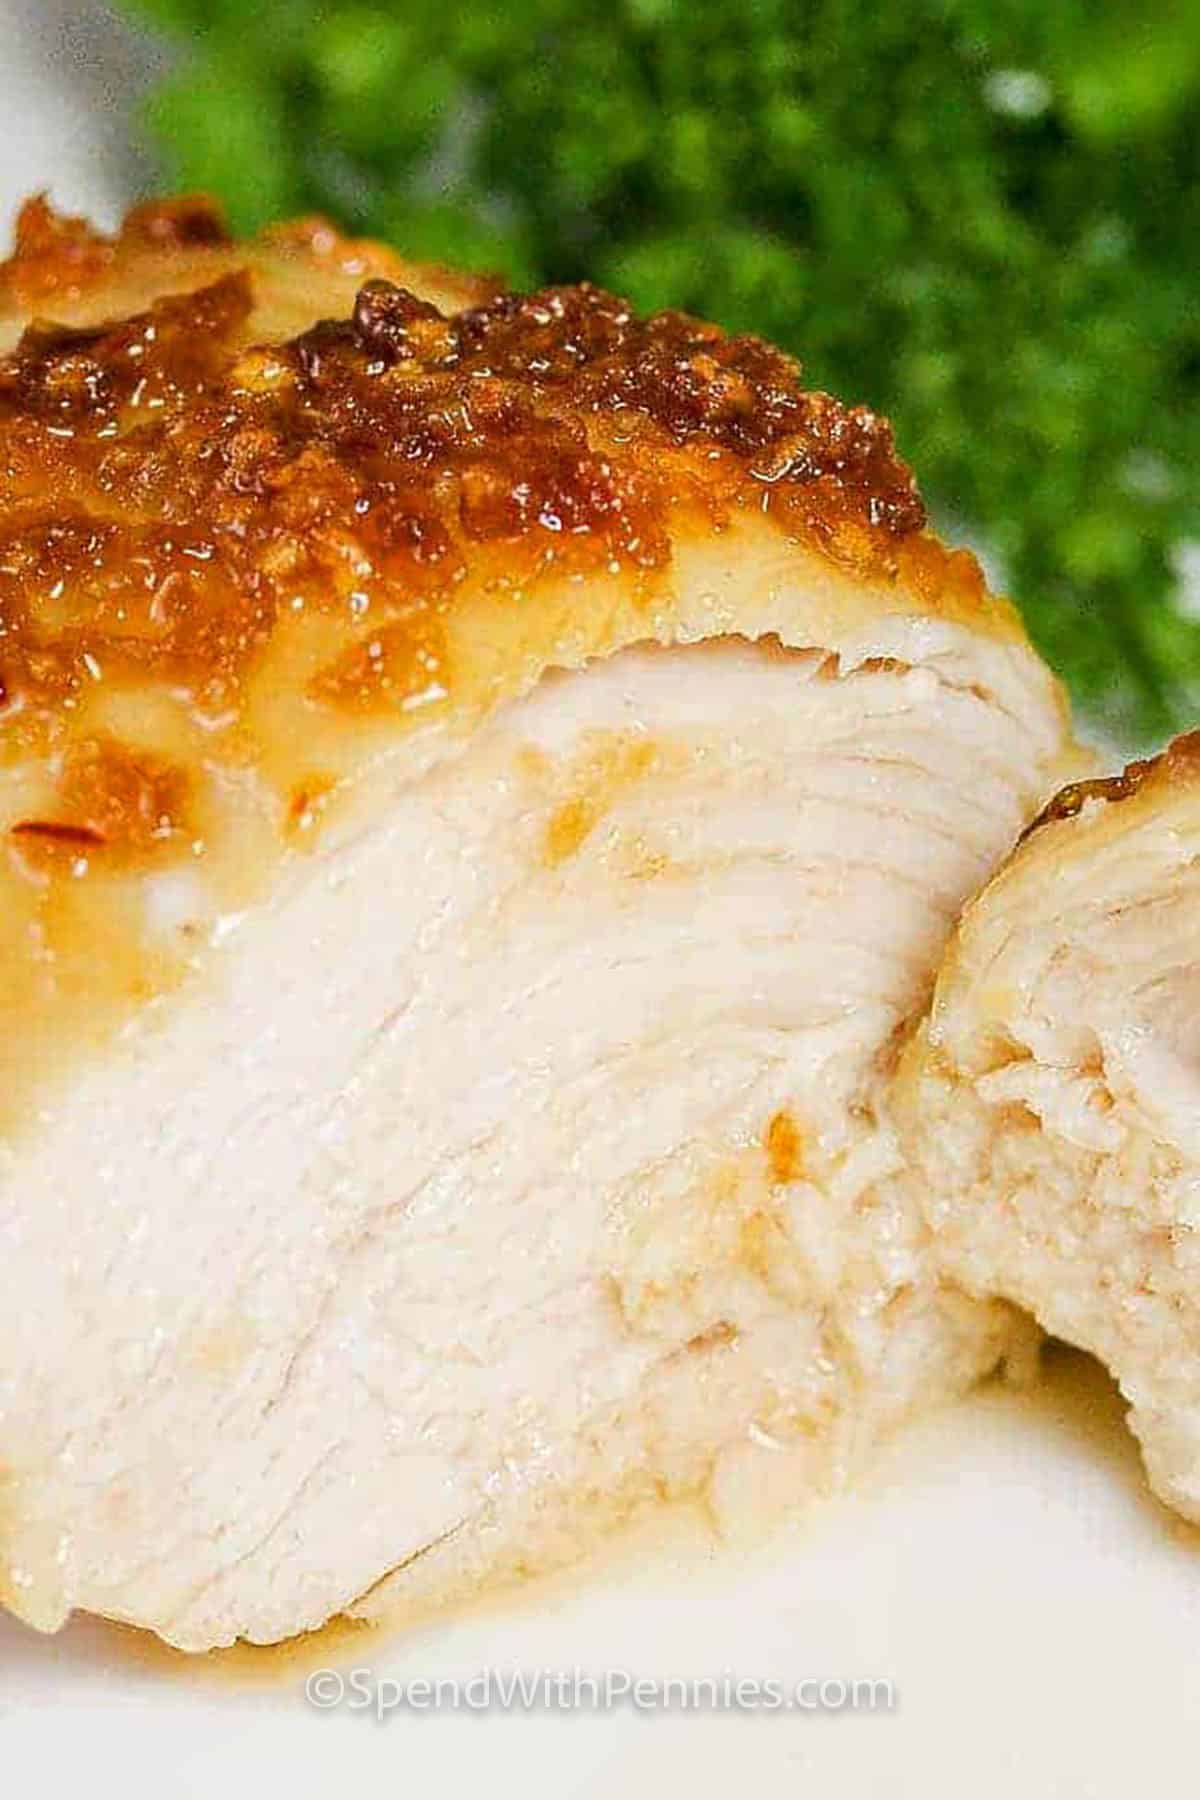
Chicken: Boneless skinless chicken thighs are my first choice for this recipe as they are juicy and delicoius. You can use chicken cutlets or breasts. If using chicken breasts, I recommend pounding it to ½-inch thick.
Lemongrass: Lemongrass is the key ingredient in this recipe, adding a delicate lemon flavor. You can also use lemongrass paste (check the recipe notes). While it’s not the same flavor, a bit of lemon zest can be used as a substitute.
Aromatics: Garlic and ginger add a lot of flavor to this recipe, dried is not recommended.
Fish sauce: I love the savory flavor fish sauce adds to the marinade.
Brown sugar: Brown sugar adds sweetness and helps the chicken to caramelize. It can be replaced with honey.
Variations
Spice up the marinade with extra red pepper flakes, black pepper, Thai basil, sriracha, Thai chili paste, or gochujang.
To prepare lemongrass for this recipe, cut the stalk into pieces 3 to 4 inches long and remove the tough, woody outer layers. Finely chop the tender inside portion.
Storing Leftover Lemongrass Chicken
Keep leftover lemongrass chicken in a covered container in the refrigerator for up to 4 days and freeze portions in zippered bags for up to a month.
Reheat lemongrass chicken in the microwave or air fryer and serve as a new meal with sweet chili sauce, or add leftovers to a quick stir fry or a coconut curry soup.
Did you enjoy this Lemongrass Chicken Recipe? Be sure to leave a comment and rating below.
5 from 3 votes↑ Click stars to rate now! Or to leave a comment, click here!
Lemongrass Chicken
This lemongrass chicken has a sweet and savory marinade and is grilled to juicy perfection.
Prep Time 1 hourhour10 minutesminutes
Cook Time 6 minutesminutes
Total Time 1 hourhour16 minutesminutes
Prevent your screen from going dark
To prepare lemongrass, cut it into pieces 3 to 4 inches long and remove the tough, woody outer layers. Finely chop the tender inside portion.
In a medium bowl, combine brown sugar, soy sauce, fish sauce, lime juice, lemongrass, ginger, garlic, and red pepper flakes if using.
Add the chicken thighs and toss well to coat. Marinate at least 1 hour or up to 8 hours.
Preheat the grill to medium-high. Cook the chicken 3 to 4 minutes per side or until it reaches 165°F in the thickest part.
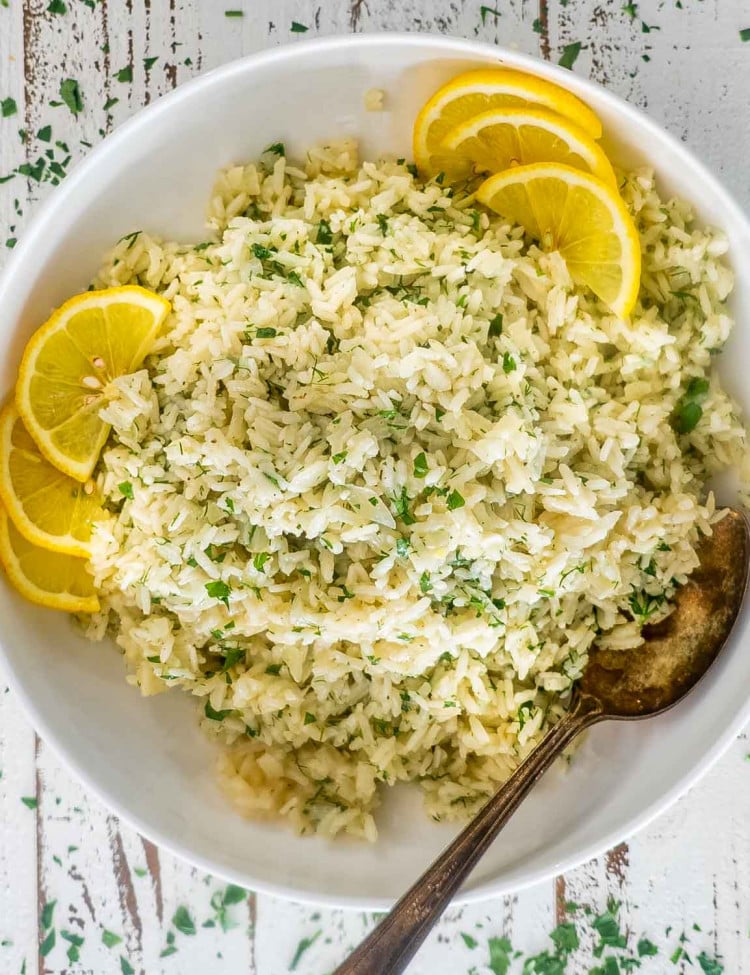
Lemongrass subsitute: You can replace lemongrass with a lemongrass paste if you’d prefer. Chicken breasts: If using chicken breasts in place of chicken thighs, pound the breasts to ½-inch thickness before marinating and grill 6 to 7 minutes per side. Serving suggestion: Our favorite way to serve this chicken is with rice noodles or over rice with fresh lime, fresh vegetables such as cucumbers, bean sprouts, pea shoots, and fresh herbs like basil, cilantro, and/or mint. Store leftovers in an airtight container in the refrigerator for up to 4 days.
Holly Nilsson is the creator of Spend With Pennies, where she creates easy, comforting recipes made for real life. With a passion for nostalgic flavors and simplified techniques, Holly helps busy home cooks create delicious meals that always work. She is also the author of “Everyday Comfort,” which promises to inspire even more hearty, home-cooked meals. See more posts by Holly
This post may contain affiliate links. Please read my disclosure policy.
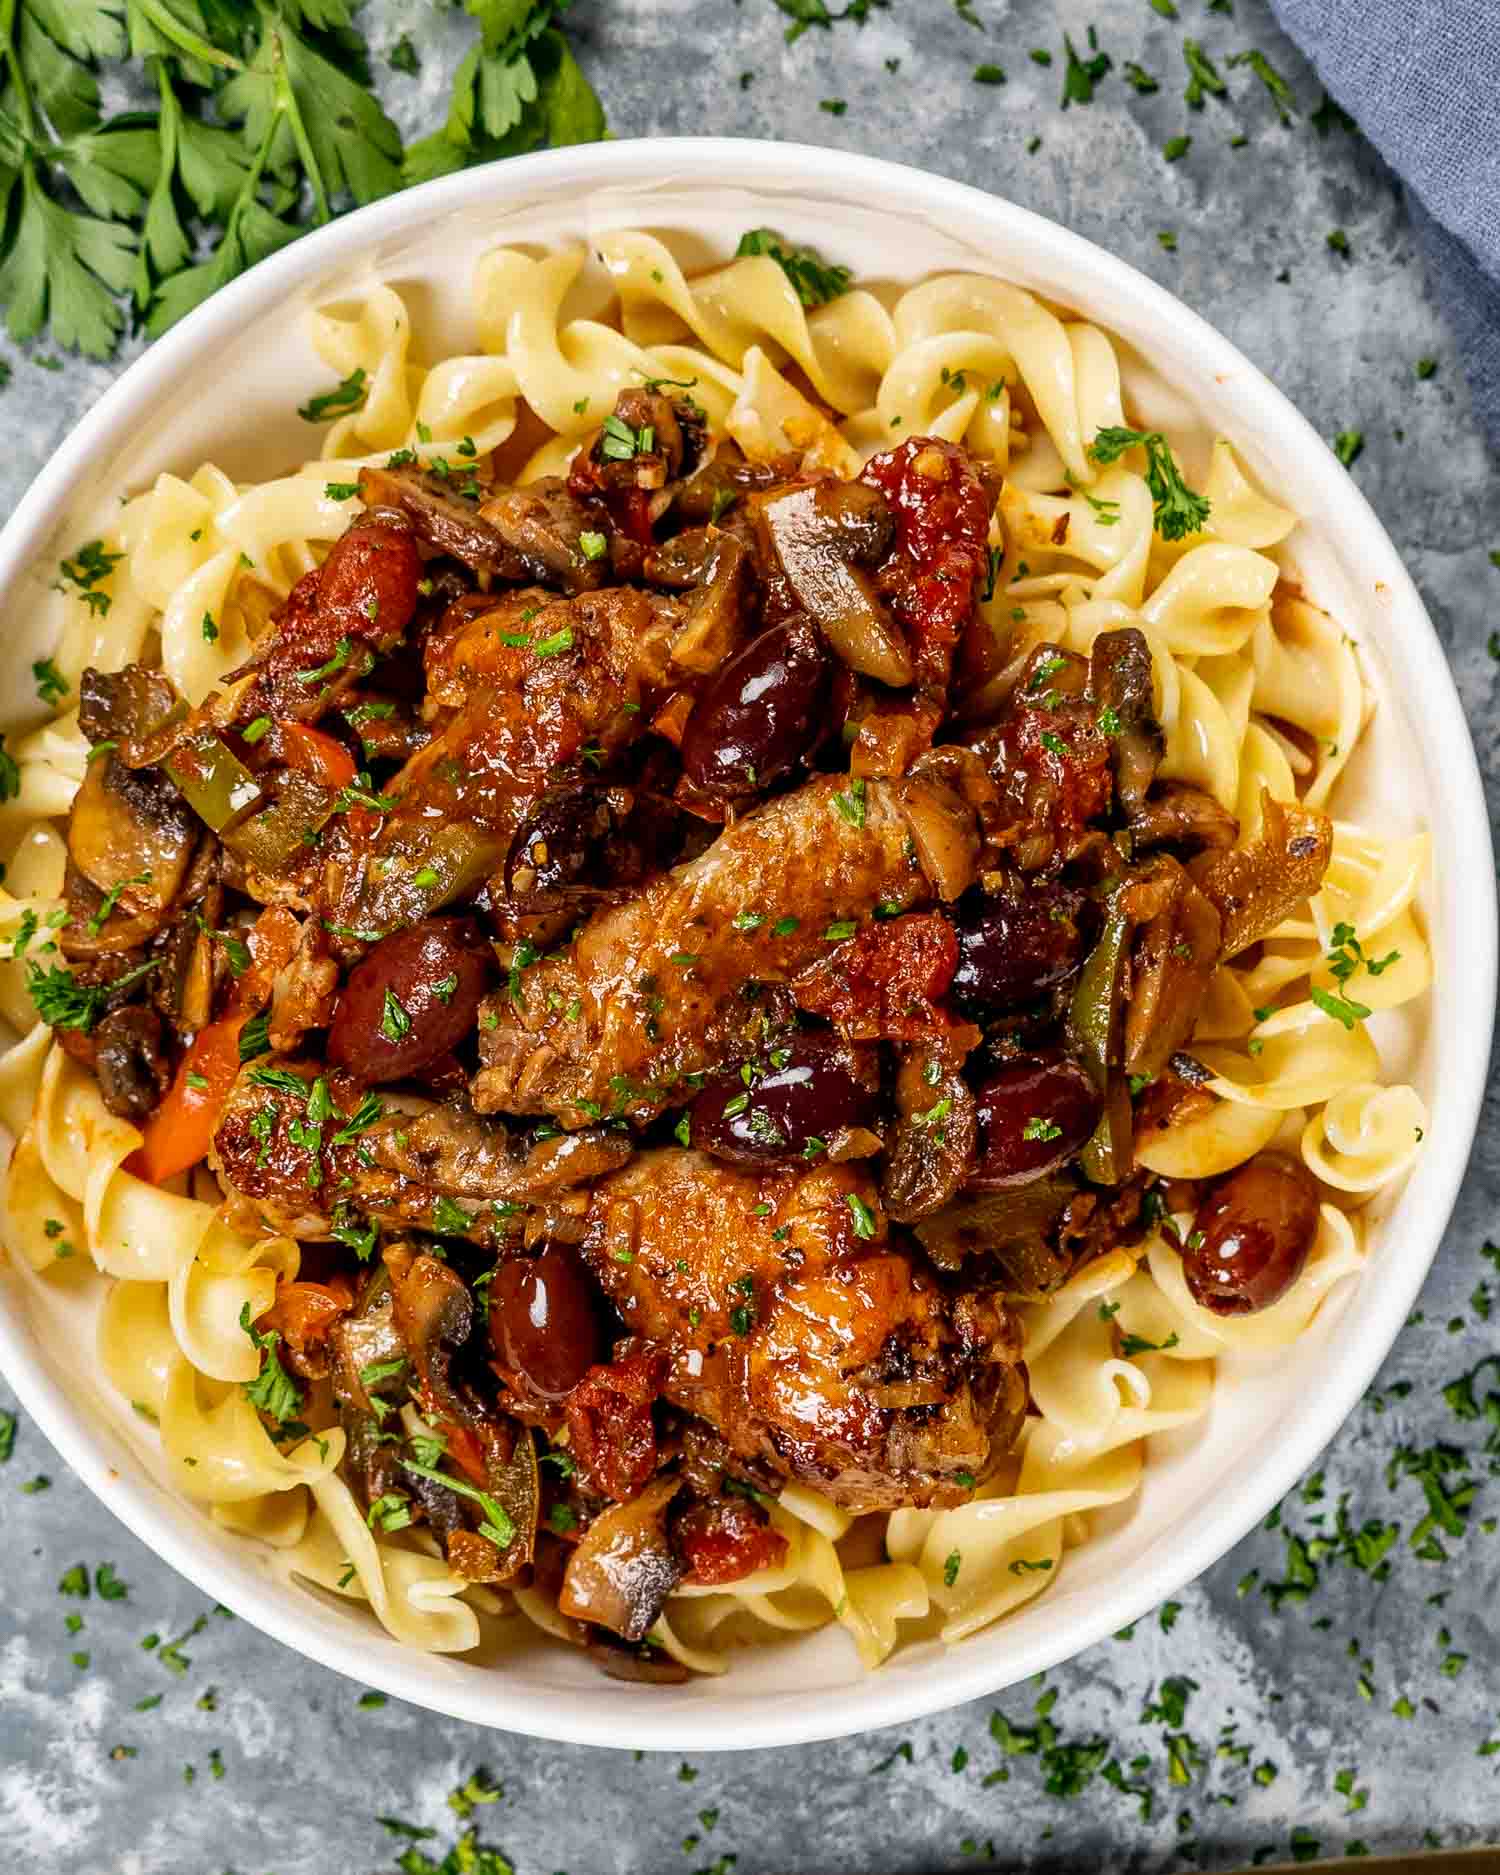
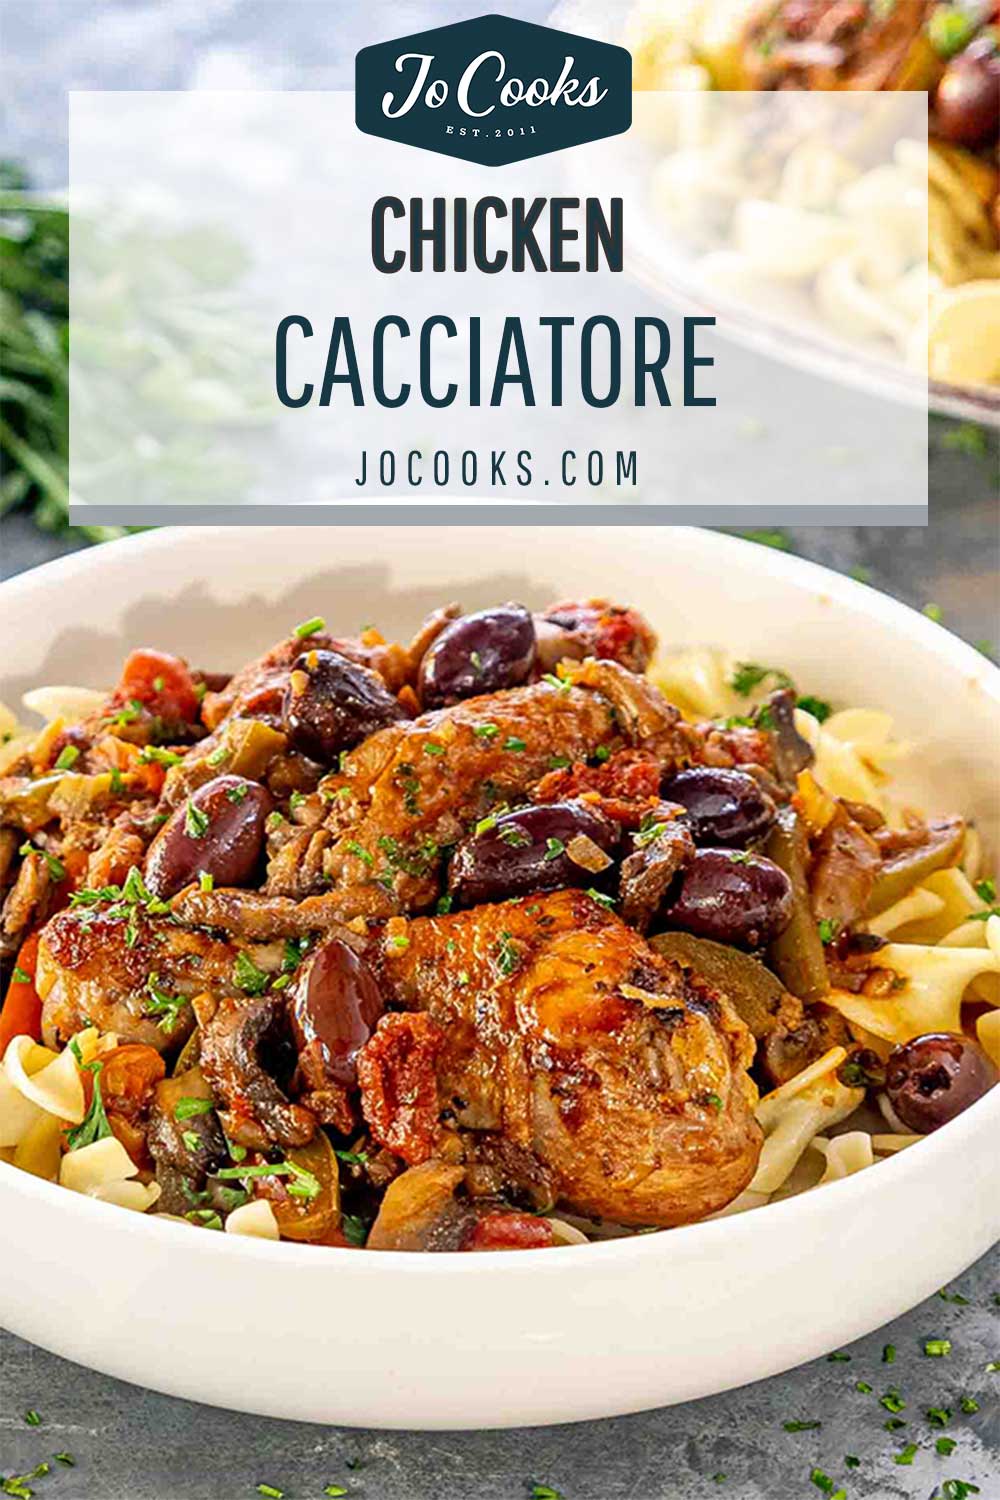
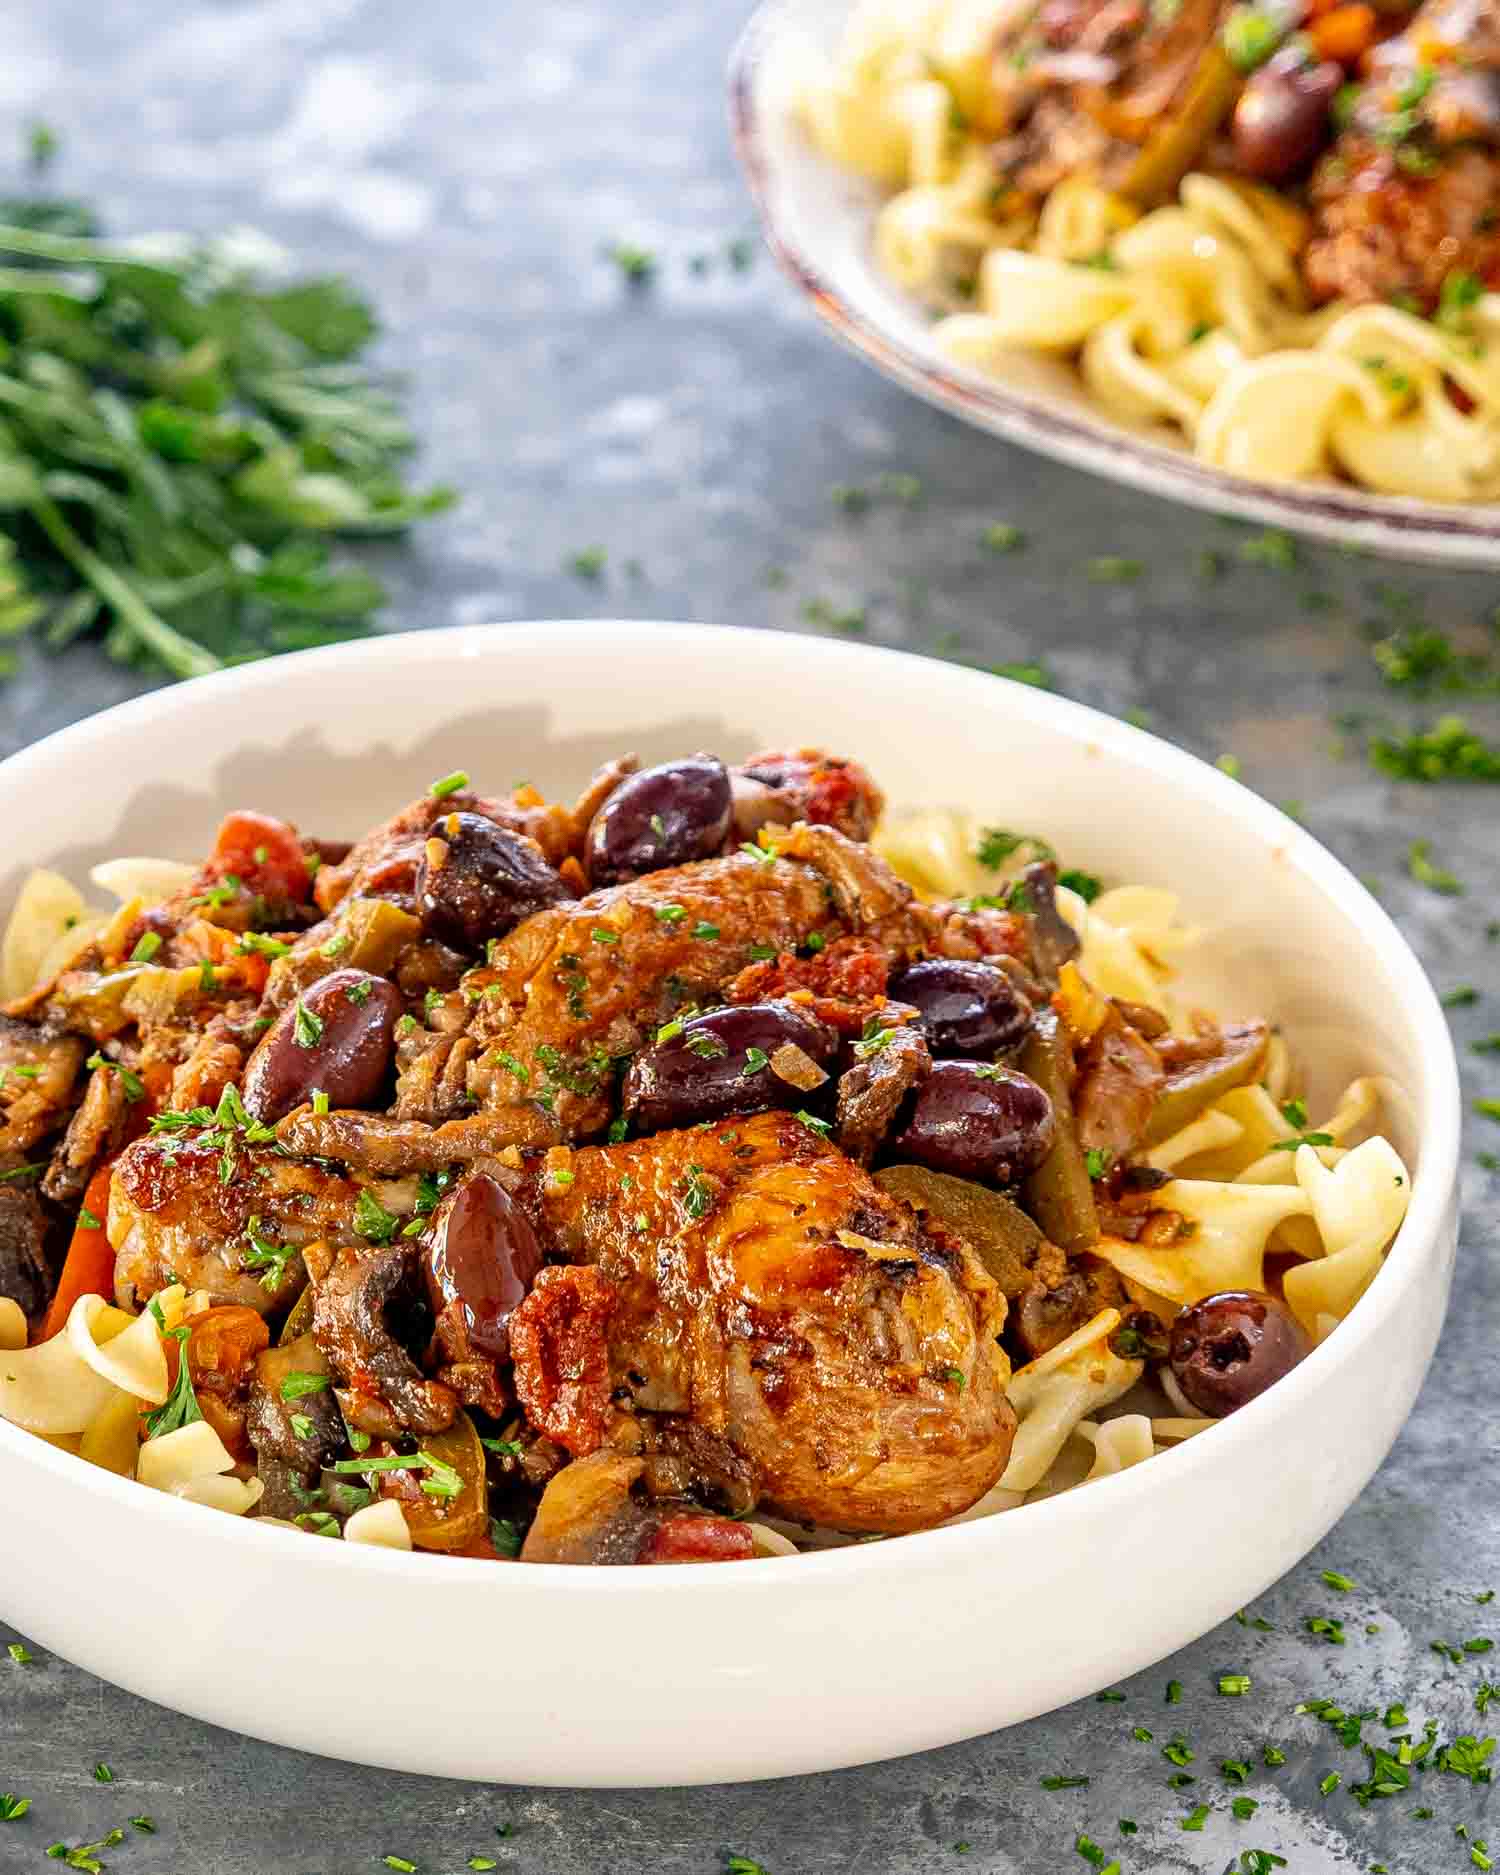
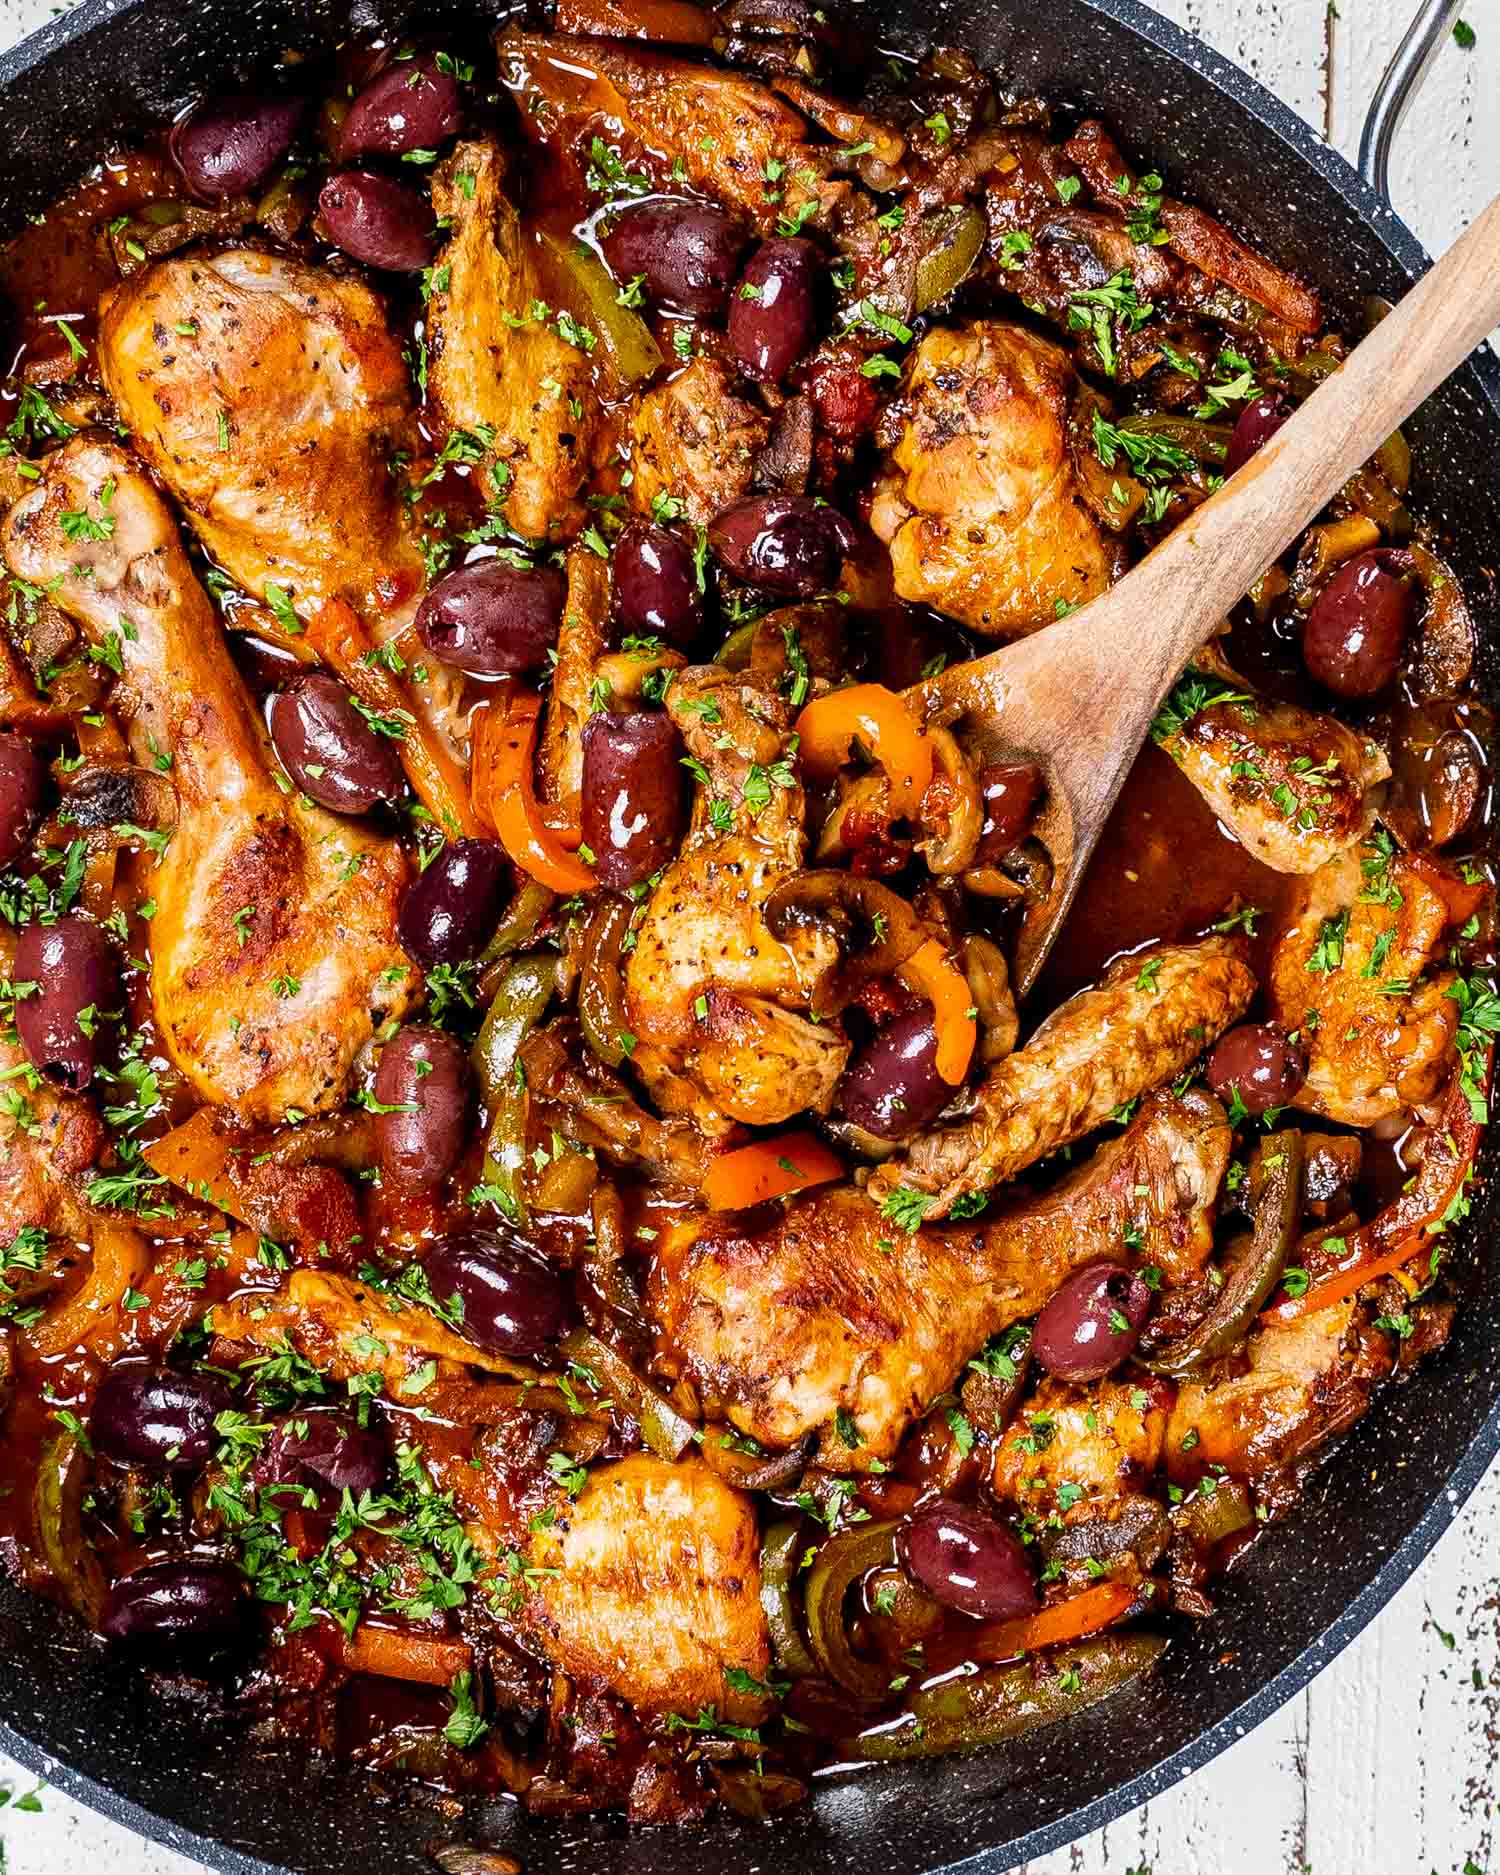
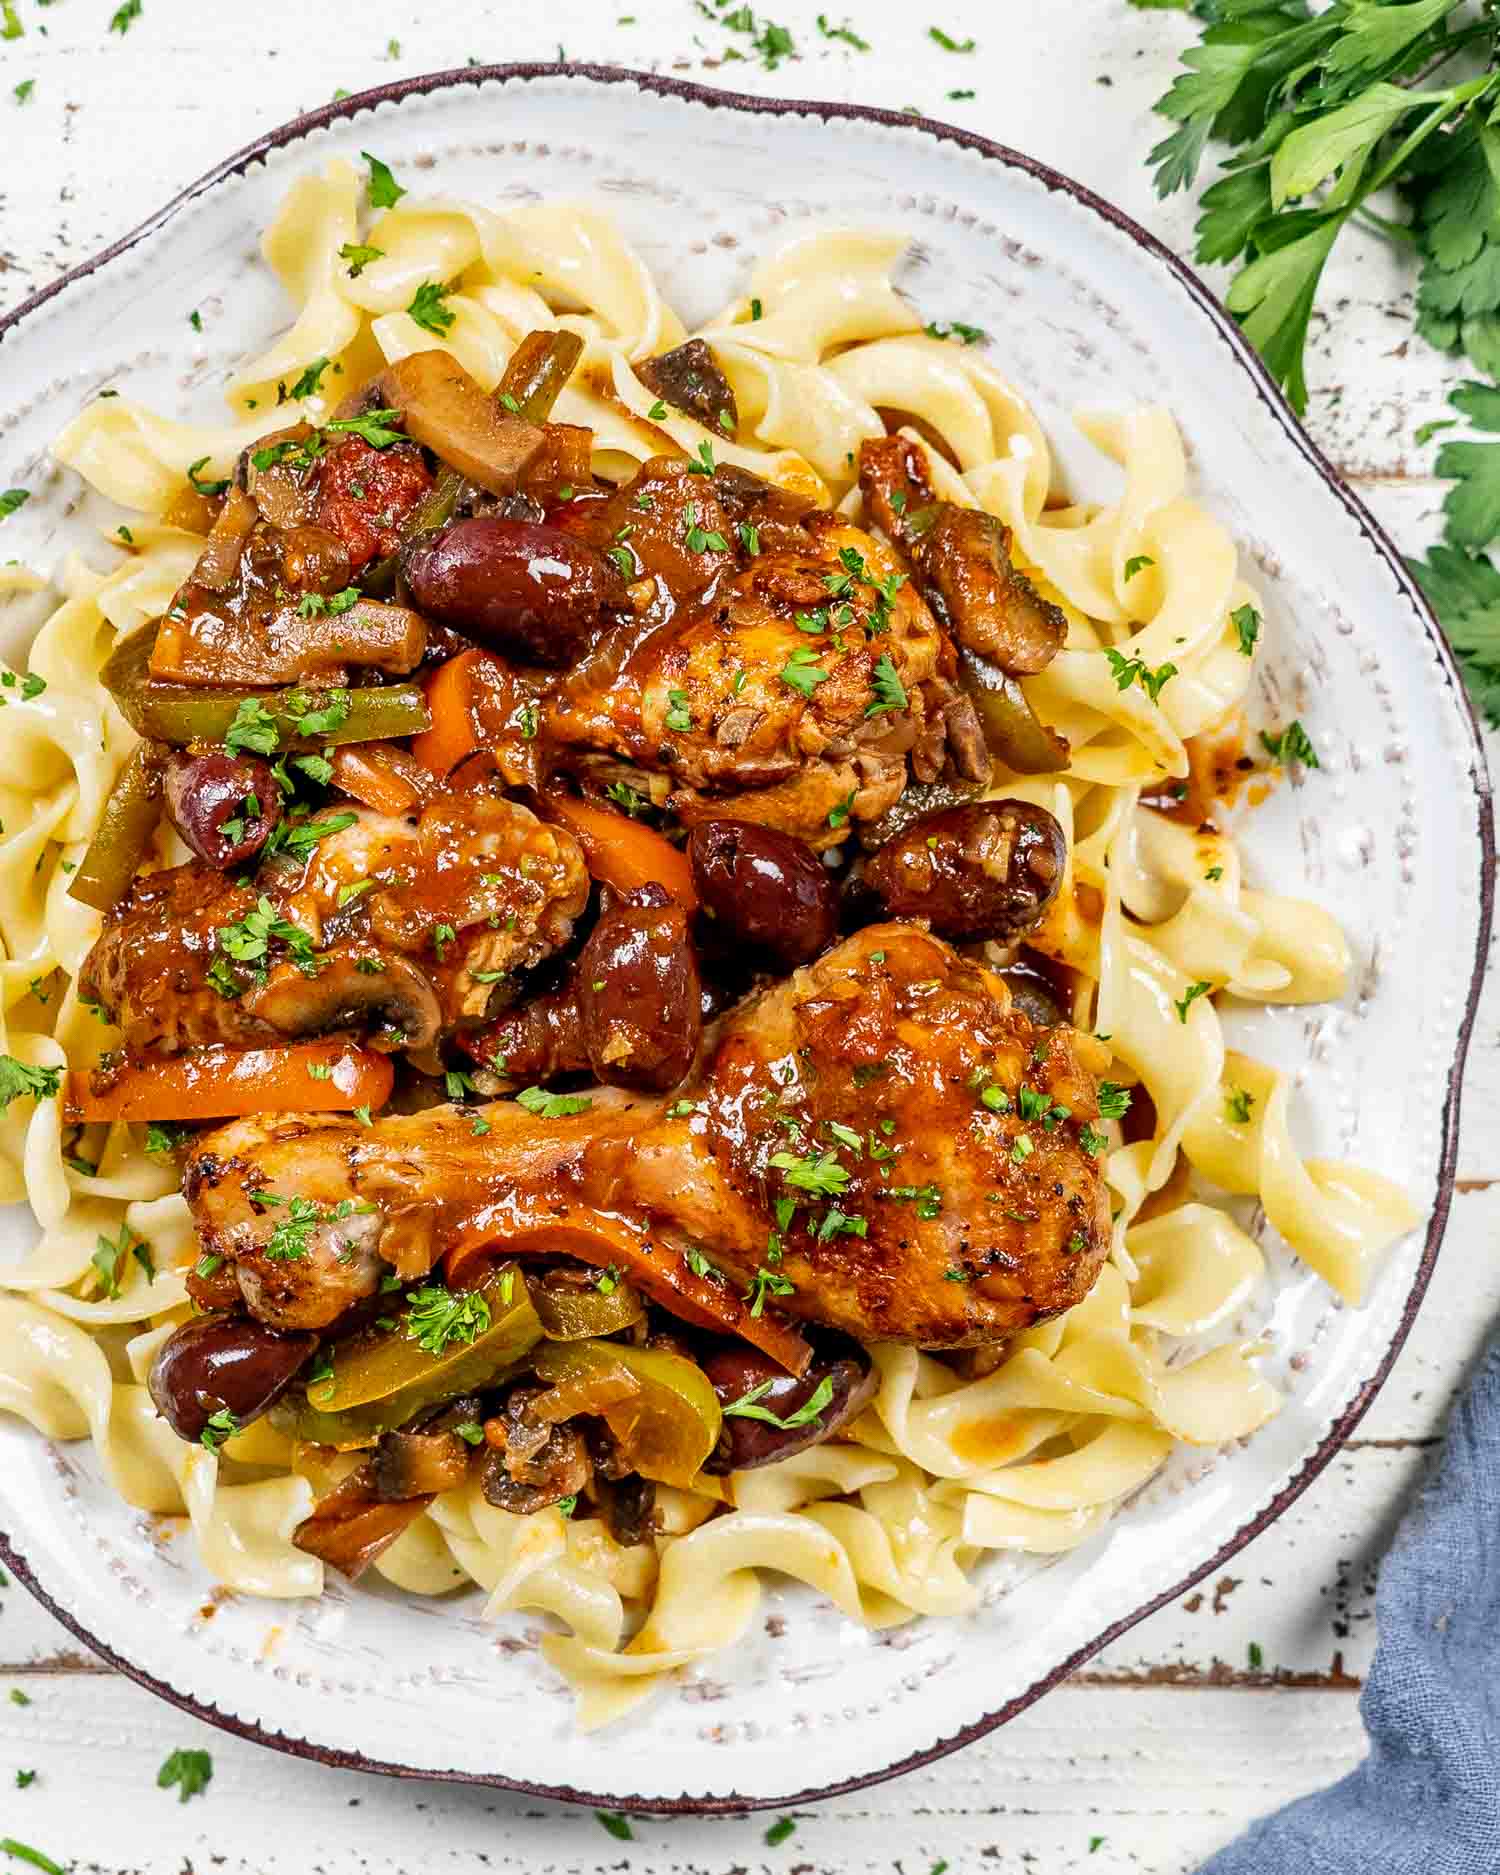
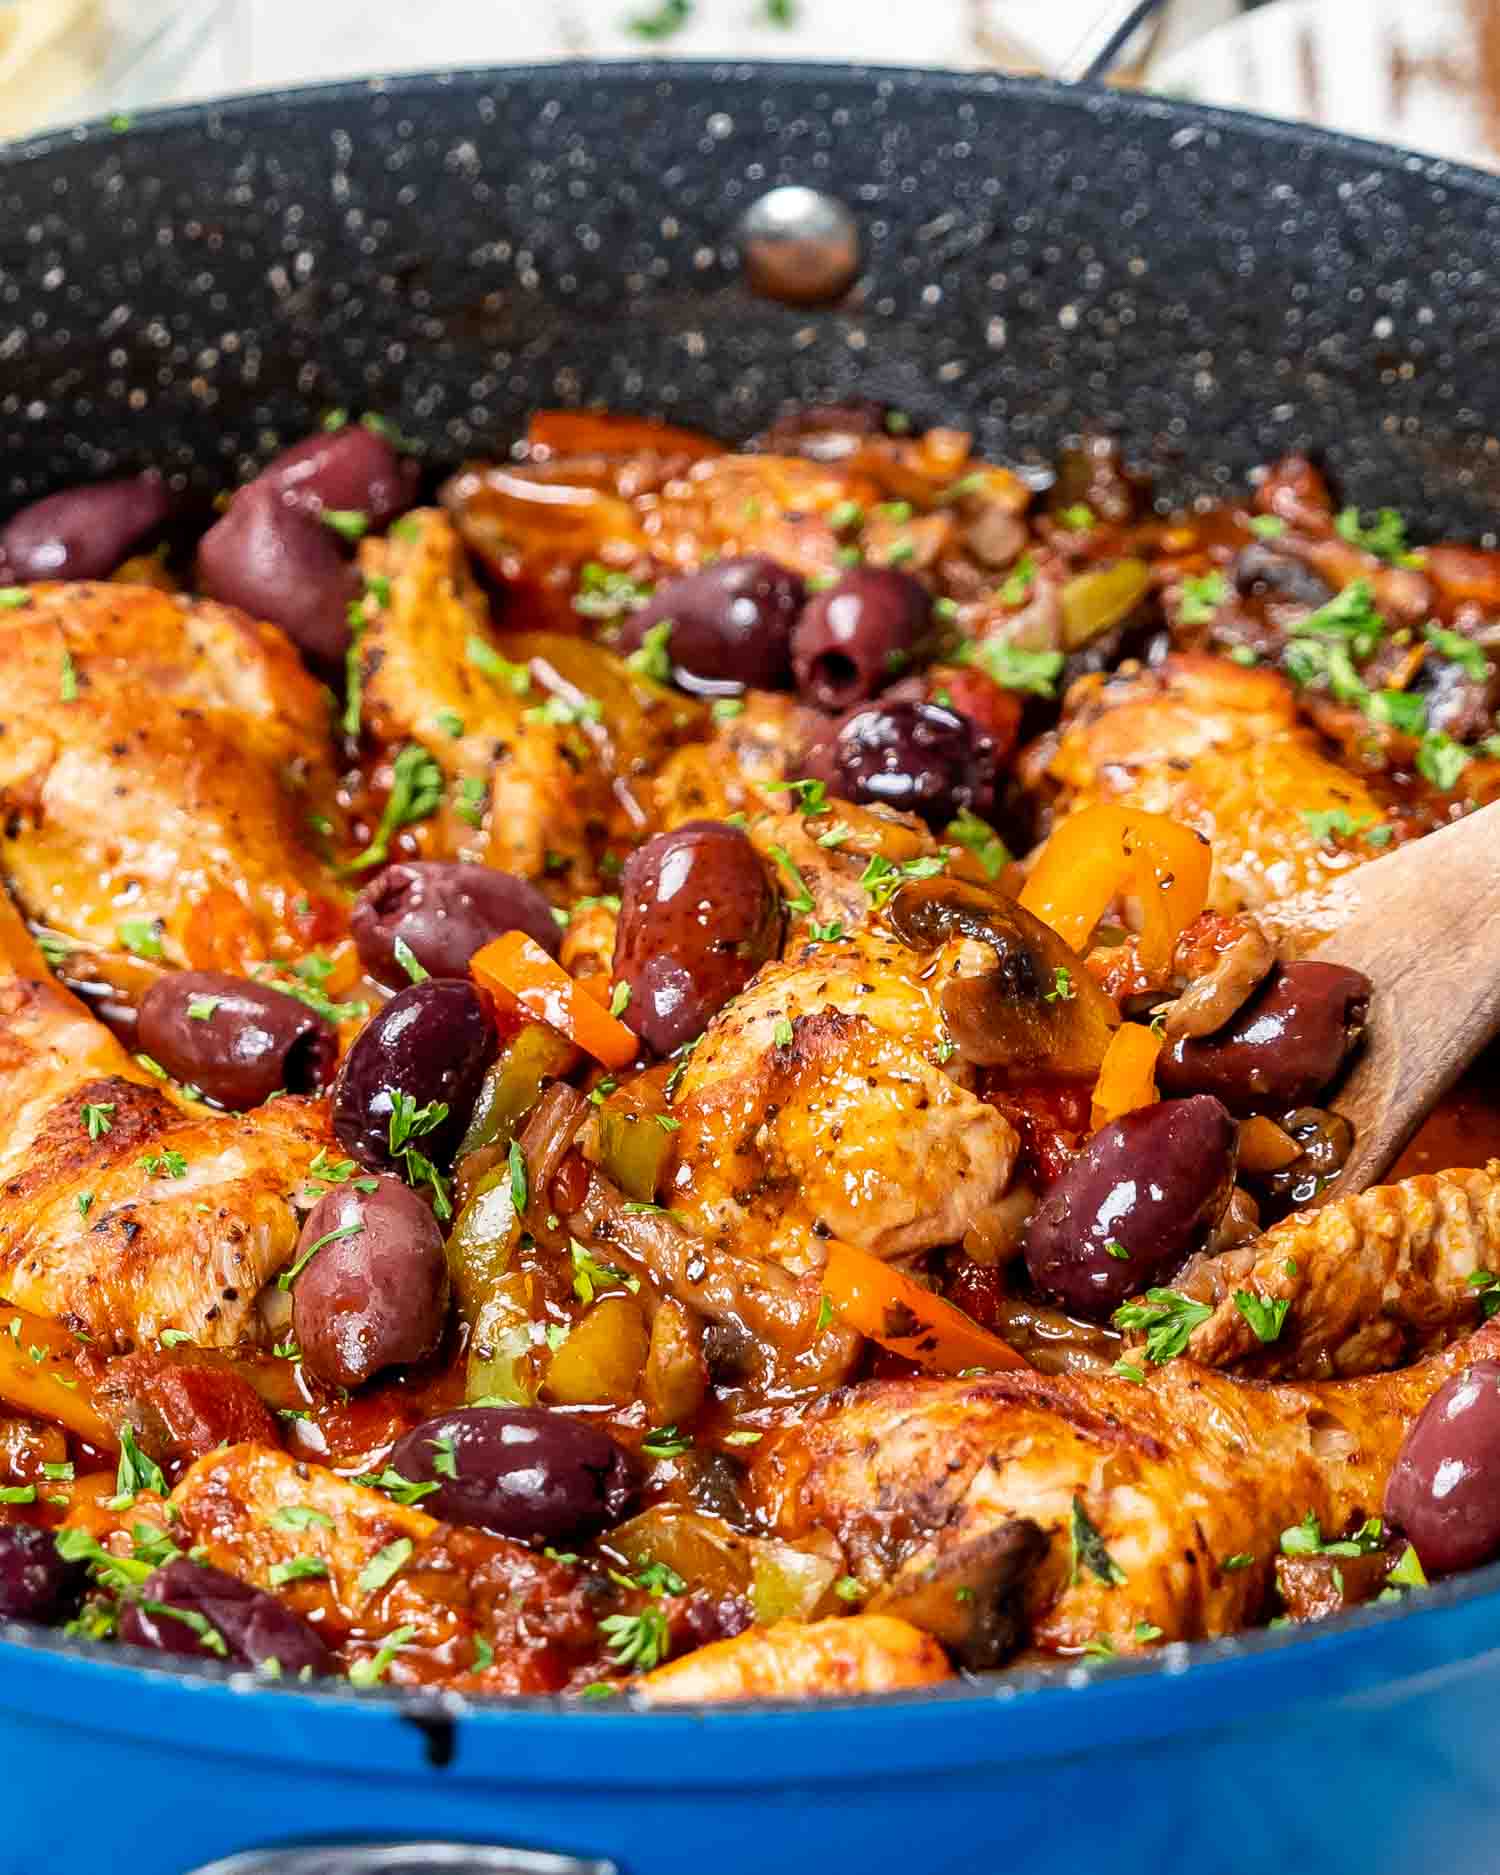
This rustic Chicken Cacciatore is everything comfort food should be—tender, fall-off-the-bone chicken baked in a rich tomato and red wine sauce, with mushrooms, sweet bell peppers, and briny olives. One pot, big flavor, and the kind of cozy dinner that basically cooks itself while you pretend you’re in the Italian countryside.
The Best Chicken Cacciatore Recipe
Chicken Cacciatore is one of those dishes that instantly makes me feel like I’ve got life together—even if I’m wearing pajama pants and the dogs are barking at nothing. It’s cozy, rustic, and full of flavor, but totally unfussy. One big pan, some basic ingredients, and the oven takes it from there.
This is how I make it at home—bone-in chicken that practically falls off the bone, sautéed peppers and mushrooms, a splash of red wine (some for the pot, some for me), and olives tossed in at the end because we’re fancy like that. It smells like you’ve been simmering all day, but your stove knows better.
Why You’ll Love This Chicken Cacciatore
One Pot, Big Flavor – Everything simmers in one oven-safe skillet, soaking up all that garlicky, herby, wine-spiked tomato sauce. No stovetop juggling, no mess.
Cozy, Rustic Vibes – This isn’t a buttoned-up, plated chicken dish. It’s saucy, hearty, and meant to be served family-style over something that soaks it all up.
Bone-In Chicken = Built-In Flavor – I use wings and drumsticks for maximum tenderness and richness. Bonus: no slicing required.
Even Better the Next Day – Like most braised dishes, the flavors deepen overnight. It reheats like a dream.
Classic but Flexible – Add extra mushrooms, skip the olives, or swap in white wine—this dish isn’t fussy, and it’s hard to mess up.
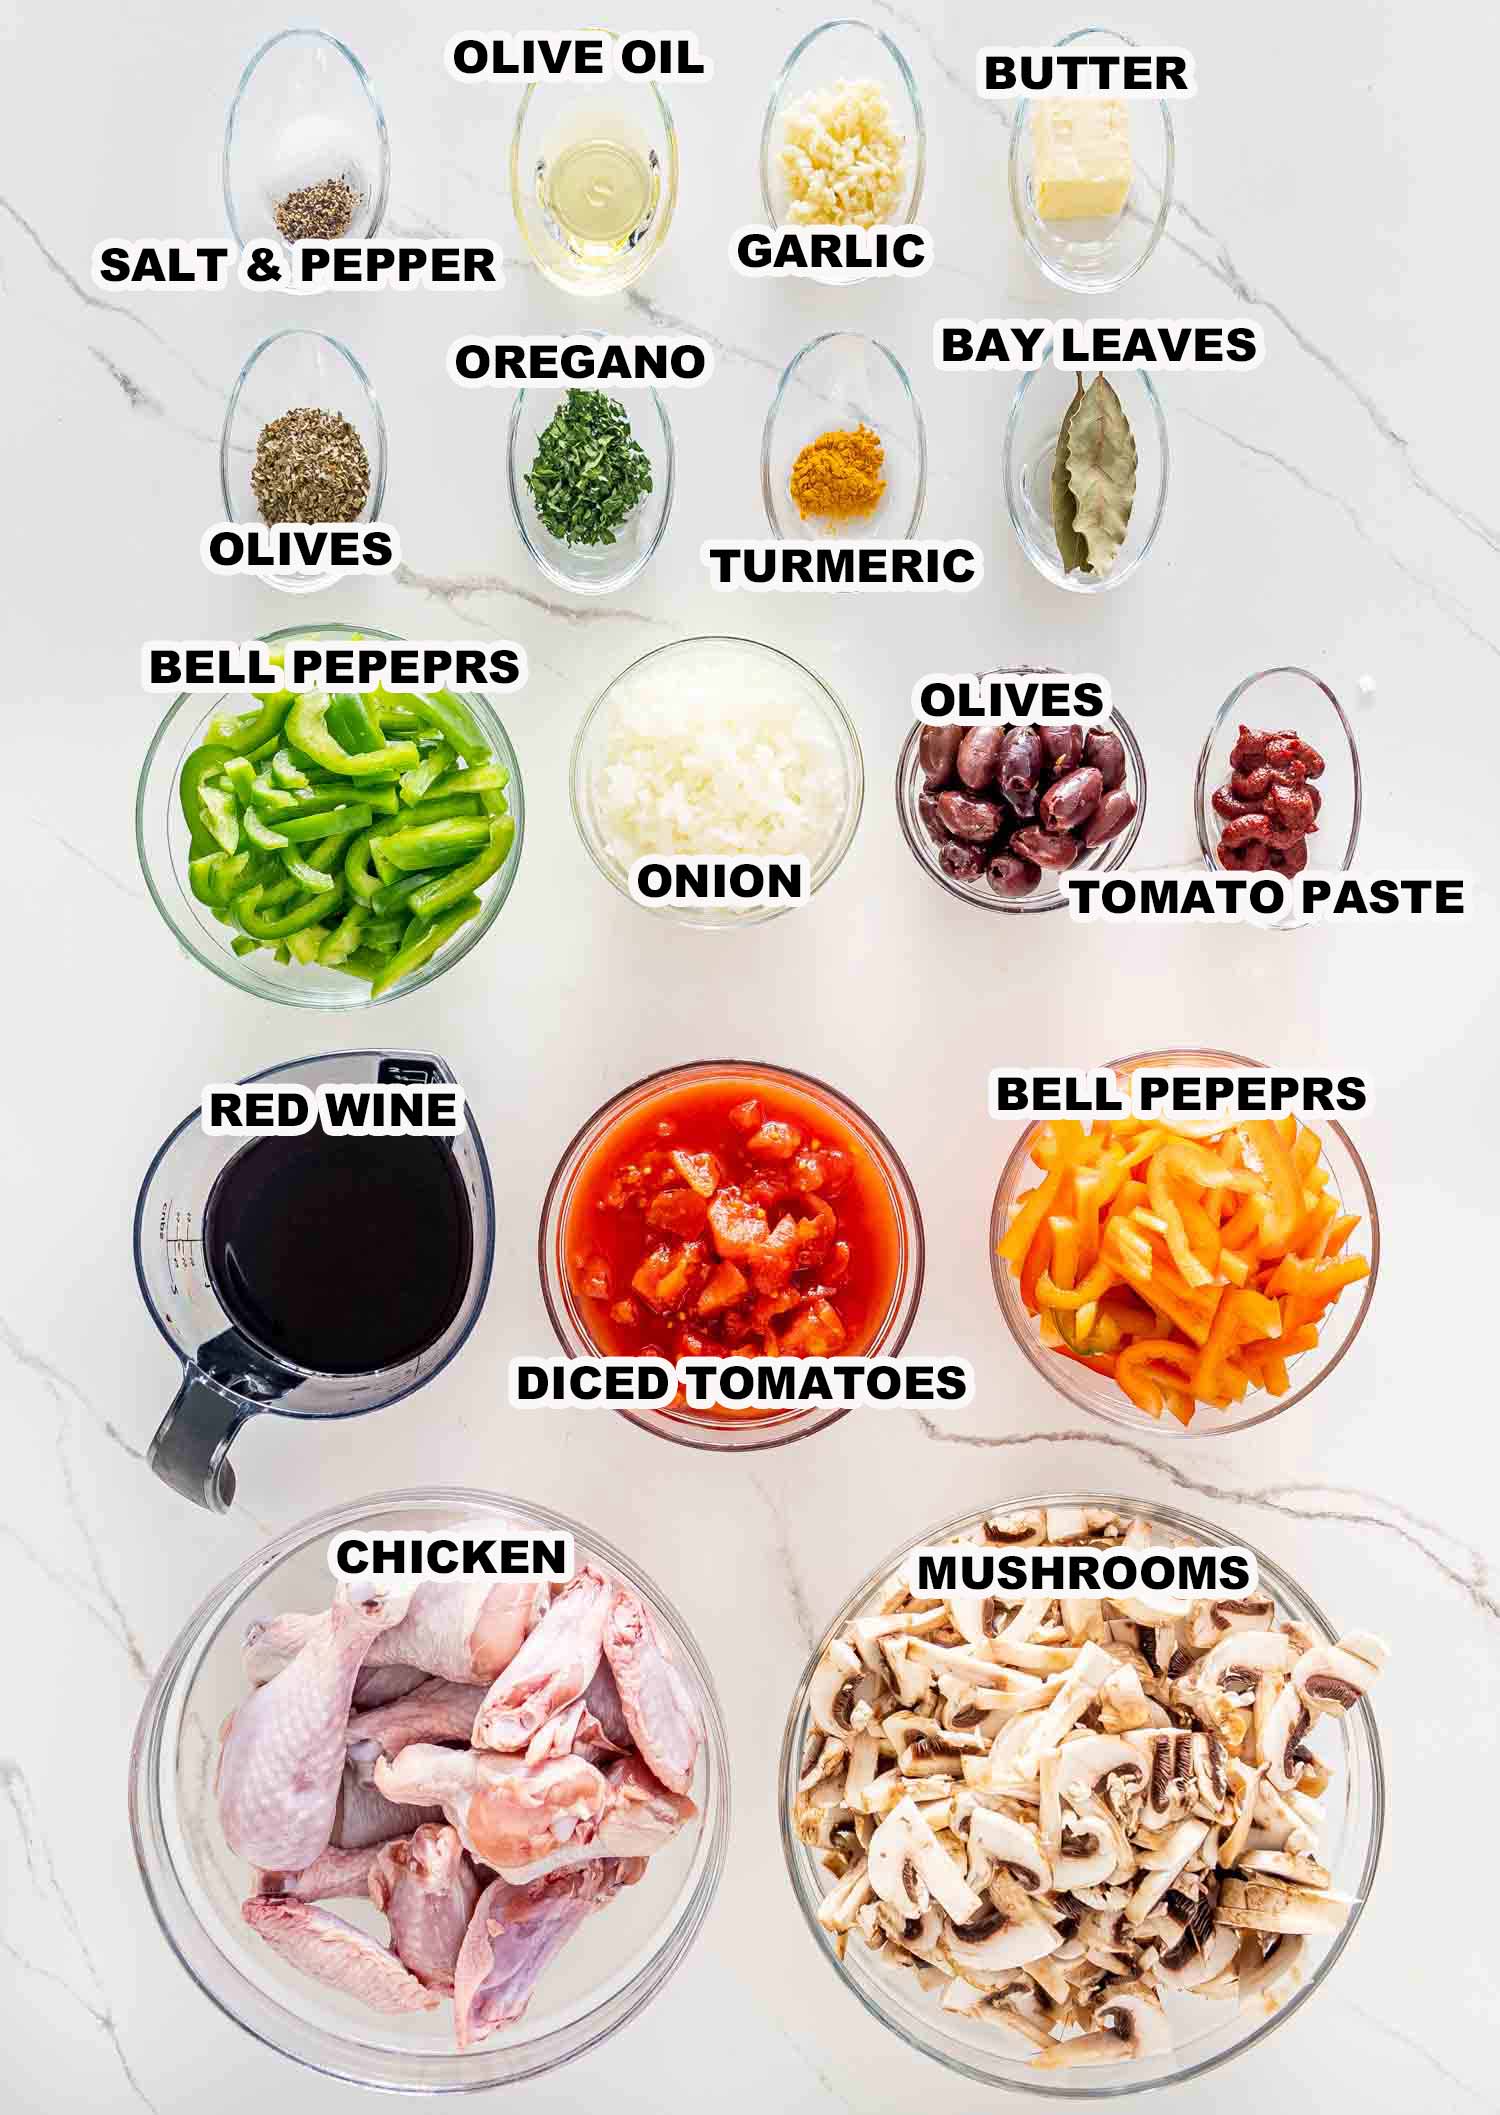
Before You Start: Tips & Ingredient Notes
Chicken Cacciatore isn’t complicated, but there are a few things you should know before you start tossing things into the pan. This dish is all about building flavor in layers, using simple techniques that actually matter.
🍗 Use Bone-In, Skin-On Chicken
Wings and drumsticks are perfect here. They stay juicy, they add richness to the sauce, and they handle long cooking like champs. Boneless breasts will dry out and don’t bring the same depth—save those for something faster.
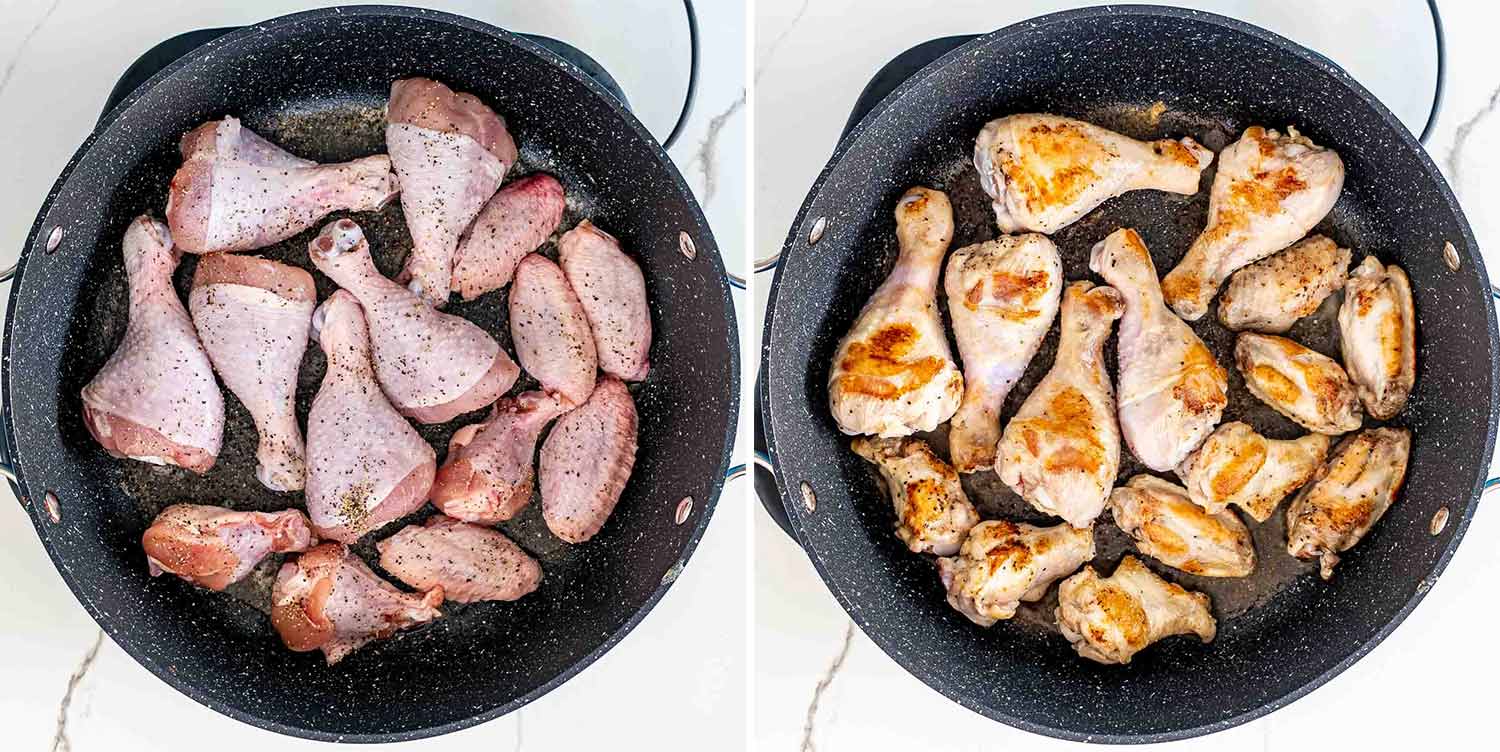
🔥 Don’t Skip the Sear
Browning the chicken before it goes into the oven adds a ton of flavor. You don’t need to cook it through—just get that golden crust going. It makes a difference.
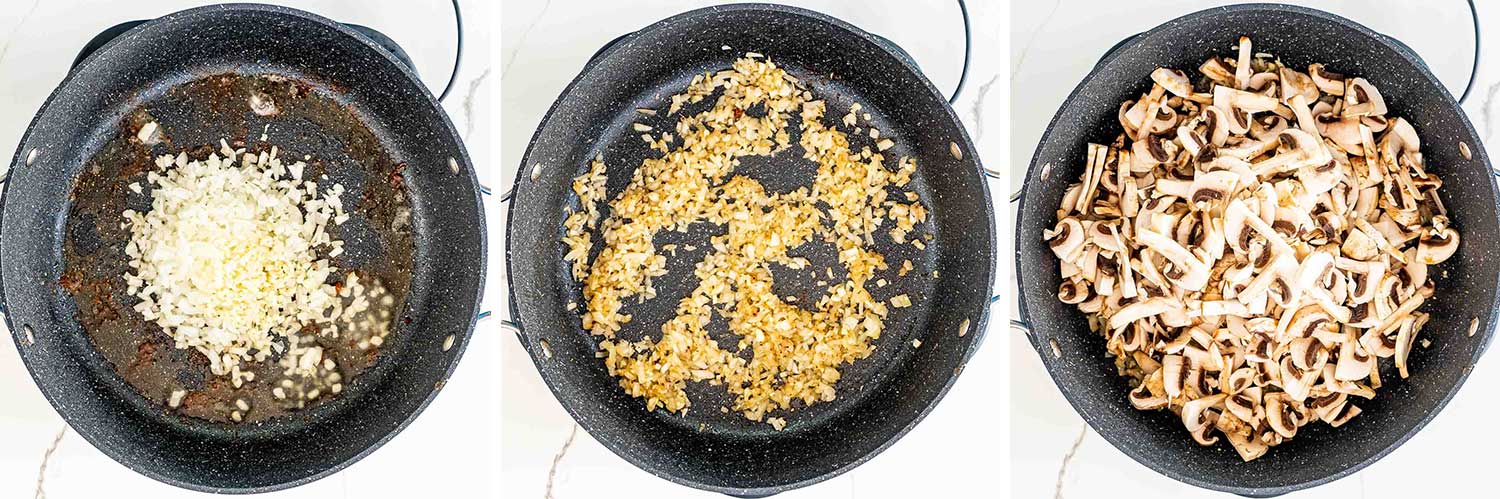
🍄 Cook the Mushrooms First
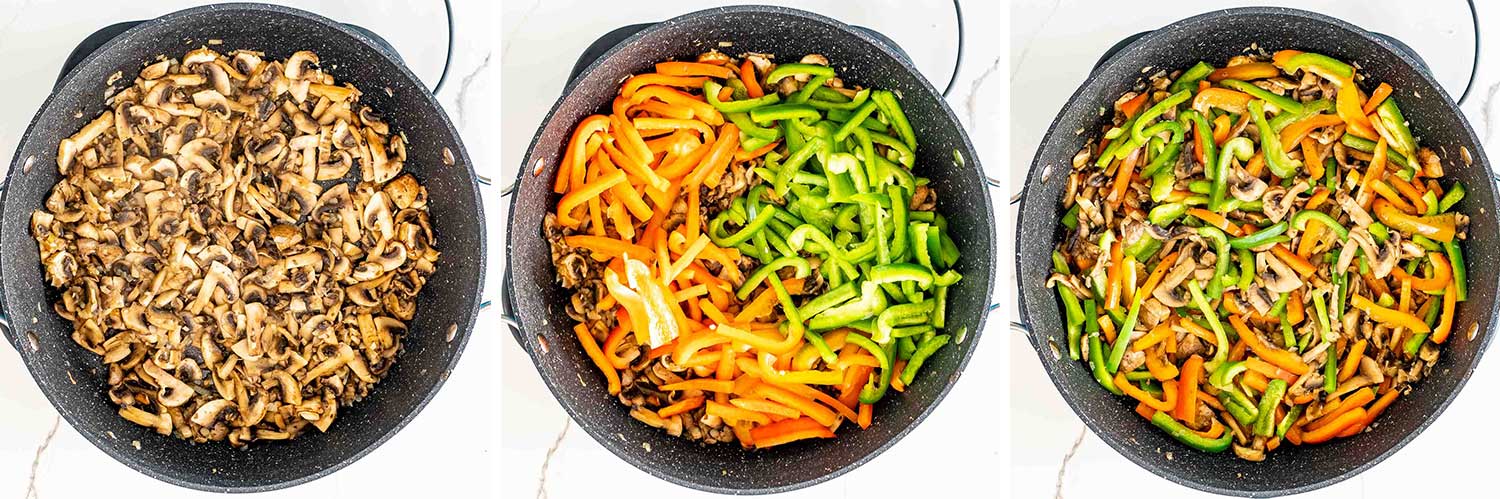
Yes, before the peppers. Mushrooms release moisture, and if you throw everything in together, they’ll steam instead of brown. I like to give them 5 minutes to cook down on their own first, then add the peppers after.
🍷 Wine or No Wine?
I use red wine because it gives the sauce depth and richness you can’t fake. But if you’re skipping alcohol, use low-sodium chicken broth and maybe a splash of balsamic vinegar to round things out.
🫒 Don’t Add the Olives Too Early
Olives go in at the end so they don’t get mushy or overpower the sauce. They’re meant to finish the dish—not take it over.
⏱️ This One’s a Slow Simmer
The oven time is where the magic happens. Give it at least 45 minutes for the chicken to fully soak in that sauce. Want it falling-off-the-bone tender? Go for the full hour.
How To Make Chicken Cacciatore
This is a one-pan wonder, so once you’ve got everything prepped, the rest is mostly hands-off. Just build flavor in layers, pop it in the oven, and let it work its magic.
Heat the olive oil and butter in a large oven-safe skillet or Dutch oven. Add the chicken and season with salt and pepper. Sear for about 4 minutes per side until golden. No need to cook it through—it’ll finish in the oven. Transfer to a plate and set aside.
Add the garlic and onions to the same pan and cook for about 2 minutes until soft and fragrant. Don’t rush this step—it lays the foundation.
Toss in the mushrooms and cook for 5 minutes. Let them release their moisture and start to brown. Then add the bell peppers and sauté for another couple of minutes just until they soften slightly.
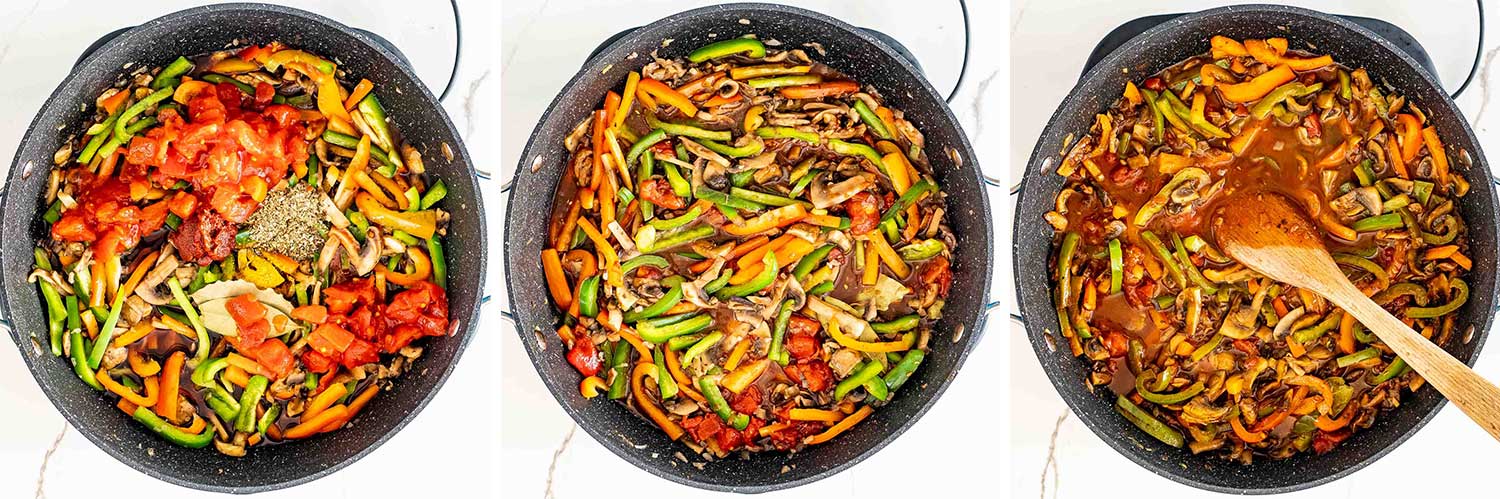
Stir in the turmeric, oregano, bay leaves, red wine, tomato paste, and diced tomatoes. Bring everything to a gentle boil, scraping up all those browned bits from the bottom of the pan.
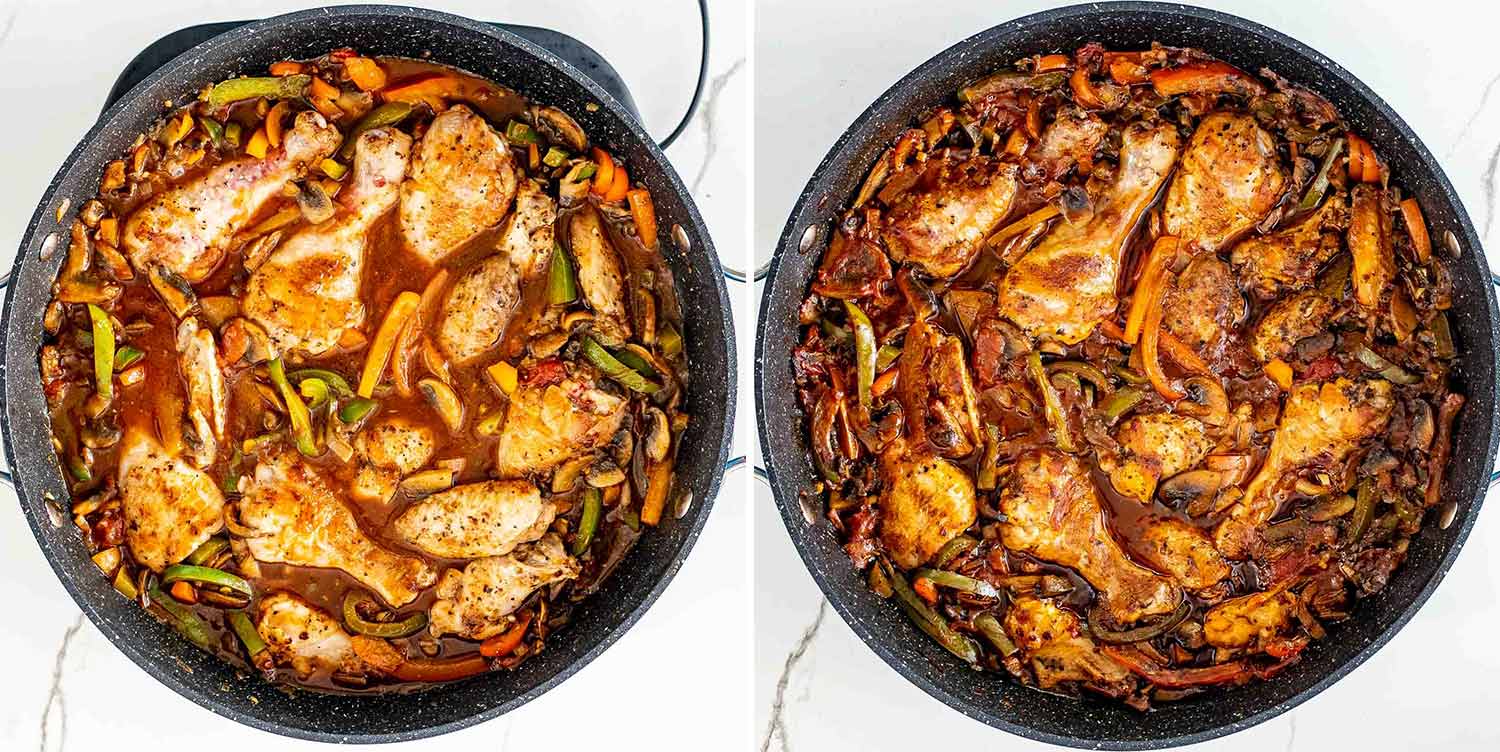
Nestle the seared chicken pieces back into the sauce. Cover with a lid and transfer the whole pan to the oven. Bake at 400°F for 45 minutes to 1 hour, depending on how tender you like your chicken.
Once it’s out of the oven, top with the Kalamata olives and sprinkle with fresh parsley. Serve it over noodles, rice, or creamy polenta. And don’t forget the crusty bread for mopping up that sauce.
Jo’s Tip:
Don’t skip the oven time. That slow braise is what makes the chicken fall-off-the-bone tender and gives the sauce its rich, developed flavor. And if you’ve got time? Let it rest for 10 minutes before serving—it’s even better once it settles.
How To Serve It
This dish is saucy, savory, and begging for something to soak it all up. Here are some of my favorite ways to serve it:
You can, but bone-in, skin-on chicken brings way more flavor and stays juicy while it bakes. Boneless thighs will work if you’re short on time, but I’d skip the breasts.
Can I make this without wine?
Yep. Swap the wine for low-sodium chicken broth and add a splash of balsamic or red wine vinegar for a little acidity and richness.
What kind of wine should I use?
Go for a dry red wine—Chianti, Pinot Noir, or even Cabernet Sauvignon work great. Use something you’d drink (not cooking wine) but don’t stress—just keep it dry, not sweet.
What kind of olives are best?
I love Kalamata olives for their bold flavor, but green or Castelvetrano work too. Just wait to add them at the end so they don’t go mushy or take over the sauce.
Can I make it ahead of time?
Absolutely. This dish gets even better after a day in the fridge. Make it up to 2 days ahead and reheat gently on the stove or in a 350°F oven.
Can I freeze Chicken Cacciatore?
Yes, minus the olives if possible. Freeze in an airtight container for up to 3 months. Thaw overnight in the fridge, then reheat gently until warmed through.
Storage & Reheating
Fridge:
Store leftovers in an airtight container for up to 4 days. The flavors get even better overnight, so don’t be surprised if it tastes even richer the next day.
Freezer:
Chicken Cacciatore freezes well—just leave the olives out if you’re making it specifically to freeze (they can go a bit mushy). Store in a freezer-safe container for up to 3 months. Thaw overnight in the fridge.
To Reheat:
Warm gently on the stovetop over medium-low heat, or reheat in a 350°F oven until heated through. Add a splash of broth or water if the sauce has thickened too much in the fridge.
Try These Chicken Recipes Next
Before You Begin! If you make this, please leave a review and rating letting us know how you liked this recipe! This helps our business thrive & continue providing free recipes.
Chicken Cacciatore
Prep 10 minutesminutes
Cook 1 hourhour10 minutesminutes
Total 1 hourhour20 minutesminutes
This rustic Chicken Cacciatore is comfort food at its finest—juicy bone-in chicken simmered in a rich tomato and red wine sauce with mushrooms, sweet peppers, and briny olives. All baked in one pot for deep flavor and easy cleanup.
Before You Begin! If you make this, please leave a review and rating letting us know how you liked this recipe! This helps our business thrive & continue providing free recipes.
Instructions
Preheat oven to 400°F.
Add the olive oil and butter to a large oven-safe skillet with a lid, and heat until butter has melted.
Add the chicken to the skillet and season generously with salt and pepper. Fry the chicken on both sides until golden, about 4 min per side. The chicken doesn't have to be cooked through, as it will continue cooking while in the oven. Transfer the chicken to a plate and set aside.
Add the garlic and onions to the skillet and saute for 2 minutes until the onion is translucent and the garlic becomes aromatic. Add the chopped mushrooms and cook for 5 min until the mushrooms cook down then add the peppers.
I like to cook my mushrooms first, but you could add the mushrooms and peppers all at once. Stir and cook for a couple more minutes until the peppers soften a bit.
Add the turmeric, oregano, bay leaves, red wine, tomato paste, and diced tomatoes. Stir well and bring to a boil.
Add the chicken back to the pot, cover with a lid and place in the oven. Bake for 45 minutes to an hour.
Top with whole Kalamata olives and garnish with fresh parsley before serving.
Serve over noodles, rice or polenta.
Notes
Chicken: I use a mix of wings and drumsticks, but any bone-in, skin-on pieces work. Thighs are great too. Boneless chicken will cook faster, but it won’t have the same depth of flavor.
Mushrooms First: Cooking the mushrooms before the peppers helps them brown and build flavor instead of steaming.
Wine Swaps: Chianti, Pinot Noir, or any dry red works. No wine? Use low-sodium chicken broth + a splash of balsamic or red wine vinegar.
Make It Ahead: Perfect for prepping ahead. Store in the fridge for up to 4 days—flavors deepen and the sauce gets even better overnight.
Deglaze the pan. When adding the wine and other liquid ingredients make sure to scrape the bottom of the pan to loosen all the browned bits. This will make the cacciatore more flavorful.
Holly Nilsson is the creator of Spend With Pennies, where she creates easy, comforting recipes made for real life. With a passion for nostalgic flavors and simplified techniques, Holly helps busy home cooks create delicious meals that always work. She is also the author of “Everyday Comfort,” which promises to inspire even more hearty, home-cooked meals. See more posts by Holly
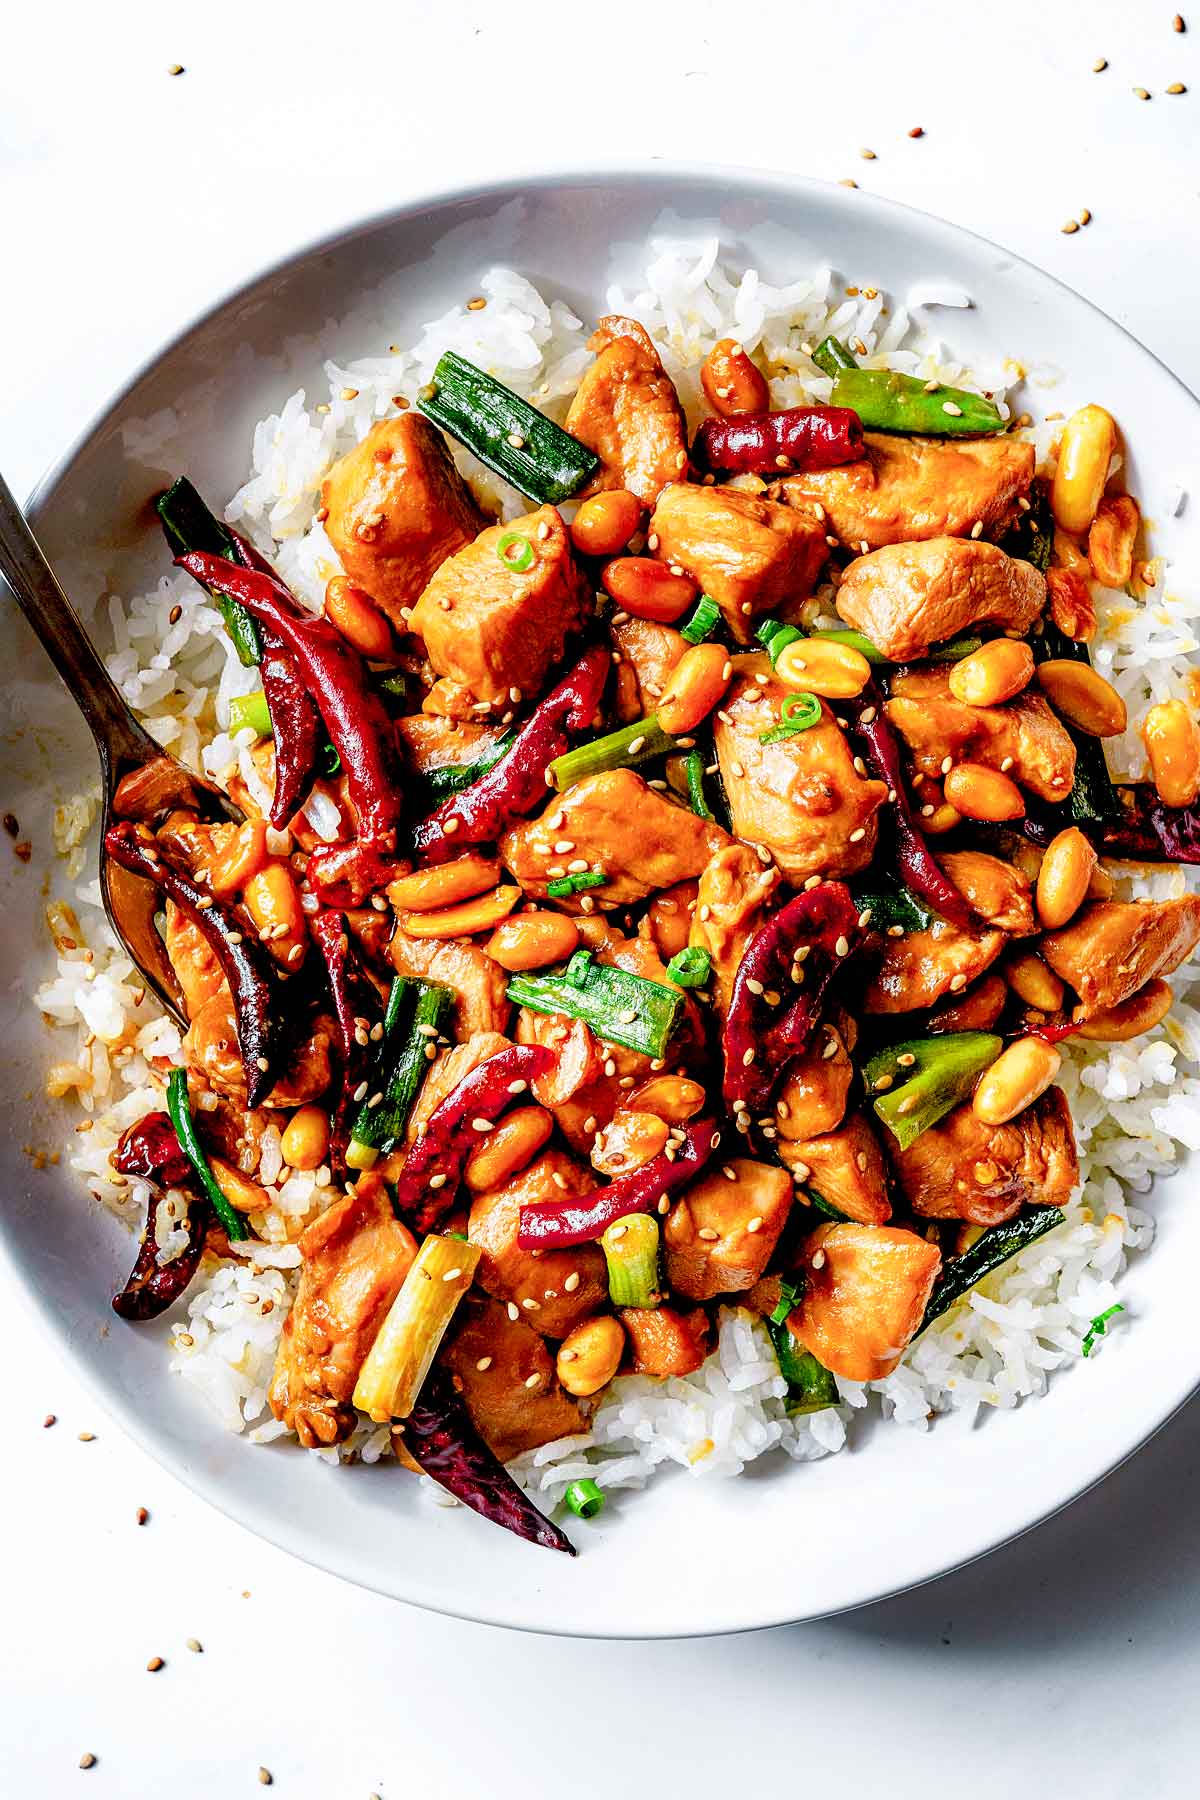
A delectably spicy, sweet, and savory Asian-inspired sauce clings to every piece of juicy chicken in this easy dish. Kung pao chicken is quicker to make at home than ordering takeout, and it tastes so much better too.
Kung pao chicken is a deceptively simple recipe to make by stir-frying juicy pieces of chicken in a nuanced spicy-sweet-savory sauce.
Add in some toasted peanuts and before you know it, your favorite Chinese dish is on the dinner table in just 30 minutes for a fraction of the price of takeout.
Is this recipe 100% authentic? No. It’s sure tasty, though.
The kung pao chicken from your favorite Chinese restaurant typically leaves your mouth feeling numb and tingly from the Sichuan peppercorns that are traditionally included in this dish. But since Sichuan peppercorns are hard to find at most grocery stores (and can be pricey, to boot) this recipe uses dried red chiles for tons of flavor minus the tingling.
Heidi’s Tips for Recipe Success
Cook this homemade kung pao chicken in a wok or a skillet, and make it so easy to make at home
Give the chicken a quick marinade to make it tender and juicy. With crunchy peanuts, fresh green onions, and spicy-sweet-savory sauce, there are flavors and textures galore in this recipe.
This recipe delivers the unique flavors that kung pao chicken is known for using easy-to-find ingredients you can purchase at your local grocery store.
What’s in Kung Pao Chicken?
The full recipe, with amounts, can be found in the recipe card below.
Chicken breasts — trim off any excess fat before dicing into ½-inch pieces
Soy sauce — lends the sauce so much umami flavor
Shao xing cooking wine — sometimes called “Chinese cooking wine;” it’s slightly sweet and nutty in flavor, and it helps to tenderize the chicken
Cornstarch — thickens the sauce and gives it a super glossy finish
Sugar — you need a little sweetness to balance out the salty soy sauce and tangy vinegar
Rice vinegar — this mild, sweet, and tangy vinegar rounds out the sauce (do NOT confuse it with rice wine)
Toasted sesame oil — has a much richer sesame flavor than regular sesame oil
Oil — use a neutral-flavored oil with a high smoke point, like canola or vegetable, for stir-frying the chicken
Peanuts — choose roasted unsalted peanuts for lots of crunch
Dried red chiles — use 6 to 10 depending on how spicy you like your kung pao chicken
Garlic — a couple cloves finish off the stir-fry
Green onions — you’ll be using both the green tops and white bottoms, but keep them separated after slicing
Ingredient Swaps and Substitutions
Soy sauce — you should be fine to use tamari if you need to keep the sauce gluten-free
Shao xing cooking wine — replace it with sherry for a similar flavor profile
Peanuts — are essential, in my opinion, but omit if you’re dealing with an allergy
Dried red chiles — try using red pepper flakes instead (I haven’t tested this swap though, so I can’t give you an exact amount)
How to Make Kung Pao Chicken
This recipe cooks super quickly, so have everything ready to go before heating up the skillet.
Marinate the chicken. Submerge the diced chicken in a mixture of soy sauce, shao xing cooking wine, and cornstarch.
Make the kung pao sauce. In another bowl, whisk together the sugar, rice vinegar, and water, plus the rest of the soy sauce, shao xing cooking wine, and cornstarch.
Heidi’s Tip: The soy sauce, cooking wine, and cornstarch each do double duty in this recipe. Read the recipe card closely before starting this dish to know how much of each ingredient to use, and when.
Stir-fry the peanuts. Heat a little oil in a wok or large skillet, then toast the peanuts for about 30 seconds. Remove them to a plate so they don’t burn.
Bring it all together. Once the peanuts are out of the skillet, add the white portion of the green onions, along with the dried red chile peppers and garlic. Cook just until fragrant, then add the chicken and stir-fry for 1 to 2 minutes.
Sauce it up. Add the green tops of the onions and the silky kung pao sauce last, cooking just until the sauce thickens (it will take very little time). Stir in the peanuts before serving over a bed of white rice. I like to sprinkle mine with toasted sesame seeds.
FAQs
Is kung pao chicken spicy?
There’s definitely a nice kick of heat in this recipe, but it won’t set your mouth on fire.
If you’re concerned it will be too spicy, use just six dried red chiles in the stir-fry. You can even go the extra mile and remove some of the seeds from the chiles, which is where their heat it stored.
Can I add vegetables to this stir-fry?
Feel free to stir-fry some sliced bell peppers, broccoli, or thinly sliced carrots before adding the chicken and sauce to the skillet.
Can this recipe be made in advance?
This is one dish that’s best eaten right away while the sauce is still glossy. You can definitely meal prep this kung pao chicken though, but you might need to add a splash of water when reheating to loosen up the sauce.
Storage Tips
Let any leftovers cool before transferring to an airtight container. They’ll last up to 5 days in the fridge and can be gently reheated in the microwave or in a lightly oiled skillet.
What to Serve With Kung Pao Chicken
If you make this recipe, please let me know! Leave a ⭐️⭐️⭐️⭐️⭐️ rating below, leave a comment to tell us what you think, and tag me on Instagram @foodiecrush.
Kung Pao Chicken
A delectably spicy, sweet, and savory Asian-inspired sauce clings to every piece of juicy chicken in this easy dish. Kung pao chicken is quicker to make at home than ordering takeout, and it tastes so much better too.
2tablespoonsshao xing cooking wine or sherry,divided
1tablespoon plus 2 teaspoonscornstarch,divided
1tablespoonsugar
2tablespoonsrice vinegar
2teaspoonstoasted sesame oil
½cupwater
2tablespoonscanola or vegetable oil
½cuproasted unsalted peanuts
6-10dried red chiles,roughly chopped
2garlic cloves,pressed or minced
4green onions,cut into ½-inch pieces, white and green parts separated
Instructions
Trim any fat or tendrils from the chicken breast and cut into ½-inch pieces.
In a medium bowl, mix 1 tablespoon of soy sauce, 1 tablespoon of cooking wine or sherry, and 1 tablespoon cornstarch until smooth. Add the chicken and toss to coat.
In a small bowl, combine sugar, vinegar, sesame oil, water, and the remaining 4 tablespoons soy sauce, 1 tablespoon cooking wine or sherry, and 2 teaspoons cornstarch. Whisk until smooth.
In a wok or large frying pan, heat 1 tablespoon oil over high. Add the peanuts and stir-fry until light brown, about 30 seconds. Remove from the pan.
Heat the remaining 1 tablespoon oil. Add chiles, garlic, and white part of the scallions to the pan and cook, stirring, for 30 seconds. Add the chicken with its marinade and cook, stirring, 1 to 2 minutes. Add the soy sauce mixture and scallion tops and simmer until the chicken is just done, about 1 minute longer. Stir in the peanuts and cook to warm through. Serve topped with more chopped green onion and white rice.
We send good emails. Subscribe to FoodieCrush and have each post plus exclusive content only for our subscribers delivered straight to your e-mail box.
As always, thank you for reading and supporting companies I partner with, which allows me to create more unique content and recipes for you. There may be affiliate links in this post of which I receive a small commission. All opinions are always my own.
Holly Nilsson is the creator of Spend With Pennies, where she creates easy, comforting recipes made for real life. With a passion for nostalgic flavors and simplified techniques, Holly helps busy home cooks create delicious meals that always work. She is also the author of “Everyday Comfort,” which promises to inspire even more hearty, home-cooked meals. See more posts by Holly
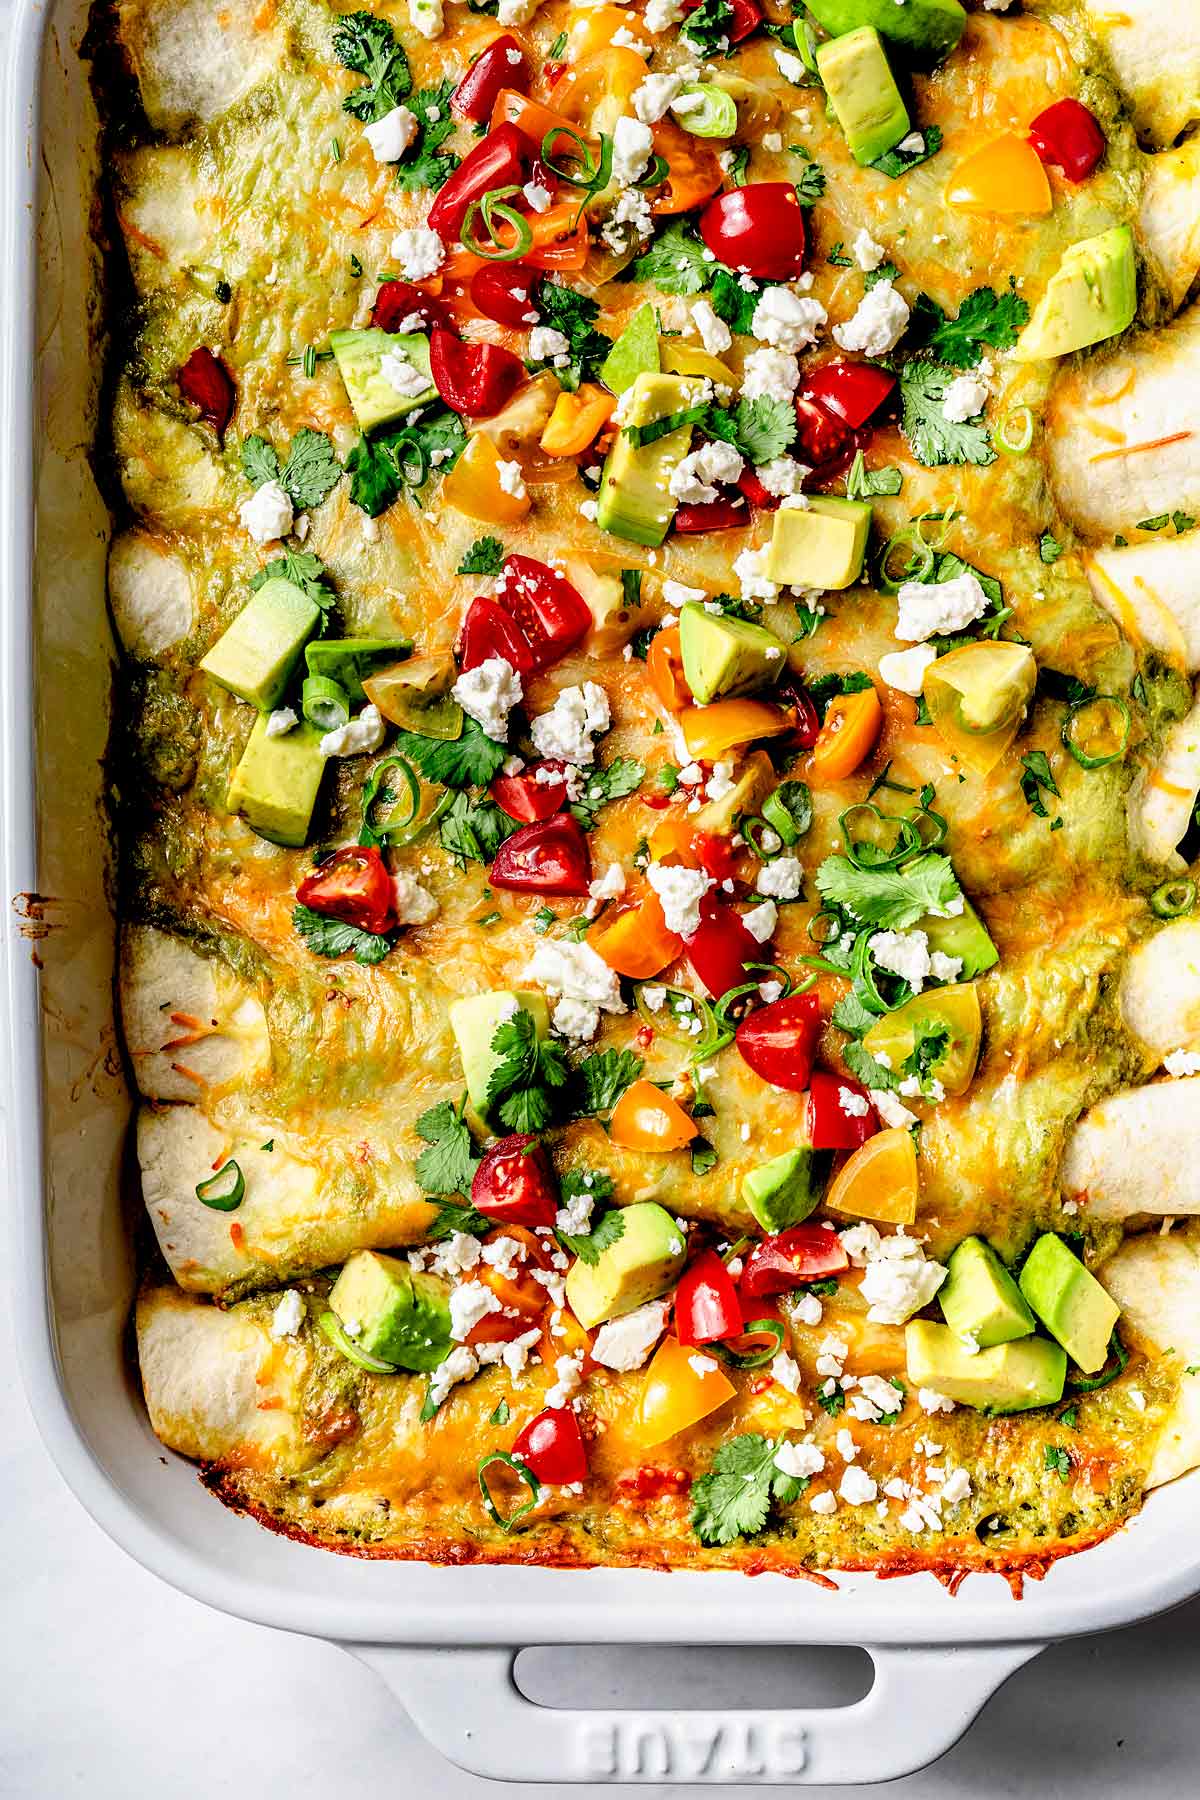
Juicy shredded chicken is rolled up in flour tortillas and topped with the creamiest cilantro lime sauce to make the best-ever green chicken enchiladas.
These chicken enchiladas doused in green sauce are fast, easy, and oh so flavorful.
The sauce comes together in 5 minutes with the help of your trusty blender and is made extra creamy thanks to the addition of ripe avocados and heavy cream.
To keep this recipe extra easy breezy, a store-bought rotisserie chicken is shredded and used for filling the tortillas. Any pre-cooked chicken will do, but why make life harder than you have to?
Green chicken enchiladas are hearty and filling, yet bursting with the fresh flavors of cilantro, lime, and green onion. Mexican food is truly the best.
Heidi’s Tips for Recipe Success
I prefer using flour tortillas in this recipe because I love the way they nearly melt into the cheese. If you’re looking for something a little heftier, go ahead and give white corn tortillas a try.
Store-bought rotisserie chicken is the easiest to shred, and I typically go at the bird using just two forks and some willpower.
Unlike traditional enchilada sauce, the green sauce in this recipe isn’t cooked and is bursting with fresh ingredients. Because of that, it’s best prepared and used right away.
What’s in This Recipe?
The full recipe, with amounts, can be found in the recipe card below.
Canned hatch chiles — The distinct fruity, smoky flavor of the hatch chiles really takes the filling to the next level. They’re not too spicy, but they definitely pack in some heat.
Onion — Dice it finely so you don’t crunch down on big bites in the filling.
Shredded Mexican cheese blend — Feel free to swap in another favorite cheese, like Monterrey Jack or cotija.
Flour tortillas — Flour tortillas almost melt into the filling. If you’re a corn tortilla purist, fry them quickly in canola oil (about 10 seconds) to make them pliable and easy to roll.
Heavy whipping cream — Makes for a creamy sauce and balances out any spiciness from the hatch chiles.
Avocados — Lends the sauce even more creamy richness without making it taste heavy.
Chicken broth — Thins out the sauce without making it taste watery.
Fresh cilantro — Since the green enchilada sauce gets blitzed in the blender, you can use both the stems and leaves.
Lime juice — Brightens up the sauce and cuts through the heavy cream.
Spices — A little ground cumin, garlic salt, and kosher salt are all you need to finish the sauce.
How to Make Green Chicken Enchiladas
Blend up the sauce. It’s as easy as adding everything to a blender and mixing until smooth.
Make the filling. Stir together the shredded chicken, onion, and hatch chiles.
Sauce them up. Add part of the green sauce to inject the filling with flavor and keep it moist.
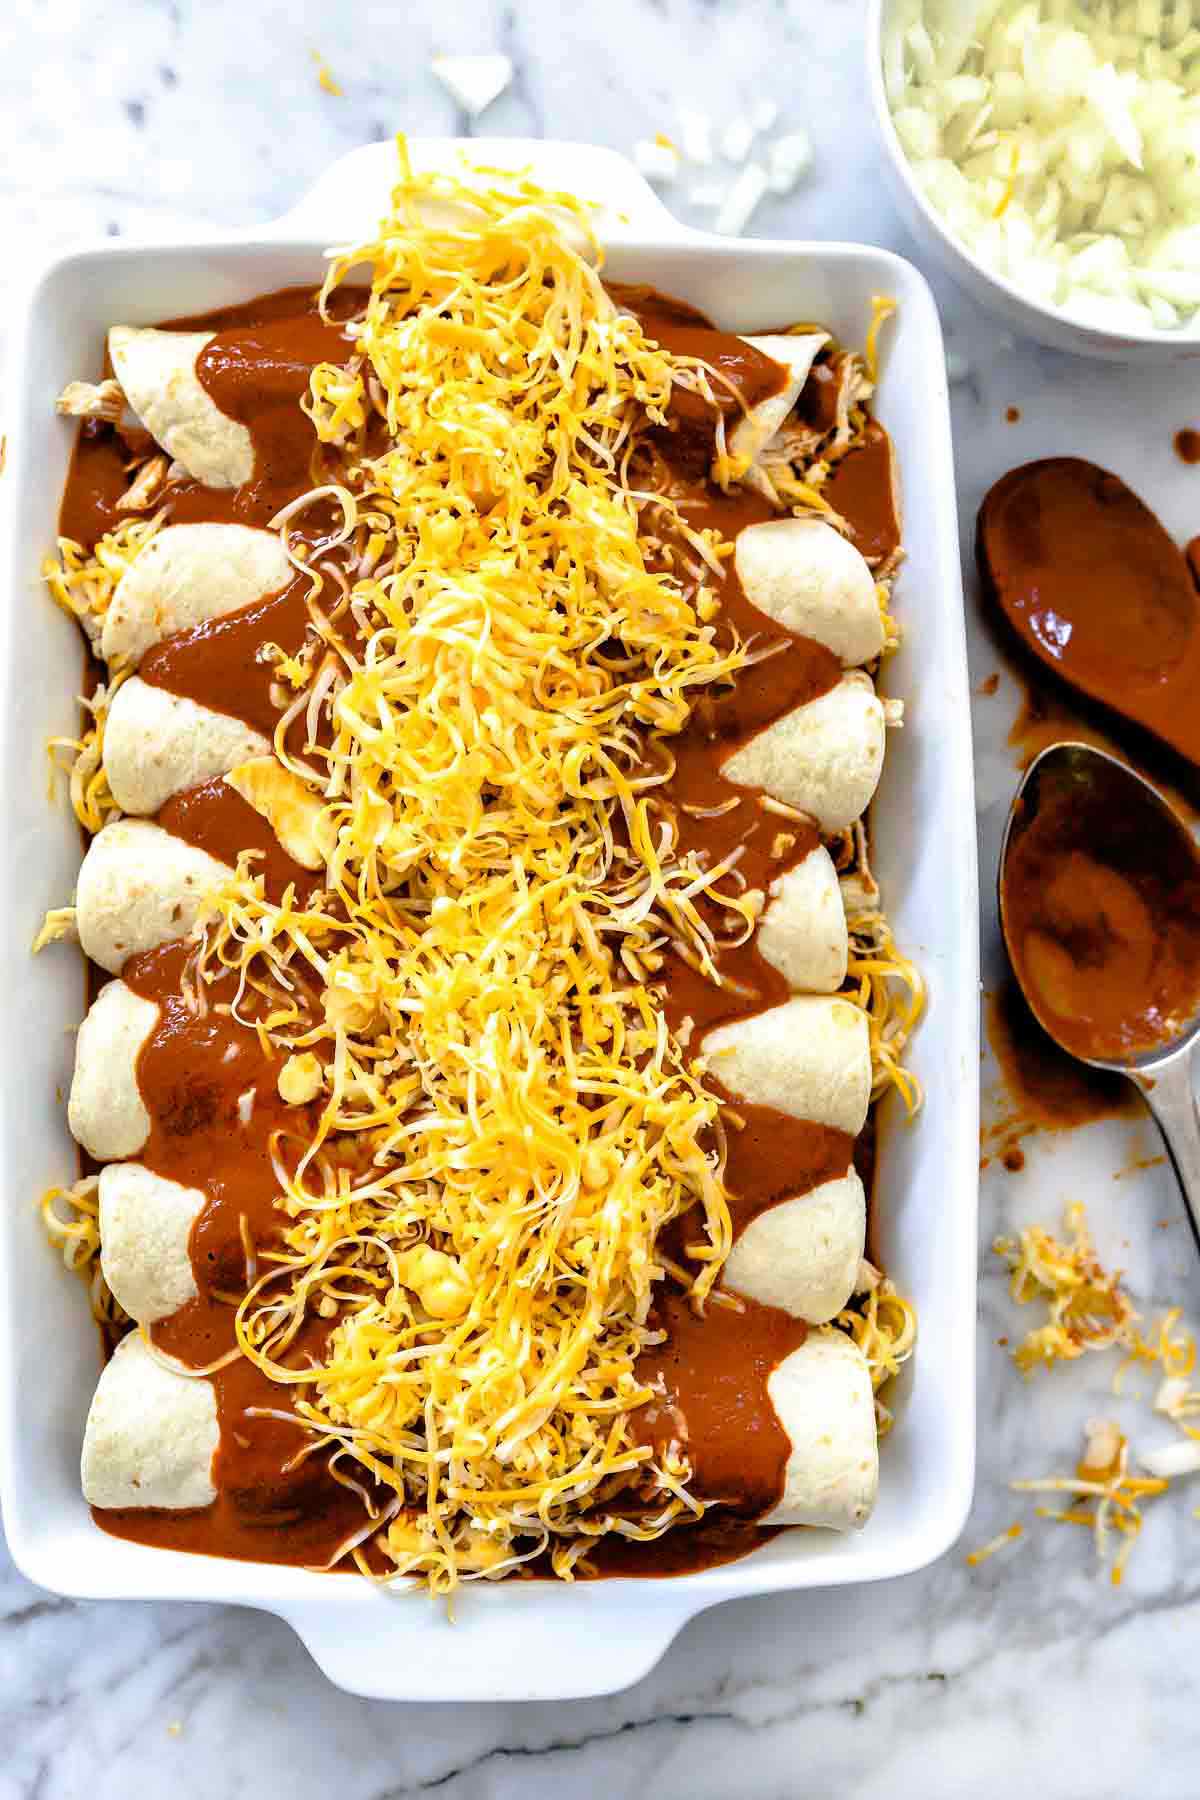
Roll ’em up. Add a little of the chicken mixture and shredded cheese to each tortilla, then roll the enchiladas. Place them seam-side down in your baking dish to avoid leakage in the oven.
Heidi’s Tip: I like to spoon a little sauce into the bottom of the baking dish to prevent the enchiladas from sticking and flavor them from the bottom-up.
Sprinkle with cheese and bake. Finish the enchiladas with a final layer of sauce and a hearty sprinkling of cheese before baking until browned and bubbling. Cover the pan with foil to seal in the moisture and encourage even cooking before removing so the cheese can brown in the final few minutes.
FAQs
Can enchiladas be frozen?
Enchiladas are a fantastic freezer meal to have on hand. Assemble the enchiladas, then cover tightly with plastic wrap and foil before freezing.
Bake the enchiladas from frozen (remove the plastic wrap first!) for 45 minutes, covered, then a final 10 minutes uncovered.
Can I use a different enchilada sauce?
If you’re not in the mood for green enchiladas, swap out the cilantro lime sauce with classic red enchilada sauce or mole sauce.
Should I cover enchiladas when baking them?
Pop the enchiladas into the oven covered, then after about 20 minutes remove the foil. This ensures the enchiladas will be heated through with a golden layer of cheese on top without the danger of drying them out.
Storage Tips
Leftover enchiladas will last up to 5 days in the fridge, noting that the tortillas will continue to soften as they sit in the sauce. Reheat enchiladas for 30-second bursts in the microwave or covered in a 350ºF oven.
What to Serve With Green Chicken Enchiladas
If you make this recipe, please let me know! Leave a ⭐️⭐️⭐️⭐️⭐️ rating below, leave a comment to tell us what you think, and tag me on Instagram @foodiecrush.
Green Chicken Enchiladas Recipe
Chicken enchiladas are topped with the creamiest homemade avocado cilantro sauce for an easy dinner the whole family will gobble up.
To prepare the sauce: Mix whipping cream, chicken broth, 2 avocados, cilantro leaves and stems, cumin, garlic salt, lime juice and ½ teaspoon kosher salt in a blender and mix well to combine. Season with more salt if needed.
In a large bowl mix together chicken, chiles and onion. Add half of the avocado cream and stir to mix well. Add more salt if needed (this will depend on how salty your rotisserie chicken is.)
Prepare a 9×12-inch baking dish by giving it a light coat of cooking spray and ¼ cup of avocado cream spread evenly on bottom of baking dish.
To assemble enchiladas: Place about ⅓ cup chicken mixture along the bottom third of tortilla and top with ¼ cup of shredded cheese. Carefully roll the tortilla and place it seam-side down in the baking dish. Repeat placing tortillas side by side until you’ve run out of space. Pour avocado cream evenly over the tortillas and spread 1 cup cheese on top.
Cover with foil and bake for 20 minutes, remove foil and bake for another 10 minutes or until enchiladas are cooked through and cheese is lightly browned.
Garnish with chopped green onion, cotija cheese, additional avocado, cilantro leaves and salsa or fresh tomatoes.
We send good emails. Subscribe to FoodieCrush and have each post plus exclusive content only for our subscribers delivered straight to your e-mail box.
As always, thank you for reading and supporting companies I partner with, which allows me to create more unique content and recipes for you. There may be affiliate links in this post of which I receive a small commission. All opinions are always my own.
Disclosure: This is a working partnership with Avocados from Mexico and Muy Bueno Cookbook. I was compensated for recipe development but as always my opinions are my own and my opinion is I love avocados.


