بلاگ

  • Creamy Tuscan Shrimp Pasta (Dairy-Free)

    Creamy Tuscan Shrimp Pasta (Dairy-Free)


    Serving spoons resting in a skillet of our dairy-free Tuscan shrimp pasta recipe

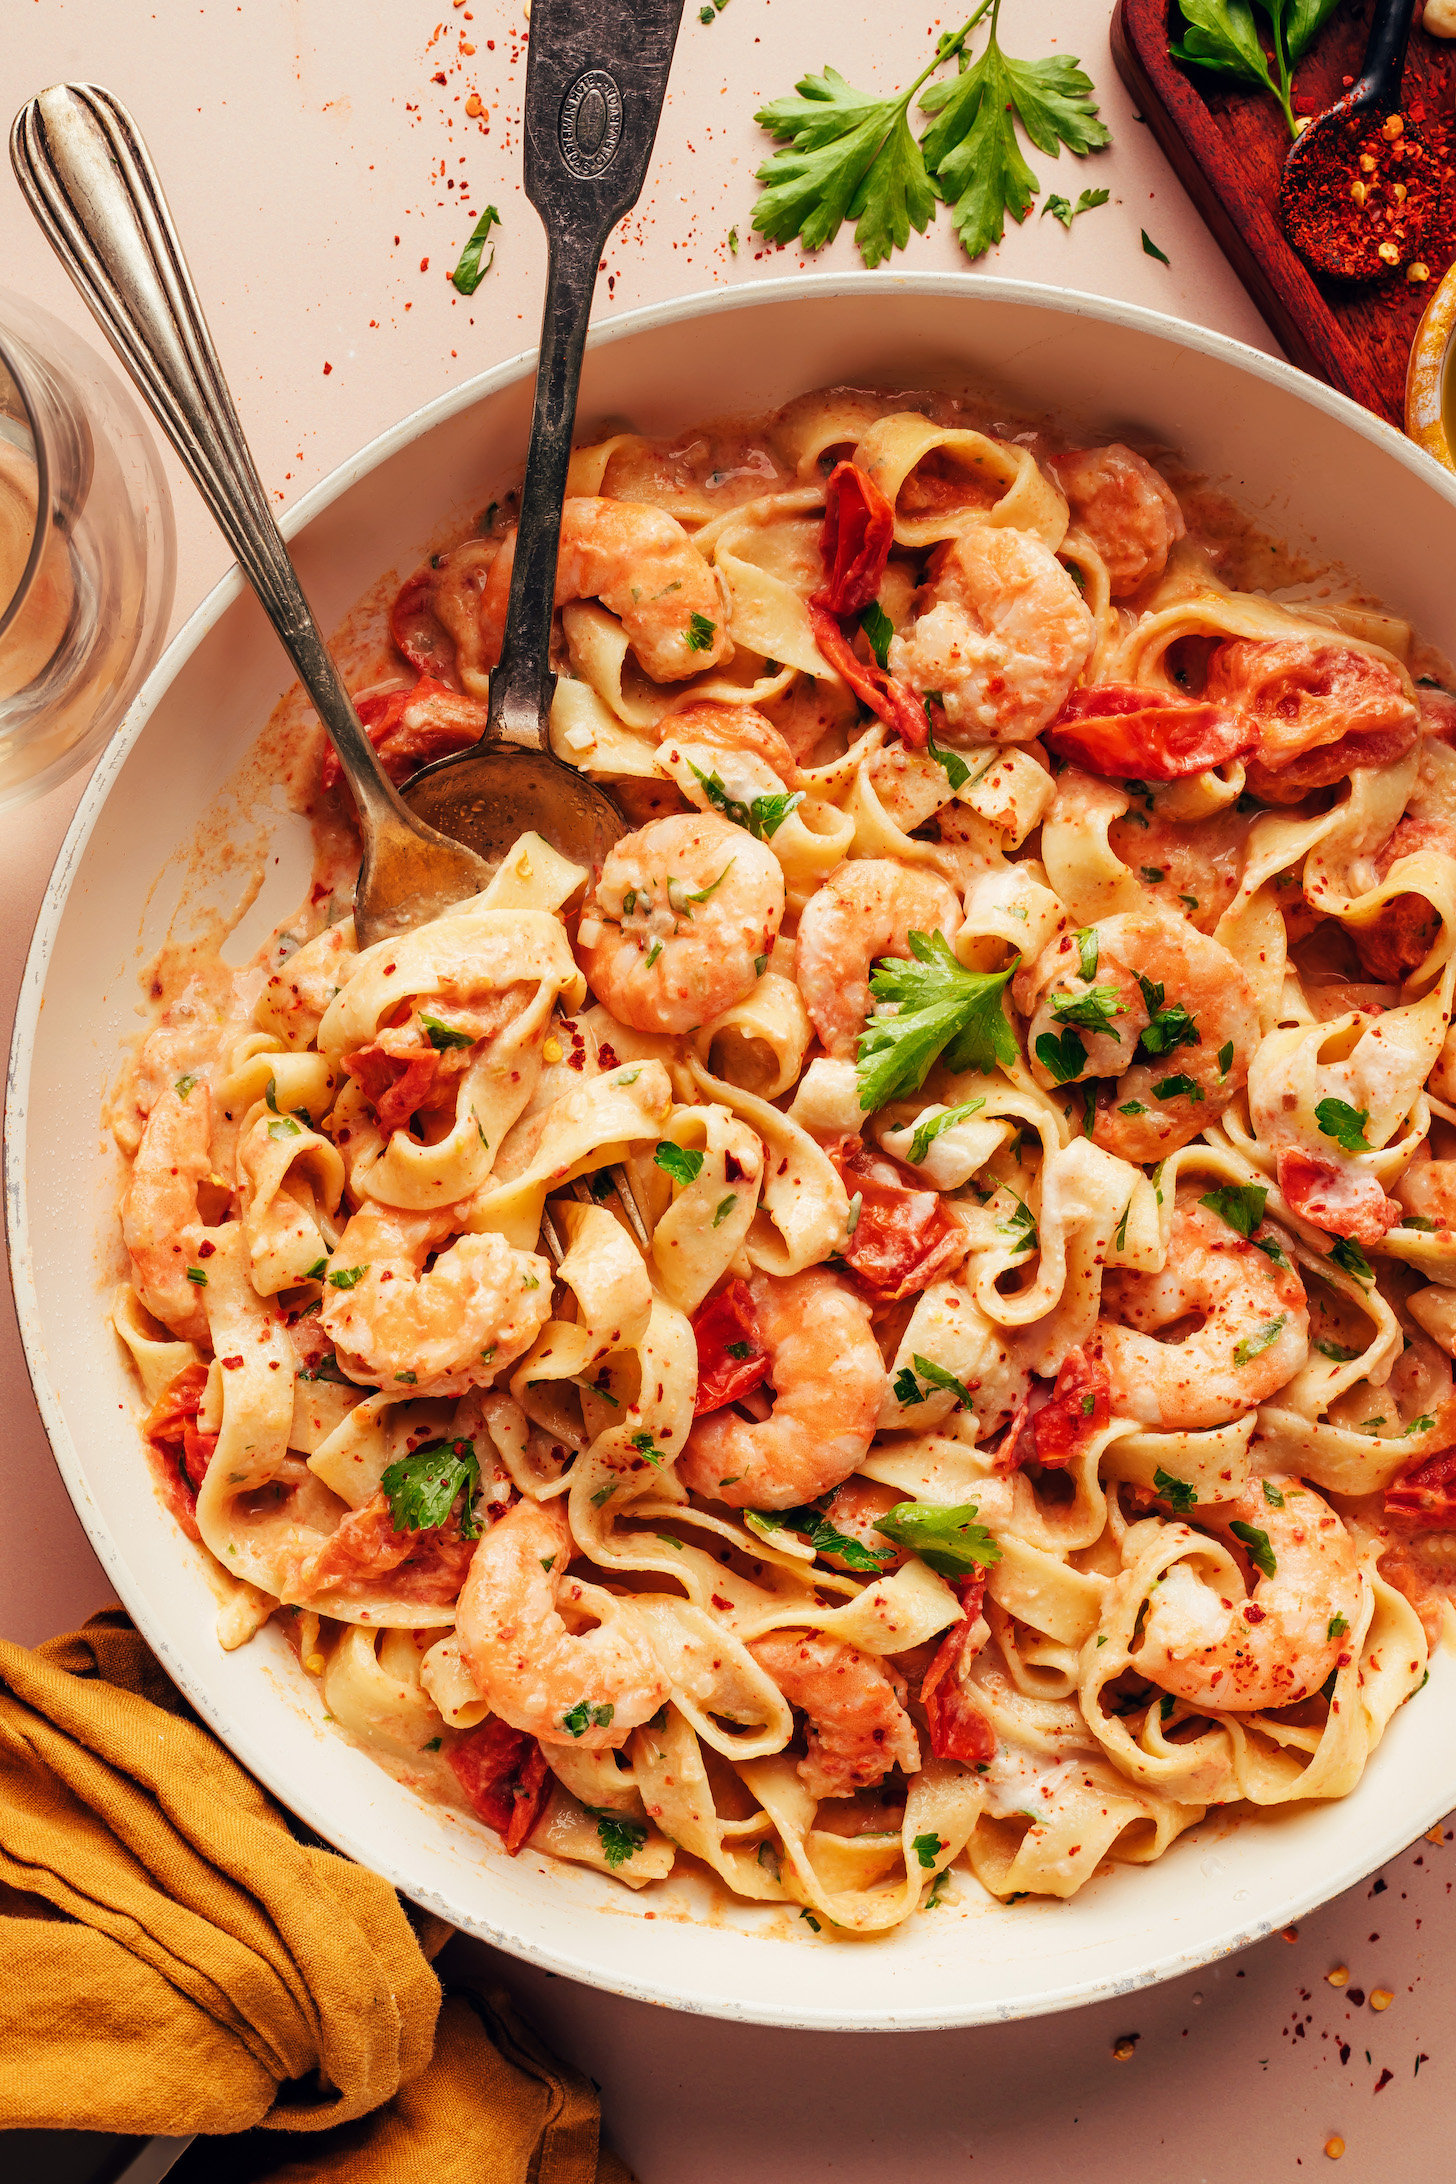
    Weekend flavor meets weeknight ease: 30-minute Tuscan-style shrimp pasta! This CREAMY, dairy-free dish is rich, garlicky, and bursting with bright tomato flavor.

    It’s impressive enough to wow any guests but simple enough that you’ll want to make it again and again! Let us show you how it’s done!

    How to Make Dairy-Free Shrimp Pasta

    This EASY shrimp pasta starts with cooking your favorite pasta (we like gluten-free fettuccine) and soaking some cashews for dairy-free creaminess.

    Cooking raw shrimp in a skillet with sautéed garlic and shallot

    Next come the perfectly cooked shrimp! The trick is to sauté shallots, garlic, and red pepper flakes for flavor, then add raw shrimp and cook until pink and slightly curled up. The timing will depend on the size of the shrimp and other factors, but we find 2 minutes per side is usually the magic number for shrimp that’s tender, fully cooked, and not rubbery.

    Cooked shrimp in a skillet with sautéed shallot and garlic

    Then it’s on to the bright, creamy tomato sauce! Inspired by our fan-favorite Creamy Italian White Bean Skillet Meal, cherry tomatoes cook with white wine, red pepper flakes, and salt until the tomatoes are soft and burst open.

    Pouring cashew cream into a skillet of burst tomatoes

    Then we add homemade cashew cream and the sauce becomes creamy and develops a thick, luxurious texture!

    Sprinkling fresh parsley over pasta

    Lastly, add in your cooked pasta, garnish with fresh parsley or basil, and dinner is served!

    Large serving dish of our creamy dairy-free Tuscan shrimp pasta

    We can’t wait for you to try this shrimp pasta! It’s:

    Creamy
    Bright
    Saucy
    Rich
    Flavorful
    Comforting
    & Easy to make!

    This dish is satisfying on its own or paired with sautéed greens, roasted broccoli, green salad, or garlic bread.

    More Dairy-Free Pasta Recipes

    If you try this recipe, let us know! Leave a comment, rate it, and don’t forget to tag a photo @minimalistbaker on Instagram. Cheers, friends!

    Fork with a close up bite shot of pasta swirled on a fork with shrimp

    Prep Time 10 minutes

    Cook Time 20 minutes

    Total Time 30 minutes

    Servings 4 Servings

    Course Entrée

    Cuisine Dairy-Free, Gluten-Free (optional), Italian-Inspired

    Freezer Friendly No

    Does it keep? 2-3 Days

    Prevent your screen from going dark

    CASHEW CREAM

    • 1/2 cup raw cashews, soaked
    • 1 ¼ cup water (plus more for soaking cashews)

    PASTA

    • 1 (8 oz.) box fettuccine or spaghetti (we like Jovial fettuccine // ensure gluten-free as needed)
    • 1 lb raw shrimp*, peeled and deveined with tails removed (thaw and pat dry if frozen*)
    • 2 Tbsp olive oil
    • 2 medium shallots, minced (2 shallots yield ~80 g or 1/2 cup)
    • 6-8 medium cloves garlic, minced (6-8 cloves garlic yield ~1/4 cup or 50 g)
    • 3/4-1 tsp red pepper flakes
    • 5 cups cherry tomatoes, left whole
    • 3/4 cup dry white wine (we like a lighter white like Sauvignon Blanc // or sub water)
    • 3/4-1 tsp sea salt (plus more to taste)
    • 1/2 cup chopped fresh parsley (or basil)
    • Add cashews to a heatproof bowl and cover with hot water by at least 1-2 inches. Let them soak while you get started on everything else. Soaking makes the cashew cream neutral-flavored and extra creamy, but (in a pinch) you can skip this step if using a powerful blender such as a NutriBullet or Vitamix.
    • Bring a large pot of water to a boil. Once boiling, add your pasta and cook according to the package directions.

    • If using frozen shrimp, see notes for defrosting instructions.

    • Meanwhile, heat a large skillet over medium heat. Once hot, add olive oil, shallots, and garlic and cook for 3-4 minutes until softened. Add the red pepper flakes and cook until fragrant (~1 minute). Add the shrimp and cook for 1-3 minutes on each side — until they turn pink and curl up (2 minutes per side is usually perfect!). They will cook quickly and cook time will depend on how hot your pan is. We like to let them curl up completely on the first side, then flip and cook until the underside is pink. To avoid under cooking, you want them to have a vibrant pink color (not translucent) and feel firm when pierced with a fork, but avoid overcooking or they will get rubbery! Remove the shrimp from the pan, place them on a plate, and set aside.

    • Add the cherry tomatoes, white wine, and salt to the same (relatively empty) pan (it’s okay if the sautéed shallots and garlic remain). Cover and cook on medium-high heat for 5-10 minutes or until the tomatoes have burst.

    • Meanwhile, make the cashew cream. Drain the cashews and add them to a high-speed blender with the water. Blend on high until smooth and creamy.
    • Remove the lid from the tomatoes and use the back of your spoon or spatula to further break them down. Turn the heat to medium-low and stir in the cashew cream. Let the sauce cook down for about 2 more minutes. Taste and adjust flavor as needed, adding more salt for overall flavor or red pepper flakes for heat. Add the shrimp back into the mixture and stir to coat. Turn off the heat and stir in the chopped parsley (or basil) and cooked pasta (keep separate if preparing in advance).

    • Serve immediately garnished with dairy-free parmesan cheese, red pepper flakes, or extra parsley and/or basil (all optional). Best served fresh but can be stored in an airtight container in the refrigerator for up to 2-3 days. Not freezer friendly.

    *We prefer using raw (vs. cooked) shrimp because it absorbs the flavors of the garlic and shallots while cooking. If using pre-cooked shrimp, we suggest adding it in step 3 very briefly (~20-30 seconds), then remove from the heat and proceed.
    *To quickly defrost frozen shrimp, place in a colander and run cold water over it for ~3 minutes, until no longer frozen. If it’s not defrosted (soft) after 3 minutes, allow to soak in cold water for up to 20-30 minutes, checking it and replacing the water after 5-10 minutes. Once thawed, drain and pat dry with a paper towel.
    *This dish pairs well with roasted broccoli, red bell pepper, and onion. To prepare the veggies, cut 1 head of broccoli into florets, 1/2 red bell pepper into 2-inch pieces, and 1/4 onion into 1/2-inch slices. Add to a parchment-lined baking sheet and toss with 1 Tbsp olive oil. Sprinkle generously with garlic powder, salt, and black pepper. Bake at 400 F (204 C) for ~15 minutes, until the veggies are tender and browned on the edges.
    *Inspired by our Creamy Italian White Bean Skillet Meal.
    *Nutrition information is a rough estimate calculated with Jovial brown rice fettuccine, the lesser amount of red pepper flakes, and without optional ingredients.

    Serving: 1 serving Calories: 535 Carbohydrates: 62.9 g Protein: 29.7 g Fat: 16.4 g Saturated Fat: 2.3 g Polyunsaturated Fat: 2.2 g Monounsaturated Fat: 8.9 g Trans Fat: 0 g Cholesterol: 175 mg Sodium: 1148 mg Potassium: 1024 mg Fiber: 5.8 g Sugar: 8.1 g Vitamin A: 722 IU Vitamin C: 30 mg Calcium: 127 mg Iron: 3.3 mg


    Source link

  • Carrot Cake – Spend With Pennies

    Carrot Cake – Spend With Pennies


    About the author

    Holly Nilsson is the creator of Spend With Pennies, where she creates easy, comforting recipes made for real life. With a passion for nostalgic flavors and simplified techniques, Holly helps busy home cooks create delicious meals that always work. She is also the author of “Everyday Comfort,” which promises to inspire even more hearty, home-cooked meals.
    See more posts by Holly

    Follow Holly on social media:

    pinterest facebook twitter instagram


    Source link

  • Elote Seasoning Recipe – The Daring Gourmet

    Elote Seasoning Recipe – The Daring Gourmet


    This post may contain affiliate links. See my disclosure policy.

    Celebrate the flavors of one of Mexico’s most popular street foods, elotes, in the form of this homemade Elote Seasoning recipe that is quick and easy to make and will add life, flavor, and fiesta to your foods! Highly versatile, its combination of smoky, spicy, sweet, tangy and salty is delicious on everything from grilled chicken and salmon to scrambled eggs and popcorn!

    elote seasoning recipe homemade traditional mexican elotes spice blend trader joe's copycat

    Mexican Street Corn Seasoning

    You already know that I’m huge advocate of making homemade seasoning blends and this elote seasoning is no exception. Making your own gives you full control over what’s in it (and what isn’t), is fully customizable (adjusting the level of salt and spiciness, swapping out ingredients, etc), is cheaper to make, and is much fresher and more vibrant tasting!

    One of my favorite Mexican seasoning blends, this homemade elote seasoning is wonderfully versatile and positively bursting with smoky, zesty, tangy, savory flavors! And if you’re looking for unique edible gift ideas, this is a great one!

    What is Elote Seasoning?

    You may be familiar with “Trader Joe’s Everything But the Elote Seasoning”. This is my take on it, but with even more flavor. Elote seasoning is a spice blend that is inspired by a traditional Mexican snack called elotes, or Mexican street corn. While you won’t find “elote seasoning” in Mexico, what you’ll find is grilled corn on the cob that is seasoned with chilies, cumin, cilantro, lime juice and cotija or queso fresco cheese. That combination of smoky, sweet, spicy, savory, salty and herbaceous flavors is captured in this dried elote seasoning blend that you can conveniently grab and shake onto a variety of foods. It’s a fun way to harness that famous flavor profile in everything from roast chicken to popcorn!

    elotes mexican street corn grilled

    Elote Seasoning Ingredients

    Mexican street corn (or elotes) feature a blend of sweet, smoky, spicy, herby, and salty. They’re sprinkled with a variety of ground chilies, cumin, salt, cilantro, lime juice and cotija or queso fresco cheese and then roasted on the grill. My elote seasoning recipe captures these flavors in a dried spice blend form that you can easily grab and shake onto your foods to capture that famous flavor. Here is what you’ll need to make it:

    • Chili Powder:  This is your standard mild chili powder that you can find in any store.
    • Guajillo or Ancho Chili Powder: I like to add a variety of chili blends for flavor complexity but if you don’t have guajillo chili powder or ancho chili powder you can substitute more of the regular chili powder. If you have another chili variety, add that!
    • Paprika: Adds color and an earthy sweetness.
    • Chipotle Powder: This adds the smoky component of the blend. Chipotle powder is made from smoked and ground jalapeno peppers. If you don’t have chipotle powder you can substitute smoked paprika. For my DIY’ers, see my tutorial on How to Make Chipotle Peppers and then grind some to use in this blend.
    • Cayenne Pepper:  If you’re using chipotle powder you won’t need the extra heat (unless you want more heat) but if you’re using smoked paprika, the cayenne will provide that added kick.
    • Parmesan cheese:  This mimics the flavor of the cotija and adds that wonderful “umami” element to the blend. If you’re vegan or dairy free, you can substitute nutritional yeast.
    • Cumin: Adds a slightly sweet, nutty flavor.
    • Garlic Powder: This adds a wonderful earthy umami component and rounds out the elote seasoning.
    • Dried cilantro:  Adds a bright citrusy-peppery flavor. Cilantro is the signature herb used for making elotes but it is a polarizing herb (it’s literally a gene thing; if you have the gene it tastes like soap). If you’re one of those people who can’t tolerate it, you can substitute oregano. You can find dried cilantro in the spice section of most grocery stores or you can easily make your own by dehydrating some fresh cilantro in the oven at 170-180F until dried and flaky and then crumble it with your fingers.
    • Dried Lime Zest: A key flavor component in Mexican street corn, you don’t want to miss out on this. Don’t worry about special ordering it, it’s so easy to make and I’ll show you how below.
    • Cane Sugar:  This mimics the sweetness of the corn and provides balance.
    • Salt:  I use kosher or sea salt. Depending on how you’re planning on using this blend, you can add more or less salt, or omit it entirely.
    elote seasoning ingredients homemade copycat trader joe's

    Elote Seasoning Recipe

    Let’s get started!

    First you’ll need to make the dried lime zest. Preheat the oven to 170-180F/75-80C.

    Zest one lime, lay the zest out on a plate and stick it in the oven for 15-20 minutes. Remove and let it cool completely, then crumble it up finely with your fingers.

    how to make dried lime zest

    Measure the ingredients and place them into a bowl or jar.

    elote seasoning recipe homemade traditional mexican elotes spice blend trader joe's copycat

    Stir the spices or shake the jar until combined. Done!

    Store the elote seasoning in a glass jar with an airtight lid.

    elote seasoning recipe homemade traditional mexican elotes spice blend trader joe's copycat

    Store in the fridge where it will keep for up to a month or at room temperature where it will keep for up to a week.

    elote seasoning recipe homemade traditional mexican elotes spice blend trader joe's copycat

    How to Use It

    One of the things I love about elote seasoning is its versatility. There are so many creative ways that you can use it. Here are just a few ideas to get you started:

    Storing Tips

    Unless you’re using the spice blend right away, be sure to use dehydrated and not fresh parmesan (dehydrated is the stuff in the canisters stored at room temp). If storing at room temp I recommend using the elote seasoning within a week. If you store it in the fridge, it will keep for up to a month.

    elote seasoning recipe homemade traditional mexican elotes spice blend trader joe's copycat

    For more homemade seasoning blends from around the world try my:

    elote seasoning recipe homemade traditional mexican elotes spice blend trader joe's copycat

    Elote Seasoning Recipe

    This Elote Seasoning captures the life and flavor of one of Mexico’s most famous street foods, elotes, in the form of a convenient spice blend you can add to a variety of foods for a delicious flavor kick!

    Prep Time 5 minutes

    Dehydrating Time (Lime Zest) 15 minutes

    Total Time 20 minutes

    Course Seasoning Blend

    Cuisine Mexican

    Servings 16

    Calories 8 kcal

    • To make the lime zest (this can be done days in advance): Preheat the oven to 170-180F/75-80C.Zest one lime, lay the zest out on a plate and stick it in the oven for 15-20 minutes. Remove and let it cool completely, then crumble it up finely with your fingers.
    • Place all of the ingredients in a bowl or in a jar and stir or shake to thoroughly combine. Store in a glass jar with an airtight lid in the fridge where it will keep for up to a month. At room temperature it should be used within a week. Makes about 1/3 cup seasoning.

    Storage:  Unless you’re using the spice blend right away, be sure to use dehydrated and not fresh parmesan (dehydrated is the stuff in the canisters stored at room temp). If storing at room temp I recommend using the elote seasoning within a week. If you store it in the fridge, it will keep for up to a month. 

    Serving: 2teaspoonsCalories: 8kcalCarbohydrates: 1gProtein: 0.4gFat: 0.4gSaturated Fat: 0.1gPolyunsaturated Fat: 0.1gMonounsaturated Fat: 0.1gCholesterol: 0.2mgSodium: 99mgPotassium: 41mgFiber: 1gSugar: 0.4gVitamin A: 617IUVitamin C: 0.2mgCalcium: 10mgIron: 0.4mg

    kimberly killebrew the daring gourmet

    Hi, I’m Kimberly Killebrew and welcome to Daring Gourmet where you’ll find delicious originals, revitalized classics, and simply downright good eats from around the world! Originally from Germany, later raised in England, world-traveled, and now living in the U.S., from my globally-influenced kitchen I invite you to tour the world through your taste buds!

    Read more about me…


    Source link

  • Friday Faves : April 18, 2025

    Friday Faves : April 18, 2025


    Hello and happy Friday!

    Egg Salad Sandwich with lettuce

    If you’re cooking hard-boiled eggs this weekend, you MUST try my foolproof method for the easiest-to-peel-hard boiled eggs. It works like a charm every time.

    And then you should make my egg salad sandwich, or try my version with a touch of curry added in.

    Here’s a smart DIY: How to make natural Easter egg dye.

    I played this album in my bedroom over and over and over again, and now she’s re-released it 35 years later. It’s no wonder it was just named to the National Recording Registry, and this interview with Tracy about the album makes me love it even more now. So much.

    This dating documentary series looks interesting and a way better dating show than The Bachelor.

    If you have Instagram, I suggest you activate two-factor authentication so it’s harder for someone to log in as you, and steal your account.

    In case you were wondering…Pairing wine with Easter candy. This is my fave Easter candy so it looks like I’ll be having chardonnay. Who else turned the blue ones into lipstick??? 🙂

    I have ultra-ripe bananas on my counter right now so I think I’ll give these protein-packed muffins a try.

    My friend Phi made this hot honey chicken recipe from my friend Jessica’s new cookbook and it looks so easy and scrumptious. Now I need to choose a recipe from Jess’s new book to share but there’s so many good ones, I gotta narrow it down!

    Under the category of more things to make with cottage cheese (where will it end?)

    This Easter-ized play on Chex Mix is so fun.

    I’m totally intrigued by mastering spatchcock chicken and this recipe looks so good. The step-by-step instructions for butterflying the chicken are oh-so-helpful.

    I’ve had a spring salad recipe like this one on my recipe development list because it looks so fresh and inviting.

    OMG, these pork bites look so perfectly juicy and cripsy and now I need to break out the air fryer!

    Pineapple, coconut, and an ultra-creamy frosting! This is 1000000% my kind of cake!

    I love a ham and cheese make-ahead casserole and this recipe with croissants looks divine!

    And, these little ham and cheese pockets would be happy on any table.

    Another kale salad to add to the list. Yum.

    I mostly eat it deep fried, but this calamari recipe with pasta looks too succulent to pass up.

    This chicken sandwich is a total meal and overloaded with flavor!

    Dieticians agree, eating more might be the secret to your strongest year yet.

    I ditched my self-tanner because I think it was too old, and bought this brand instead and I like it so much because it doesn’t smell!

    My vice is yummy smelling soaps and lotions and I think I’m going to have to break down and get this body wash because the cheaper knock-offs I’ve tried haven’t done the job.

    This straw bag would fit everything you need for summer.

    If I had a pool, this is the pool I would have.

    12 teeny steps to simplify your life. I’m starting with #4.

    That’s it for this week. Have a wonderful Easter and Passover. XO

    We send good emails. Subscribe to FoodieCrush and have each post plus exclusive content only for our subscribers delivered straight to your e-mail box.

    Follow me on Instagram, Facebook, and Pinterest for more FoodieCrush inspiration.

    As always, thank you for reading and supporting companies I partner with, which allows me to create more unique content and recipes for you. There may be affiliate links in this post of which I receive a small commission. All opinions are always my own.


    Source link

  • No-Bake Gluten-free Cookie Pops | Gluten Free & More

    No-Bake Gluten-free Cookie Pops | Gluten Free & More


    Spring Fun in Every Bite:

    If you’re looking for a fun, hands-on treat to make with the kids, these No-Bake Cookie Pops are the perfect pick! Easy, mess-friendly, and full of personality, they’re ideal for springtime celebrations—or any day you want a sweet little project.

    Made with Home Free Chocolate Chip Mini Cookies and just a few simple ingredients, these pops come together in no time. Kids can help with everything from rolling the cookie mixture into balls to dipping and decorating. For a festive spring look, we used pastel-colored chocolate melts—think soft pinks, blues, yellows, and greens. Add sprinkles and you’ve got instant joy on a stick.

    Whether you’re prepping for a party, creating Easter basket goodies, or simply keeping little hands busy on a weekend afternoon, these no-bake cookie pops are as fun to make as they are to eat. Just be ready—they’ll disappear fast!

    No-Bake-Cookie-Pops-Recipe

    No-Bake Cookie Pops

    Prep Time15 minutes

    Fridge Time45 minutes

    Servings: 10 pops

    Calories: 40kcal

    Author: Gluten Free & More

    Nutrition Facts

    No-Bake Cookie Pops

    Amount Per Serving

    Calories 40
    Calories from Fat 36

    % Daily Value*

    Fat 4g6%

    Saturated Fat 2g10%

    Polyunsaturated Fat 0.2g

    Monounsaturated Fat 1g

    Cholesterol 11mg4%

    Sodium 36mg2%

    Potassium 15mg0%

    Carbohydrates 1g0%

    Sugar 0.4g0%

    Protein 1g2%

    Vitamin A 152IU3%

    Calcium 11mg1%

    Iron 0.01mg0%

    * Percent Daily Values are based on a 2000 calorie diet.

    Disclaimer: All nutrition facts on Gluten Free & More are meant only as a guide and may differ depending on product brands used or ingredient substitutions. Some errors may occur, so you are encouraged to confirm the recipe’s ingredient and nutrition suitability for your own diet.

    Have you tried this recipe? Give it a star rating and let us know your thoughts in the Ratings & Reviews section below.


    Source link

  • Easy Raspberry Compote (Naturally Sweetened)

    Easy Raspberry Compote (Naturally Sweetened)


    Spoonful of raspberry compote over a jar of compote with fresh raspberries next to it

    Looking to add a burst of flavor to your favorite breakfasts and desserts? Say hello to Raspberry Compote! This simple, 2-ingredient, 15-minute berry sauce adds delicious, tart-sweet flavor to everything from cheesecakes to pancakes & waffles, crepes, ice cream, and so much more.

    Whether you have an abundance of fresh raspberries or want to make a warm sauce with frozen berries during the cooler months, this recipe has you covered. Let’s dive in and make some raspberry magic!

    Plate of fresh raspberries with a spoonful of sea salt and bowl of maple syrup next to it

    What is Compote?

    Compote (the French word for stewed fruit) refers to fruit that’s been cooked until it’s warm and tender. It originated in medieval Europe and was traditionally made by cooking down fruit with water, sweetener, and spices.

    Our inspired, naturally sweetened version is made with raspberries and is about as simple as it gets! It results in a similarly thick stewed fruit mixture in which the raspberry flavor shines.

    How to Make Raspberry Compote

    This EASY raspberry compote requires just 2 ingredients: raspberries (fresh or frozen) and maple syrup. There’s no need to add water to this compote since the maple syrup provides just enough liquid to get things bubbling.

    Pouring maple syrup into a saucepan of fresh raspberries

    The raspberries and maple syrup are heated in a saucepan and mashed with a spoon or potato masher, causing the berries to begin releasing their liquid.

    Using a potato masher to mash raspberry compote in a saucepan

    After simmering for about 10 minutes, the mixture becomes thicker with an intensified raspberry flavor. A pinch of salt is optional at this point for subtle flavor balance.

    Saucepan of homemade raspberry compote next to ingredients used to make it

    The final steps thicken the compote even more! While it thickens as it cools, we like to make it even thicker (and free from seeds) by passing some (or all) of it through a fine mesh strainer.

    Bowls of raspberry compote with and without seeds and a strainer used for removing the seeds

    For cheesecakes, a fully smooth and strained compote is nice. For pancakes and waffles, we prefer to strain just half!

    Bowl of fresh raspberries next to a jar of raspberry compote

    We can’t wait for you to try this compote! It’s:

    Perfectly tart-sweet
    Vibrant
    Fruity
    Naturally sweetened
    Quick & easy
    & SO versatile!

    With minimal effort, you have a delicious topping ready for all your pancakes, waffles, crepes, French toast, oats, cheesecake, and so much more!

    More Raspberry Recipes

    If you try this recipe, let us know! Leave a comment, rate it, and don’t forget to tag a photo @minimalistbaker on Instagram. Cheers, friends!

    Using a spoon to add raspberry compote on top of a stack of crepes

    Prep Time 5 minutes

    Cook Time 10 minutes

    Total Time 15 minutes

    Servings 8 (2-Tbsp servings)

    Course Condiment, Sauce

    Cuisine Gluten-Free, Oil-Free, Vegan

    Freezer Friendly 1 month

    Does it keep? 1 Week

    Prevent your screen from going dark

    • 3 cups raspberries (fresh or frozen)
    • 1/4 cup maple syrup
    • 1 pinch sea salt (optional)
    • Place raspberries and maple syrup in a small saucepan and bring to medium heat.

    • Once bubbling, reduce heat slightly and use a wooden spoon or potato masher to muddle and mash the fruit.
    • Continue cooking over medium-low heat (uncovered) for 10-12 minutes, mashing occasionally to combine until the volume is reduced to about half and it’s slightly thickened. Turn off the heat and adjust the flavor as needed, adding more maple syrup for sweetness and the optional pinch of salt to balance the flavor and reduce any bitterness.

    • Remove from the heat and let cool slightly. It will thicken more as it cools, but it can be enjoyed warm or at room temperature. If you prefer your compote without seeds, you can strain it after cooling. We like straining half of the compote (it minimizes the crunch from the seeds but ensures the compote is thick with a noticeable raspberry appearance). To strain, set a fine mesh strainer over a bowl, pour the compote into the strainer, and stir with a spoon to encourage it to move through the strainer.
    • Enjoy with oats, pancakes, waffles, crepes, French toast, cheesecake, and more! Leftover compote will keep in the refrigerator for 1 week or in the freezer for 1 month. We like to freeze in an ice cube tray to make it easy to defrost small amounts. When ready to use, reheat in the microwave or on the stovetop until warm.

    Serving: 1 (two-tablespoon) serving Calories: 48 Carbohydrates: 11.8 g Protein: 0.5 g Fat: 0.3 g Saturated Fat: 0 g Polyunsaturated Fat: 0.17 g Monounsaturated Fat: 0.03 g Trans Fat: 0 g Cholesterol: 0 mg Sodium: 1.6 mg Potassium: 87 mg Fiber: 2.8 g Sugar: 7.9 g Vitamin A: 2 IU Vitamin C: 11 mg Calcium: 21 mg Iron: 0.3 mg


    Source link

  • Crock Pot Ham – Spend With Pennies

    Crock Pot Ham – Spend With Pennies


    About the author

    Holly Nilsson is the creator of Spend With Pennies, where she creates easy, comforting recipes made for real life. With a passion for nostalgic flavors and simplified techniques, Holly helps busy home cooks create delicious meals that always work. She is also the author of “Everyday Comfort,” which promises to inspire even more hearty, home-cooked meals.
    See more posts by Holly

    Follow Holly on social media:

    pinterest facebook twitter instagram


    Source link

  • Easter Bread – Jo Cooks

    Easter Bread – Jo Cooks


    This post may contain affiliate links. Please read my disclosure policy.

    Let’s be honest, I don’t need an excuse to bake bread—but if Easter gives me a reason to bust out a golden braided loaf, I’m going for it. This Braided Easter Bread looks fancy (your relatives will be impressed), but it’s surprisingly simple to pull off—and the payoff is huge. Soft, rich, slightly sweet, and totally slather-worthy with butter and jam.

    Sliced Easter bread on a wooden cutting board.

    We grew up with homemade Easter bread on the table—usually made by hand, with lots of strong opinions about braiding technique. These days, I let the mixer do the hard work, but the result still brings that same cozy nostalgia to the holiday table—with far less mess on the counter.

    Before You Start – Tips, Ingredients & Secrets

    ingredients needed to make easter bread.
    • Let’s talk yeast. We’re using active dry yeast, so it needs to be proofed. That quick 5-minute wait in warm water with a bit of sugar is your way of checking that the yeast is alive and ready to work its magic. If it doesn’t foam, toss it—it’s either expired or just moody.
    • Flour power. You’ll need around 6½ cups of all-purpose flour, but start with 6 cups and add more as needed. You’re aiming for a slightly sticky dough that pulls away from the sides of the bowl—not something that sticks to your elbows. If it’s super dry, it’ll give you dense bread. We want fluffy and light.
    • Butter matters. Melted unsalted butter adds richness, and yes, you’re using a whole cup—don’t panic. This is Easter bread, not a salad. The butter makes the crumb incredibly tender, so don’t skimp.
    • Eggs = richness + structure. This dough uses five eggs, which is part of what makes it so soft, rich, and yellow-toned. Room temperature eggs mix better, so pull them out early.
    • Knead like you mean it. Whether you use a stand mixer or your hands, knead for a solid 5–7 minutes until smooth and elastic. Your dough should feel soft and a bit tacky but not wet. And yes, your arms will thank you later.
    • The rise needs warmth. Dough loves a cozy, draft-free spot. I like to use my oven with the light on or place the bowl near a sunny window. If your kitchen is chilly, give it a little extra time—it should double in size before shaping.
    • To braid or not to braid? Braiding looks beautiful, and it’s not hard once you try it. Divide the dough into 3 strands per loaf, roll them into logs, and braid like you’re making a friendship bracelet. Just thicker. And with more carbs.
    • Egg wash = bakery shine. Brush the loaves with a beaten egg before baking for that gorgeous golden finish. Sprinkle with sesame or poppy seeds for a little extra texture and visual flair.
    • Loaf pan or freeform? Totally your call. Loaf pans give you a taller, more structured loaf. Freeform on a baking sheet lets that braid shine. Just grease your pans or line your sheet with parchment.
    front shot of Easter bread with the end sliced off.
    process shots showing how to make easter bread.

    In the bowl of your stand mixer, combine the active dry yeast with lukewarm water and a bit of sugar. Stir and let it sit for about 5 minutes. You want to see some foam—that’s your yeast saying “I’m alive!”

    process shots showing how to make easter bread.

    Add the rest of the sugar, warm milk, melted butter, eggs, salt, and 6 cups of flour to the bowl. Using your dough hook, mix on low speed until the dough starts pulling away from the sides. Add more flour, a tablespoon at a time, if it’s too sticky. You’re aiming for a soft, slightly tacky dough that still cleans the sides of the bowl. Let it knead for 5–7 minutes.

    process shots showing how to make easter bread.

    Transfer the dough to a greased bowl, spray the top of the dough with cooking spray, then cover the bowl with plastic wrap. Let it rise in a warm, draft-free spot until doubled in size—about 1 hour. This is a great time to make a coffee and stare at your rising dough like a proud parent.

    process shots showing how to make easter bread.

    Punch down the dough, then divide it in half. For each half, divide into 3 equal pieces, roll them into long ropes, and braid like you’re on Great British Bake Off. Pinch the ends to seal. You can place them on parchment-lined baking sheets or into greased 12-inch loaf pans.

    process shots showing how to make easter bread.

    Cover and let the loaves rise again until puffy and nearly doubled in size, about 30 minutes. They should look nice and plump—like they’ve had a very relaxing nap.

    process shots showing how to make easter bread.

    Brush the tops generously with egg wash, then sprinkle with sesame seeds (or poppy seeds if you’re feeling fancy). Bake at 350°F (175°C) for about 30 minutes, or until deep golden brown and your kitchen smells like a bakery.

    Let the bread cool in the pans for about 10 minutes, then transfer to a wire rack. Slice when it’s warm but not hot—trust me, patience is hard here but worth it.

    overhead shot of two loaves of braided Easter bread on a cooling rack.

    Frequently Asked Questions

    What is considered lukewarm water for yeast?

    Lukewarm means around 100°F to 110°F (38°C to 43°C)—warm to the touch but not hot. If it feels like bathwater, you’re good. Too hot and you’ll kill the yeast (RIP little guys), too cold and they’ll just sit there doing nothing.

    Can I make the dough ahead of time?

    Absolutely. After the first rise, cover and refrigerate the dough overnight. Let it come to room temp before shaping and continuing with the second rise. Perfect if you’re planning ahead for brunch or just want to sleep in (relatable).

    How do I decorate Easter bread?

    Traditionally, you can press colored Easter eggs (raw or hard-boiled) into the braid before baking. Just nestle them into the dough after shaping. You can also get fancy with colored sprinkles or use poppy or sesame seeds for that classic bakery look. Optional—but highly encouraged for extra Easter flair.

    Can I freeze the bread?

    Yes! Once fully cooled, wrap the loaf tightly in plastic wrap and foil, then freeze for up to 2 months. Thaw at room temp and warm in the oven before serving. It reheats beautifully.

    How long does it stay fresh?

    This bread is best within 2–3 days at room temperature. Store it in an airtight container or bread bag. If it starts to dry out? French toast to the rescue.

    Can I add raisins or citrus zest?

    Totally! Add a handful of raisins, dried cranberries, or a bit of orange/lemon zest to the dough before kneading. It gives it a little extra sweetness and makes it more traditional in some European variations.

    4 Slices of Easter bread being cut from the loaf on a wooden cutting board.

    Try These Delicious Bread Recipes Next

    4 Slices of Easter bread being cut from the loaf on a wooden cutting board.

    Easter Bread

    Prep 45 minutes

    Rising time 1 hour 15 minutes

    Cook 30 minutes

    Total 2 hours 30 minutes

    This Braided Easter Bread is a soft, rich, golden loaf with just a touch of sweetness. Beautifully braided, buttery, and perfect for Easter brunch or any special occasion.

    Instructions 

    • Add the yeast, ½ cup of water, and 2 teaspoons of the sugar to the bowl of your mixer, stir and let it sit for 5 minutes until the yeast starts to activate and foam.

    • Add the remaining sugar, milk, melted butter, eggs, salt and 6 cups of the flour. Use the dough hook to mix on low speed, until the dough basically comes clean from the side of the bowl. Add the remaining flour as needed. I used the full 6½ cups of flour. The dough should be sticky but it should come clean from the side of the bowl. Make sure to mix for about 5 to 7 minutes.

    • Spray a large bowl with cooking spray, place the dough in the bowl and spray the dough itself with a bit of cooking spray. Cover the bowl with plastic wrap. Let the dough rise in a warm, draft-free environment until doubled in size, about 40 minutes to an hour. Once doubled in size, punch it down to release some of the air out.

    • Divide the dough in half. I prefer to braid these loaves, but you can also just roll out each piece of dough into a loaf and place it into greased loaf pans. I prefer to do a 3 strand braid. To do so cut each half into 3 pieces, and roll each piece into long strips about a foot long. Braid and repeat with remaining dough.

    • Preheat the oven to 350°F.

    • You can either place them on a baking sheet lined with parchment paper, or if you have 12-inch loaf pans, grease them well with cooking spray and place the loaves in them. Let them rise a second time until doubled in size in a warm, draft-free environment. Should take about 30 minutes.
    • Brush the loaves with the egg wash all over. Sprinkle with sesame seeds or poppy seeds. Bake the bread for 30 minutes or until golden brown. If using loaf pans, let them cool for 10 minutes in the pans before transferring them to a cooling rack to finish cooling.

    Notes

    1. Don’t rush the rise: Give that dough time to double in size both times—rushing it will give you dense bread, and no one wants that on a holiday.
    2. Yeast 101: Make sure your yeast foams during proofing. If it doesn’t, start over. It’s the backbone of this whole operation.
    3. Braid your way: Traditional 3-strand braid works great, but if you’re feeling confident (or reckless), try a 4- or 6-strand for extra flair. YouTube is your friend.
    4. Loaf pan vs baking sheet: Loaf pans = structured, tall loaves. Baking sheet = freeform, bakery-style braid. Both delicious.
    5. Make it festive: Tuck a few dyed Easter eggs into the braid (just don’t eat the raw ones after baking). Or go sweet with icing drizzle post-bake.
    6. Leftovers? Don’t waste them. Use slices for French toast, bread pudding, or even a sweet breakfast sandwich. Trust me, it’s chef’s kiss.

    Nutrition Information

    Serving: 1sliceCalories: 234kcal (12%)Carbohydrates: 31g (10%)Protein: 6g (12%)Fat: 10g (15%)Saturated Fat: 5g (31%)Polyunsaturated Fat: 1gMonounsaturated Fat: 3gTrans Fat: 0.3gCholesterol: 67mg (22%)Sodium: 170mg (7%)Potassium: 74mg (2%)Fiber: 1g (4%)Sugar: 5g (6%)Vitamin A: 313IU (6%)Vitamin C: 0.02mgCalcium: 33mg (3%)Iron: 2mg (11%)

    Notice: Nutrition is auto-calculated for your convenience. Where relevant, we recommend using your own nutrition calculations.

    4 Slices of Easter bread being cut from the loaf on a wooden cutting board.

    Did You Make This?

    We love seeing what you made! Tag us on Instagram at @jocooks or hashtag #jocooks so we can see your creations!

    Originally Published January 2012.


    [ad_2]
    Source link

  • Easy Veggie Wraps with Hummus

    Easy Veggie Wraps with Hummus


    These simple veggie wraps are fast, fresh, and easy to assemble. Use any flavor of hummus you like, and mix and match the vegetables to use up whatever’s in your produce drawer.

    Hummus wrap with avocado and tomato

    This veggie wrap recipe is one of those “recipes” that seems more like the assembly of pre-made ingredients rather than an actual recipe. But because it’s become my standard lunch, I deemed it in need of a share.

    To make the wrap, a soft and pliable tortilla is slathered with creamy hummus before being piled with thinly sliced cucumber and tomato, spinach, avocado, and sprouts.

    Go crazy with the veggies or pare back this recipe based on your personal tastes. It’s a cinch to customize, so get creative by switching up the type of wrap, hummus, and veggies you use.

    Heidi’s Tips for Recipe Success

    • Hummus and veggie wraps are a quick yet filling vegetarian lunch. Customize the how you like using any vegetables in your produce drawer.
    • This recipe can be made low-carb by swapping the tortilla for a lower-carb alternative.
    • These wraps are not only vegetarian, but they’re accidentally vegan too!
    • Slice the cucumber lengthwise in thin planks so the slices run all the way across the tortilla and don’t fall out when cut.
    What's in Hummus Veggie Wraps ingredient ideas

    What’s in This Recipe?

    The full recipe, with amounts, can be found in the recipe card below.

    • Tortilla — I used a spinach flavored wrap and there are so many others on the market that you can really have fun creating flavor combos. Sun-dried tomato, jalapeño, garlic, whole wheat…the list goes on and on. Use a standard (or flavored) tortilla if you prefer.
    • Hummus — stick with classic hummus, or use roasted red pepper hummus for even more flavor.
    • Cucumber — is sliced thinly, skins and seeds and all. I halve the cucumber instead of slicing it in rounds, then slice it lengthwise so it’s one less veggie chunk to escape out the sides with each bite.
    • Spinach — is an easy way to add extra greens to this meal, plus fresh spinach is easy to squish down in a loaded veggie wrap like this.
    • Tomato — avoid using cherry or grape tomatoes since they tend to fall out of wraps.
    • Avocado — adds an extra layer of creaminess.
    • Sprouts — provide a fresh flavor and bite of texture to a veg heavy wrap like this.
    • Microgreens — have a more concentrated flavor than their fully-grown counterparts. Omit if desired.

    Ingredient Swaps and Substitutions

    • Tortilla — use any flavor you like, and choose a gluten-free variety if needed.
    • Hummus — replace with baba ganoush, tzatziki, creamy avocado salsa, or spicy guac depending on the flavor and texture you’re craving.
    • Veggies — swap the spinach, tomato, and cucumber with any combination of vegetables you like.
    How to layer hummus veggie wrap sandwich

    How to Make Veggie Wraps

    1. Slather on the hummus. Contain the hummus to the bottom half of the tortilla, leaving about half an inch of space from the very bottom of the wrap and more on top.
    How to layer hummus wrap sandwich
    1. Add the veggies. Layer on the veggies, trying to leave some room around the edges of the wrap (this makes for easier rolling).
    How to layer hummus veggie wrap ingredients
    1. Roll it up, burrito-style. Tuck the edges into the wrap first, then roll it into a log to secure all the veggies.
    Hummus veggie wrap cut into pinwheels in rows

    Storage and Meal Prep Tips

    These hummus veggie wraps are best enjoyed the day they’re made, as they tend to get soggy over time.

    To meal prep them, I recommend slicing the veggies on a Sunday night so you can quickly assemble wraps for lunches throughout the week.

    Tips for Making Veggie Wraps

    • Add protein. You’re welcome to add your protein of choice to this wrap. Grilled chicken, baked chicken, sliced skirt steak, or garlic shrimp would all work nicely. To keep it vegetarian, add crispy tofu.
    • Warm up the tortilla. If your tortillas are a little stale or are cracking when rolled, wrap them in a damp paper towel and gently warm in the microwave for 15 to 20 seconds. This should make them more pliable.
    • Separate the ingredients until ready to roll. The tortillas soften quickly once layered with hummus and veggies, so keep everything separate until you’re ready to assemble and eat.

    What to Serve with Veggie Wraps

    If you make this recipe, please let me know! Leave a comment below or take a photo and tag me on Instagram or Twitter with #foodiecrusheats.  

    Veggie wrap with hummus, avocado and tomato