دسته: ناهار

  • Gluten Free Cinnamon Rolls

    Gluten Free Cinnamon Rolls


    unfrosted cinnamon roll on parchment paper

    Gluten Free Cinnamon Rolls are the best! Topped with a simple vanilla glaze they’re the perfect weekend treat or holiday brunch option if you or a family member needs to keep things gluten free — without compromising on flavor! Looking for more gluten free treats? Also try my Flourless Peanut Butter Cookies, Gluten Free Brownies, …

    The post Gluten Free Cinnamon Rolls appeared first on Creme De La Crumb.


    Source link

  • Cheesy Potatoes in Oven – Carlsbad Cravings

    Cheesy Potatoes in Oven – Carlsbad Cravings


    If you’re looking for the ultimate cheesy potato casserole, you’ve just struck gold—Yukon gold, to be exact. This recipe isn’t your average throw-it-together side dish; it’s a next-level comfort food experience crafted by someone who knows their way around creamy sauces, melting cheeses, and flavor-packed magic without ANY canned soups!  With step-by-step photos, expert tips, and a carefully crafted technique, this recipe guarantees a from-scratch potato casserole that puts every “cream of” shortcut to shame.

    top view of cheesy potatoes showing how cheesy and creamy they are


    You are sure to love this Recipe for Cheesy Potatoes!

    This recipe is proven, foolproof and a must-have for your weeknight or special occasion lineup. Here’s why you’ll love it:

    • No Canned Soups Needed: Ditch the mystery cans! This recipe features a luxurious, made-from-scratch sauce, a tried and tested favorite used in my Chicken Divan, Tuna Casserole, Hashbrown Casserole, and more!
    • Flavor-Packed: With layers of Dijon, Worcestershire, herbs, and spices, this casserole is anything but bland—it’s savory, balanced, and downright addictive.
    • Ultra Creamy Texture: Pre-boiling the potatoes ensures they bake up irresistibly tender, even, and creamy—no hard or undercooked bites here!
    • Two Kinds of Cheese: A combo of sharp cheddar and Gruyere means ultra-flavorful, melty magic in every bite with unparalleled flavor.
    • So Saucy: Generous amounts of creamy sauce mean zero dryness and maximum comfort food satisfaction.
    • Make-Ahead Magic: This recipe is perfect for prepping in advance! Assemble up to two days ahead, then bake and enjoy when ready.
    up close of cheesy potatoes recipe showing how cheesy they are

    Cheesy Potato Recipe Ingredients

    Let’s take a closer look at what you need to make this recipe (measurements in the printable recipe card at the bottom of the post):

    • Potatoes: Use Yukon Gold potatoes for their naturally creamy texture. They hold up well and don’t disintegrate or taste mealy. Look for larger potatoes, which make peeling quicker.
    • Homemade Cream of Chicken Soup:  This sauce is epic.  It begins with a roux that’s whisked with chicken broth, milk, and spices. Cornstarch helps thicken and stabilize the sauce, while Dijon mustard and Worcestershire sauce add brightness and savory depth.
    • Spices: A flavorful mix of salt, pepper, onion powder, garlic powder, dried parsley, and a pinch of cayenne adds depth, warmth, and balanced seasoning throughout the casserole—there are no bland bites here!
    • Sharp Cheddar:  Freshly shredded cheddar adds bold, tangy richness and savory sharpness.
    • Gruyere: This is the consummate melting cheese that’s slightly sweet, slightly salty, creamy, nutty, and boasts enough flavor to cut through the richness of the casserole.
    • You will likely have the option between regular Gruyère and smoked Gruyère cheese. I recommend using regular for this recipe, as the smoked flavor is quite strong and better suited for single-layering, such as in French Onion Chicken or Monte Cristo Sandwiches.
    • Chicken bouillonThis imparts a complex, savory goodness to the cheesy sauce (it’s like salt with FLAVOR). You may use bouillon powder, bouillon cubes or bouillon base (like Better Than Bouillon or Zoup!).  Add it to the sauce without dissolving it in liquid first. 
    • Sour Cream: Adds a slight tanginess and fabulous creaminess. Full-fat sour cream melts easier than nonfat, but you can use nonfat with this knowledge. 
    • Topping: Panko is a Japanese breadcrumb and can be found next to traditional Italian breadcrumbs at your grocery store.  Panko breadcrumbs are lighter, larger, and drier than regular breadcrumbs, absorbing less moisture and resulting in a crispy topping.
    top view showing cheesy potato ingredients: Yukon gold potatoes, cheddar, Gruyere, butter, chicken broth, milk, butter, flour, spices

    How to make Cheesy Potato Casserole with Diced Potatoes

    Let’s take a closer look at how to make this recipe with step-by-step photos (full recipe in the printable recipe card at the bottom of the post):

    • Step 1: Cook Potatoes. Boil the potatoes until they are fork-tender.
    showing how to make cheesy potatoes by boiling diced potatoes until tender
    • Step 2: Make the Homemade Cream of Chicken Soup. Cook the flour in melted butter for 2 minutes to make the roux. Gradually whisk in the milk and part of the broth. Whisk the cornstarch with the remaining broth, then add it to the pot. Next, add the Dijon, Worcestershire sauce, chives, chicken bouillon, and all the spices.
    showing how to make cheesy potatoes by cooking the flour in melted butter for 2 minutes to make the roux. Gradually whisk in the milk and 1 ½ cups of chicken broth. Whisk the cornstarch with the remaining chicken broth, then add it to the pot. Next, add the Dijon, Worcestershire sauce, chives, chicken bouillon, and all the spices and spices.
    • Step 3: Thicken the Sauce. Bring the sauce to a simmer, whisking constantly, until it has thickened, about 5 minutes.
    showing how to make cheesy potatoes by simmering the sauce until thickened
    • Step 4: Add Cheese. Whisk in the cheddar until melted, followed by the Gruyere cheese until melted. Whisk in the sour cream until blended.
    showing how to make cheesy potatoes by stirring the cheese until melted, followed by the sour cream
    • Step 5: Add the Potatoes. Combine the boiled potatoes and the sauce
    showing how to make cheesy potatoes by adding the cheese to the sauce and stirring to combine
    • Step 6: Bake. Add the potatoes to a 9×13 casserole dish, top with cheese and bake until hot and bubbly.
    showing how to make cheesy potatoes by topping with cheese and baking
    • Step 7: Panko Topping. Meanwhile, melt the butter and olive oil together over medium heat in a large skillet. Add the panko and cook until the crumbs become golden brown.
    showing how to make cheesy potatoes by toasting the panko in a skillet
    • Step 8: Dig in! Evenly sprinkle the panko over the potatoes. Let the potato casserole stand for 10 minutes.
    showing how to make cheesy potatoes by topping the casserole with crispy panko after baking

    Tips for Cheesy Diced Potatoes

    • Don’t overboil the potatoes: They should be fork-tender, but not falling apart, or else they will continue to fall apart as you combine them with the sauce.
    • Shred your own cheese: Pre-shredded cheese contains anti-caking agents that prevent smooth melting. Freshly shredded cheddar and Gruyere melt like a dream.
    • Cook the flour thoroughly: Thoroughly cooking the roux removes the raw flour taste and ensures the flour is fully activated to properly thicken the sauce, making it extra velvety without being gritty or pasty.
    • Simmer the sauce until thick: It should appear slightly thick after simmering because it will thin out once baked with the potatoes. 
    • Half casserole. This casserole makes a reasonable amount, and the leftovers are fantastic!  If you don’t want leftovers, use the arrows in the recipe card to half the recipe and make it in an 8- or 9-inch square pan.
    • Let it rest before serving: After baking, give the casserole a few minutes to settle and set up for cleaner scooping and better texture.
    up close of cheesy potatoes recipe showing how cheesy they are

    Cheesy Potato Recipe Variations

    • Gluten Free: Eliminate the flour and increase the cornstarch to 3 ½ tablespoons. Double-check that the Worcestershire sauce is gluten-free. Use gluten-free panko. My favorite is Aleia’s Gluten Free Real Panko Original. It is the crunchiest panko I’ve found!
    • Bacon Lover’s Cheesy Potatoes: For irresistible smoky flavor and crunch, add crispy crumbled bacon, either mixed into the casserole or sprinkled on top before baking-or both!
    • Cheesy Ham and Potato Casserole: Stir in diced ham for a heartier, protein-packed version that turns this into a full meal.
    • Loaded Baked Potato Casserole: Top with extra cheddar, sour cream, green onions, and bacon for all the classic flavors of a baked potato in casserole form.
    • Spicy Jalapeño Cheddar Potatoes: Add chopped pickled or fresh jalapeños and use pepper jack cheese alongside the cheddar for a kick of heat.
    • Veggie-Packed Casserole: Reduce the potatoes and mix in steamed broccoli, cauliflower, sautéed mushrooms, or bell peppers.
    • Southwest Cheesy Potatoes: Mix in taco seasoning, black beans, and green chiles, and top with crushed tortilla chips before baking for a Tex-Mex twist.
    picking up a serving spoonful of cheesy potatoes recipe

    How to serve this Recipe for Cheesy Potatoes

    top view of showing how to serve cheesy potatoes recipe in a bowl garnished with green onions and parsley
    up close of recipe for cheesy potatoes in a bowl showing how cheesy and creamy they are

    WANT TO TRY THIS Potato Casserole RECIPE?

    PIN IT to your recipe BOARD TO SAVE FOR LATER!

    FIND ME ON PINTEREST FOR MORE GREAT RECIPES!  I AM ALWAYS PINNING :)!

    ©Carlsbad Cravings by CarlsbadCravings.com

    Save This Recipe To Your Recipe Box

    You can now create an account on our site and save your favorite recipes all in one place!

    • 4 pounds Yukon gold potatoes, peeled and chopped into 1/2-inch pieces (about 9 cups)
    • 1 tablespoon salt for boiling
    • 6 tablespoons unsalted butter (may sub half olive oil)
    • 1/3 cup all-purpose flour
    • 2 cups milk
    • 1 14.5 oz. can (1 ¾ cups) low sodium chicken broth
    • 1 tablespoon cornstarch
    • 1 1/2 teaspoons Dijon mustard
    • 1 teaspoon Worcestershire sauce
    • 2 tablespoons chopped fresh chives or 2 tsps dried
    • 2 tsp EACH chicken bouillon, dried parsley
    • 1 1/2 teaspoons salt
    • 1 tsp EACH onion powder, garlic powder
    • 1/2 teaspoon pepper
    • Pinch of cayenne
    • 2 cups freshly shredded sharp cheddar cheese (semi-packed)
    • 3 oz. (1 packed cup) freshly shredded Gruyere cheese
    • 1 cup sour cream
    • Sour Cream: Measure before prepping the potatoes so it can come to room temperature.

    • Boil Potatoes: Add the diced potatoes to a large pot or Dutch oven and add enough cold water to cover them by about 1 inch. Cover and bring to a boil, then uncover and add one tablespoon of salt. Continue to boil (uncovered) until the potatoes are fork tender but not falling apart, about 4-5 minutes after the water starts to boil. Immediately drain the potatoes in a colander. (While the potatoes are cooking, you can continue with the recipe.)
    • Prep: Preheat the oven to 350°F. Lightly spray a 9×13 baking dish with nonstick cooking spray; set aside.
    • Make Sauce: Melt the butter in a Dutch oven over medium heat. Whisk in the flour, then cook while stirring for 2 minutes. Reduce the heat to low, then gradually whisk in the milk and 1 ½ cups of chicken broth (eyeball it). Whisk the cornstarch with the remaining chicken broth, then add to the pot, followed by the Dijon, Worcestershire sauce, chives, chicken bouillon, and all spices.
    • Thicken Sauce: Bring the sauce to a simmer, whisking constantly, until it has thickened, about 5 minutes.

    • Add Cheeses: Turn off the heat, and whisk in the cheddar a handful at a time until melted, followed by the Gruyere until melted. If it’s not melting smoothly, return the heat to low and whisk until melted. Off heat, whisk in the sour cream until blended, then stir in the cooked potatoes. Adjust seasonings to taste (we like a little more salt).
    • Assemble: Transfer the potatoes to the prepared baking dish and spread them into an even layer. Evenly top with one cup of shredded cheddar.

    • Bake: Cover the casserole with foil and bake at 350 degrees for 25 minutes, until hot and bubbly and the cheese is melted. Let the casserole stand uncovered for 10 minutes to set a bit before serving. Meanwhile, make the panko topping:

    • Panko topping: Melt the butter and olive oil together over medium heat in a large skillet. Add the panko and stir to coat. Continue cooking until the crumbs become golden brown. Evenly sprinkle over the potatoes. Garnish with fresh parsley if desired.

    Did You Make This Recipe?

    Tag @CarlsbadCravings and Use #CarlsbadCravngs

    Leave a Review, I Always Love Hearing From You!


    Source link

  • Homemade Sopapillas – The Cookie Rookie®

    Homemade Sopapillas – The Cookie Rookie®


    Homemade sopapillas are deliciously fried pillows of dough from New Mexico. Whenever I want a sweet treat, I whip these up with simple pantry ingredients and enjoy them with a drizzle of sweet honey. The puffed dough is crispy and airy, and so easy to make. Whether dusted with cinnamon sugar, served plain or with traditional honey, they’re always a hit in my kitchen!

    Golden, fried sopapillas drizzled with honey on a white plate, showcasing their puffy and crispy texture.

    For me, making homemade sopapillas is like a little trip to the Southwest. These golden, puffed-up beauties are quick bread that fries up light and hollow, begging to be drizzled with honey or sprinkled with cinnamon sugar. 

    I grew up eating fried dough and churros at fairs with a heaping coat of powdered sugar. These sopapillas remind me of those carefree days, but with a delicious Southwestern twist. Their light, crispy exterior, and hollow center make them perfect for soaking up sweet honey or carrying a dusting of cinnamon sugar, creating a treat that’s both simple and irresistible.

    What’s in This Homemade Sopapillas Recipe

    • All-Purpose Flour: All-purpose flour adds structure to the dough.
    • Baking Powder: Baking powder is essential in this recipe to puff up the dough.
    • Shortening: Adds tenderness, flakiness, and crispness while ensuring a soft interior and neutral flavor, perfect for frying.
    • Frying Oil: I like vegetable oil for frying. Any high smoke point oil will work.
    • Honey: I like drizzling my mini-fried pockets of dough with honey. You can also use a cinnamon sugar mix or powdered sugar.
    Homemade sopapillas ingredients

    Tips For Success

    • Warm tap water is essential to melt the shortening and incorporate the dough.
    • Test that the oil is hot enough by dropping one sopapilla or a scrap of dough first. If the oil bubbles and the dough starts to puff up and turn golden within a few seconds, the oil is hot enough. If it doesn’t bubble or puff up, the oil needs more time to heat. If it browns too quickly, the oil is too hot and should be adjusted.
    • Fry only a few pieces at a time to avoid overcrowding the pot, which can lower the oil temperature and result in soggy sopapillas.
    • When frying in batches, allow the oil to return to 375°F before frying the next batch.

    How to Store and Reheat

    If you have leftover sopapillas, store them in an airtight container at room temperature for up to a day. Reheat in the oven or air fryer to restore crispness.

    A plate of sopapillas with one torn open, revealing the airy and hollow inside, drizzled with honey.

    Serving Suggestions

    Traditional sopapillas are drizzled with honey, but you can also dust them with powdered sugar, cinnamon sugar, or even a drizzle of melted chocolate for a dessert twist. My family loves these all the same ways we’d enjoy fried dough at the fair, and we love them for Cinco de Mayo. I’ve also tried this recipe with a pinch of cinnamon or nutmeg to the dough for a subtle twist. We love to enjoy them with cups of hot drinking chocolate!

    Prevent your screen from going dark

    • Warm tap water is essential to melt the shortening and incorporate the dough.
    • Test that the oil is hot enough by dropping one sopapilla or a scrap of dough first. If the oil bubbles and the dough starts to puff up and turn golden within a few seconds, the oil is hot enough. If it doesn’t bubble or puff up, the oil needs more time to heat. If it browns too quickly, the oil is too hot and should be adjusted.
    • Fry only a few pieces at a time to avoid overcrowding the pot, which can lower the oil temperature and result in soggy sopapillas.
    • When frying in batches, allow the oil to return to 375°F before frying the next batch.
    • If you have leftovers, store them in an airtight container at room temperature for up to a day. Reheat in the oven or air fryer to restore crispness.

    Serving: 1servingCalories: 555kcalCarbohydrates: 21gProtein: 3gFat: 52gSaturated Fat: 8gPolyunsaturated Fat: 29gMonounsaturated Fat: 12gTrans Fat: 1gSodium: 178mgPotassium: 30mgFiber: 1gSugar: 0.1gCalcium: 31mgIron: 1mg

    Nutrition information is automatically calculated, so should only be used as an approximation.


    How to Make Homemade Sopapillas Step by Step

    Combine the Ingredients: Grab a large mixing bowl and whisk together 4 cups of all-purpose flour, 2 tsp baking powder, and 1 tsp salt. Add ¼ cup shortening and 1 ½ cups warm water to the dry ingredients. 

    A glass bowl filled with flour and a whisk, showing the beginning stage of the sopapilla dough preparation.

    Form the Dough: Using a spatula or spoon, mix the ingredients together until a dough forms. Cover the mixing bowl and set it aside to rest at room temperature for 20 minutes.

    A glass bowl containing freshly mixed sopapilla dough with a black spatula.

    Roll out the Dough: Place the dough on a lightly floured, clean workspace. Roll the dough into a ¼-inch thick rectangle.

    Rolled-out sopapilla dough on a floured surface, ready to be cut.

    Portion out the Dough: Using a pizza cutter, cut the dough into 3-inch squares. Don’t worry about them being perfect.

    Rolled-out dough cut into squares, prepared for frying, with a dough cutter visible on the side.

    Heat the Frying Oil: Heat up 1 ½ inches of frying oil in a Dutch oven. The oil should reach 375°F before frying. Use a thermometer to check the temperature. Line a baking sheet with paper towels.

    A pot of oil heating on the stove with a thermometer inserted, indicating preparation for frying sopapillas.

    Fry the Dough: Once the temperature of the oil has reached 375°F, fry the sopapillas in batches until they’re golden and puffed. This should take about 1-2 minutes per side. 

    Sopapillas frying in a pot of oil, turning golden brown, with a thermometer clipped to the side to monitor the temperature.

    Drain the Fried Dough: Remove the sopapillas from the oil using a slotted spoon and place them on the lined baking sheets to drain.

    A baking tray lined with paper towels holding freshly fried sopapillas, golden and crispy, cooling after frying.

    Finish the Sopapillas: Repeat until all the sopapillas are fried. Serve warm with a drizzle of honey or cinnamon sugar. Enjoy!

    A plate of sopapillas drizzled with honey, arranged neatly, highlighting their puffy texture and golden color.

    More Dessert Recipes to Try


    Source link

  • Olivier Salad – The Daring Gourmet

    Olivier Salad – The Daring Gourmet


    This post may contain affiliate links. See my disclosure policy.

    A favorite throughout Eastern Europe and beyond for more than 150 years, this Olivier Salad recipe, also known as Russian Salad, features the most delicious combination of flavors and textures for a winning salad that is perfect for everything from a casual picnic to an elegant dinner party!

    olivier salad recipe russian potato authentic traditional old fashioned olivye ham cucumbers peas peppers capers eggs

    Russian Salad

    While reading Amor Towles’ A Gentleman in Moscow, I couldn’t help but be drawn in by the descriptions of the lavish dinner parties of the pre-revolution Russian aristocracy. As both an ardent foodie and a food history geek, I start to get excited when authors describe food scenes and various dishes of the eras, whether set in guilded age America, the golden age of Paris or, in this case, the era of the Russian tsars. My curiosity always leads to further exploration and research of the classic dishes from those times and settings, and this time it led me to a dish once considered a pinnacle of Russian high society gastronomy. No, it’s not borscht, beef stroganoff or chicken stroganoff (though they are fabulous). It’s something called the Olivier Salad.

    What is Olivier Salad?

    Dating back more than 150 years, Olivier Salad is a nostalgic dish with a long history. In its heyday you would find it served at the most prestigious restaurants and hotels in Moscow and at the center of upscale dinner parties and celebrations. In its simplest form, which is how it’s known today, it is a creamy mayonnaise-based salad of diced potatoes, vegetables, pickles, eggs and ham. But traditionally it was far more opulent. Let’s take a look at its intriguing history.

    The time was the 1860’s and the setting the Hermitage restaurant in Moscow where the French chef Lucien Olivier created what would become the restaurant’s signature dish. His creation was a carefully guarded secret (competing restaurant chefs in the city would go on to attempt to replicate it and capitalize on the fame) but originally included hazel grouse (of the grouse bird family), veal tongue, caviar, crayfish tails, aspic, lettuce, potatoes, capers and olives in a creamy mayonnaise-based sauce.

    hermitage restaurant russian salad recipe origin olivier

    The other local restaurant chefs who tried replicating Lucien Olivier’s famous Russian salad couldn’t quite get the sauce right, noting that something was missing. It was later revealed that the original sauce included something very similar to Worcestershire sauce which gave the dressing a rich and flavorful umami component. (And it’s definitely included in my recipe!)

    Over time many of these ingredients either fell out of popularity, were just too expensive or became difficult to source, and so over time were replaced by more accessible substitutes. Eventually ham or chicken chicken replaced the grouse, boiled eggs replaced the crayfish, and the capers and olives were replaced by green peas and pickled cucumbers.

    Olivier Salad remains a popular dish throughout much of Eastern Europe where parties and holidays are incomplete without it and where each household has a slightly different take on it. Different countries also have their own variations of the dish, for example in Croatia diced apples are commonly added, Romania often uses chopped beef, in Bulgaria salami is a popular choice, in Turkey pickled beets are commonly included, and variations in Poland often include pickled herring. It’s even popular in Iran where it’s usually made with chicken and in Spain where it’s called ensaladilla rusa (Russian salad) where it’s often made with tuna.

    olivier salad recipe russian potato authentic traditional old fashioned olivye ham cucumbers peas peppers capers eggs

    Olivier Salad Ingredients

    As mentioned earlier, there is no “one way” to make Olivier salad. Every household and every country where it’s served has their own variation. And none of them match the original version from the 1860’s (see the discussion above about its history). But the ingredients I’m using to make my Russian salad are pretty standard for how you’ll find it served in many places along with a couple of additional touches to enhance flavor and texture as well some ingredients that usually no longer included in most recipes but that hearken back to the flavor notes of the original recipe (e.g., capers and Worcestershire sauce).

    Salad Ingredients

    • Potatoes – tome recipes call for starchy potatoes like Russets, but unless you want more of a mashed potato salad I strongly recommend using a firm yellow potato variety like Yukon Gold. Yellow potatoes hold their shape after cooking, making them ideal for salads like this.
    • Carrots – this adds sweetness and color.
    • Diced Ham – whether you’re using leftover ham or dicing up ham steaks, I love the flavor of smoked ham in this salad. Alternatively you can use chicken (rotisserie chicken is convenient and flavorful) or European bologna (which is similar in texture and flavor to mortadella), You can add any cooked, chopped chicken breast you have on hand; rotisserie chicken or a canned chicken work well. Some variations in other countries use diced beef, sausage, pickled herring or tuna. If you’re going for a vegetarian Olivier salad, omit the meat.
    • Sweet Peas – you can use canned (rinse and drain), frozen (thaw and drain) or fresh (be sure to cook first).
    • Hard-Boiled Eggs – these add a key creaminess and flavor.
    • Onion – I like to use yellow onion for some of that mild contrasting sharpness, but you can use sweet onion if you prefer and can also reduce the amount of the added sugar in the dressing.
    • Dill Pickles – these add a wonderful flavor and crunch. For the best flavor I strongly recommend using European pickles, e.g. German pickles (they’re ridiculously expensive on Amazon but you can find them at World Market and I’ve seen them in some Walmart locations that have a Euro section). They are milder and sweeter than American dill pickles but not nearly as sweet as bread and butter pickles and with a different flavor profile.
    • Optional Add-Ins: Diced English cucumber for added crunch, sweet corn or yellow bell pepper for a splash of color, added texture and sweetness. Diced apple is used in some countries for added sweetness and crunch. Olives were included in the original 1860’s version for their briney flavor and can likewise be added.

    Dressing Ingredients

    Not to be confused with Russian dressing (an American creation popularly used on the Reuben sandwich), the dressing for Russian salad or Olivier salad is very different. Here’s what you’ll need:

    • Mayonnaise – the creamy base ingredient of the dressing.
    • Sour Cream – this adds a bit of tanginess to cut through the mayonnaise and adds balance and a touch of freshness. I like the texture and flavor of sour cream in this salad but you can substitute Greek yogurt if you prefer.
    • Dijon Mustard – this adds a ton of flavor depth and a welcome hint of sharpness.
    • Worcestershire Sauce – The earliest published recipe from 1894 in a Russian magazine said that the original recipe contained something called mogul or kabul sauce, which is similar to Worcestershire sauce. It’s a key ingredient that adds depth of flavor. Like music that’s all treble without the bass, food lacking in umami is rather bland. Worcestershire sauce provides some of that much needed bass.
    • Green Onions / Scallions – these add a mild peppery flavor note and a pop up of color.
    • Fresh Dill – this adds that fresh herbaceous touch. I love dill and grow lots of it every year in my garden, but I know that not everyone is a fan of it and you can substitute parsley if you prefer.
    • Salt, Black Pepper and Sugar – To tie everything together.
    olivier salad recipe russian potato authentic traditional old fashioned olivye ham cucumbers peas peppers capers eggs

    Olivier Salad Recipe

    This salad is easy to make, it just requires a good amount of chopping and dicing. To make this popular Russian potato salad you’ll follow these steps:

    • Cook the diced potatoes and carrots until tender, then drain and let cool while you prepare the other ingredients.
    • Prepare the dressing by stirring all of the ingredients together in a bowl until combined.
    • Place all of the salad ingredients in a large bowl, pour over the dressing, and stir to thoroughly combine. Cover and chill in the fridge for at least an hour before serving.
    • This can be served as a side dish in a bowl or on a plate, or it can be served molded for a fancier presentation as a starter. So that it holds together better you may need to use slightly less mayonnaise (this all depends on the variety of potato used, how long the salad sits before serving and how much of the excess liquid the potatoes absorb, how well drained some of the ingredients were, etc). To mold the salad you can lightly spray the inside of a measuring cup or dedicated mold with oil, press the salad into the mold, then invert onto the serving plate. You can garnish it with a sprig of dill or parsley.

    Make Ahead and Storage

    The ingredients can all be prepped a day in advance but if you’re making this ahead of time, ideally wait until a couple of hours or so before serving to add the dressing to the salad. Leftover Olivier Salad will keep in the fridge for 3-4 days.

    olivier salad recipe russian potato authentic traditional old fashioned olivye ham cucumbers peas peppers capers eggs

    For more delicious salad recipe from around the world try my:

    olivier salad recipe russian authentic traditional old fashioned olivye ham cucumbers peas peppers

    Olivier Salad

    A favorite throughout Eastern Europe and beyond for more than 150 years, Olivier Salad is a winning combination of flavors and textures and is perfect for everything from a casual picnic to an elegant dinner party!

    Prep Time 20 minutes

    Cook Time 5 minutes

    Total Time 25 minutes

    Course Appetizer, Salad, Side Dish

    Cuisine Eastern European, Russian

    Servings 10

    Calories 344 kcal

    • For the Salad:
    • 2 pounds Yukon Gold potatoes , or other yellow potato variety (these hold their shape and won’t become mushy like Russets)
    • 3 large carrots
    • 1 small yellow onion , can use sweet onion if preferred
    • 1 1/2 cups peas , canned (15 ounces, rinsed and drained), frozen (thawed and drained) or fresh (cooked)
    • 1 pound smoked ham , cut into 1/2 inch cubes (can substitute rotisserie chicken or European bologna if preferred)
    • 4-5 hard-boiled eggs , diced
    • 2/3 cup diced dill pickles (about 3-4 pickles) , for best flavor strongly recommend using European/German pickles (check World Market, some Walmart locations)
    • 2 tablespoons capers , rinsed and drained
    • 1/3 cup sweet corn or diced yellow bell pepper , optional
    • For the Dressing:
    • 1 cup good mayonnaise
    • 1/4 cup sour cream , can substitute Greek yogurt if preferred
    • 2 green onions/scallions , chopped (or equivalent chives)
    • 1-2 tablespoons chopped fresh dill or parsley , plus some sprigs for garnish
    • 1 tablespoon Dijon mustard
    • 1 1/2 teaspoons Worcestershire sauce
    • 1 1/2 teaspoons kosher salt
    • 1/2 teaspoon freshly ground black pepper
    • 1/2 teaspoon sugar
    • Peel and dice the potatoes into 1/2 inch cubes. Peel and dice the carrots into 1/4 inch cubes. Boil them together until cooked and tender but not mushy, 3-5 minutes. Drain and let cool.

    • Combine the dressing ingredients in a bowl and stir to combine. Add more salt, pepper and sugar to taste.

    • Place all of the salad ingredients in a large bowl, pour over the dressing, and stir to thoroughly combine. Cover and chill for at least an hour before serving.Olivier Salad will keep in the fridge for 3-4 days.

    Make Ahead:  The ingredients can all be prepped a day in advance but if you’re making this ahead of time, ideally wait until a couple of hours or so before serving to add the dressing to the salad. 

    Calories: 344kcalCarbohydrates: 23gProtein: 14gFat: 22gSaturated Fat: 4gPolyunsaturated Fat: 11gMonounsaturated Fat: 6gCholesterol: 109mgSodium: 1238mgPotassium: 697mgFiber: 4gSugar: 4gVitamin A: 3429IUVitamin C: 29mgCalcium: 57mgIron: 2mg

    Keyword Olivier Salad, Russian Potato Salad, Russian Salad


    kimberly killebrew the daring gourmet

    Hi, I’m Kimberly Killebrew and welcome to Daring Gourmet where you’ll find delicious originals, revitalized classics, and simply downright good eats from around the world! Originally from Germany, later raised in England, world-traveled, and now living in the U.S., from my globally-influenced kitchen I invite you to tour the world through your taste buds!

    Read more about me…


    Source link

  • Sheet Pan Lemon Honey Garlic Chicken

    Sheet Pan Lemon Honey Garlic Chicken


    This post may contain affiliate links. Please read my disclosure policy.

    Sheet Pan Lemon Honey Garlic Chicken — juicy strips of chicken, caramelized peppers, sticky-sweet honey garlic sauce… and only one pan to clean. Weeknight win.

    sheet pan lemon honey garlic chicken on a white serving platter.

    There are days I feel like cooking… and then there are days I open the fridge, see chicken, and immediately regret not ordering takeout. This recipe was born on one of those nights. One pan. Zero thinking. Big flavor. And almost no cleanup.

    It’s sweet from the honey, garlicky in the best way, a little tangy from the lemon, and just fancy enough that you can sprinkle feta on top and pretend you planned it. I’ve made it more times than I can count lately, mostly when I’m too tired to be impressive, but still want dinner to taste like I tried.

    sheet pan lemon honey garlic chicken on a sheet pan.
    ingredients needed to make sheet pan lemon honey garlic chicken.
    • Cut the chicken into strips. Yes, strips. Not chunks, not cubes. Strips cook fast, soak up more sauce, and give you those golden edges we love. Bonus: they look like you did something fancy.
    • Use what you’ve got. No red bell pepper? Use yellow, green, or whatever’s hiding in the veggie drawer. This recipe isn’t precious, it’s flexible. Mushrooms, zucchini, even thin green beans all work.
    • Fresh lemon > bottled. I know you’ve got that plastic lemon in the fridge door. Put it down. The zest alone is worth using a real lemon. It makes the whole dish pop.
    • Don’t overcrowd the pan. If everything’s piled on top of each other, you’ll end up steaming the chicken instead of roasting it. Give it space to crisp up and caramelize. No one likes soggy sheet pan dinners.
    • Feta on top = salty magic. Don’t mix it in before baking. Crumble it over at the end so it stays tangy and creamy. You’re welcome.

    Here’s how I make it:

    Crank it to 400°F (200°C) and line a baking sheet with parchment paper so cleanup doesn’t ruin your night.

    process shots showing how to make lemon honey garlic chicken on a sheet pan.

    In a big bowl, whisk together the olive oil, honey, minced garlic, lemon zest, Italian seasoning, salt, and pepper. It should smell like you know what you’re doing, because you do. Add the chicken strips and bell peppers to the bowl. Give everything a good toss so it’s coated in that glossy, sticky marinade. You want every bite to taste like flavor, not just the first one.

    process shots showing how to make lemon honey garlic chicken on a sheet pan.

    Spread it all out on your sheet pan. No overlapping, this isn’t a chicken pile. Bake for 20–25 minutes, or until the chicken hits 165°F (75°C) and the edges start to caramelize. That’s when the magic happens.

    process shots showing how to make lemon honey garlic chicken on a sheet pan.

    Let it sit for 5 minutes, it keeps the chicken juicy and gives you a second to feel proud of yourself. Then crumble feta over the top and serve it with lemon wedges. Boom. Dinner.

    This one’s become a regular in our dinner rotation, because it just works. Easy, quick, and that sweet lemon-garlic glaze? Still gets me every time. If it didn’t hold up, it wouldn’t be on the blog. Simple as that.

    Frequently Asked Questions

    Can I use chicken thighs instead of breasts?

    Absolutely. Boneless, skinless thighs work great and stay super juicy. Just cut them into strips like the recipe calls for and you’re good to go.

    What vegetables can I swap in?

    Whatever you’ve got. Zucchini, mushrooms, onions, broccoli, cherry tomatoes, this is a clean-out-the-fridge kind of dish. Just make sure everything’s cut to cook evenly with the chicken.

    I don’t like feta. Can I skip it?

    I mean… you can, but I’ll silently judge you. Feta adds that salty, creamy, tangy magic that pulls the whole thing together. But hey, if you must, swap in goat cheese or Parmesan. Just know the feta is doing a lot of the heavy lifting here.

    Can I make it ahead of time?

    Totally. You can mix the marinade and chicken the night before and keep it in the fridge. Just dump it all on a sheet pan and bake when you’re ready.

    How spicy is it?

    Not at all, as written, it’s kid-and spice-wimp friendly. Want heat? Add red pepper flakes or a drizzle of chili oil.

    lemon honey garlic chicken with rice on a white plate.

    Storage + Reheating

    Fridge:

    Leftovers? Lucky you. Store them in an airtight container for up to 3 days.

    Freezer:

    Yes, you can freeze it. Just let it cool completely, then stash it in a freezer-safe container. It’ll keep for up to 3 months, just don’t forget about it back there.

    To Reheat:

    Microwave works fine for a quick fix, but if you want that roasted edge back? Pop it in a 350°F (175°C) oven for 10–12 minutes. Add a fresh squeeze of lemon and pretend it’s Day 1.

    sheet pan lemon honey garlic chicken on a sheet pan.

    Try These Sheet Pan Dinners Next

    sheet pan lemon honey garlic chicken on a white serving platter.

    Sheet Pan Lemon Honey Garlic Chicken

    Prep 15 minutes

    Cook 25 minutes

    Total 40 minutes

    Sweet, sticky, zesty, and ready in under 40, this sheet pan lemon honey garlic chicken is a weeknight lifesaver. Juicy chicken strips roasted with red peppers in a garlicky honey-lemon glaze, finished with a salty hit of feta. One pan, big flavor, almost no cleanup.

    Instructions 

    • Preheat the oven to 400°F (200°C) and line a baking sheet with parchment paper.

    • In a large bowl, whisk together olive oil, honey, minced garlic, lemon zest, Italian seasoning, salt, and black pepper until well combined.

    • Add the chicken breasts and peppers to the bowl and toss everything well, making sure to coat everything evenly.

    • Spread the chicken and veggies on the prepared baking sheet. Transfer the baking sheet to the oven and bake for 20-25 minutes or until the chicken is cooked through and the internal temperature reaches 165°F (75°C).

    • Once the chicken is done, remove the baking sheet from the oven and let it rest for 5 minutes.

    • Sprinkle crumbled feta cheese over the top of the chicken and red bell peppers.

    • Serve the chicken and red bell peppers with lemon wedges.

    Notes

    1. Chicken strips cook faster and stay juicier. Just make sure they’re roughly the same size so everything roasts evenly.
    2. Don’t crowd the pan. Overlapping chicken = steaming, not roasting. Give everything space to caramelize.
    3. Use fresh lemon. The zest and juice make the whole thing sing, skip the bottled stuff.
    4. Add more veggies. Mushrooms, zucchini, red onion, whatever’s in the fridge works.
    5. Feta is not optional. OK, technically it is… but I love it so much I almost put it in bold. That salty finish? It makes the dish.

    Nutrition Information

    Serving: 1servingCalories: 323kcal (16%)Carbohydrates: 17g (6%)Protein: 27g (54%)Fat: 17g (26%)Saturated Fat: 4g (25%)Polyunsaturated Fat: 2gMonounsaturated Fat: 9gTrans Fat: 0.01gCholesterol: 85mg (28%)Sodium: 586mg (25%)Potassium: 541mg (15%)Fiber: 1g (4%)Sugar: 15g (17%)Vitamin A: 1388IU (28%)Vitamin C: 57mg (69%)Calcium: 94mg (9%)Iron: 1mg (6%)

    Notice: Nutrition is auto-calculated for your convenience. Where relevant, we recommend using your own nutrition calculations.

    sheet pan lemon honey garlic chicken on a white serving platter.

    Did You Make This?

    We love seeing what you made! Tag us on Instagram at @jocooks or hashtag #jocooks so we can see your creations!

    This post was originally published in 2023 and updated in May 2025 with fresh tips, improved content, and even more flavor.


    [ad_2]
    Source link

  • How Long Can You Keep Fresh and Cooked Fish in the Fridge? • Steamy Kitchen Recipes Giveaways

    How Long Can You Keep Fresh and Cooked Fish in the Fridge? • Steamy Kitchen Recipes Giveaways


    This post may contain affiliate links. Please read our
    disclosure policy
    for more information.

    When it comes to storing fish, whether it’s fresh off the hook or leftover from last night’s dinner, knowing how long it can safely stay in your refrigerator or freezer is crucial to avoid the unpleasant consequences of spoiled seafood. 

    From raw to cooked, from fridge to freezer, we’ll cover the key timeframes for optimal storage and share our Steamy Kitchen knowledge on how to extend the shelf life of your seafood.

    Today, we are tackling the factors that influence how long fish can remain fresh, signs to look out for when it might be time to say goodbye to your fish, and innovative ways to maximize its shelf life. Let’s dive in, shall we?

    Chinese New Year whole fish

    The Short Answer

    You need to know, and you need to know NOW. How long can fish stay fresh in the fridge? (Drumroll, please…) Raw fish and seafood can chill out in your fridge for 1 to 2 days before it’s begging to be cooked or frozen, while cooked fish can enjoy a slightly extended stay of 3 to 4 days. Commercially-canned fish, like tuna, can last up to 5 years in your pantry, while home-canned fish will only last 1 year. There are a few caveats here, which is what we’re about to get into. 

    Ziploc baggies with fish filets


    Factors that Affect the Shelf Life of Fish

    There are a world of factors that can either extend or reduce the shelf life of fish:

    • The Quality of the Fish: Did your fish make a pit stop at the grocery store before it got to you or did you procure it at a fish market? Store-bought fish may have been on ice long before you laid eyes on it, whereas fresh-caught fish from a local fishmonger is, well, as fresh as it gets. The fresher it was to begin with, the longer it will last after being cooked.
    • The Coldness of Your Fridge: Fish should be kept in the fridge at 40°F or lower, so make sure your refrigerator temperature is at the right setting.
    • Type of Fish: Non-enzymatic spoilage happens due to the oxidation of fish fat. That means fatty fish like salmon or mackerel tend to spoil faster than leaner types of fish due to their fat content. 
    • Storage: How you store your sea bounty plays a big role in its freshness. Fish that is tightly wrapped in plastic wrap and nestled in the coldest part of the fridge (usually the bottom shelf) will last longer than unwrapped fish, due to the bacteria present in the air.
    • What About Room Temperature?: Fish left out for more than 2 hours is basically an open invitation for bacteria to invade. Any temp between 41°F and 135°F is considered the danger zone, so never leave any kind of fish at room temp for longer than 2 hours.

    Signs That Your Fish Has Gone Bad

    What happens if you eat bad fish? Usually, within a hour, you will experience a multitude of symptoms from what is known as scombroid poisoning. Some of those are more obvious, like nausea, vomiting and diarrhea, but there are many symptoms you might not expect like dizziness, flushing, itching, a rash, sweating and so on. This is why fish is one of those foods you have to be VERY careful about. Because nobody wants to feel that way, here are some ways to tell if your seafood has spoiled:

    The Sniff Test: Fresh fish smells like the sea–clean and briny. If your fish smells pungent, fishy, or has an ammonia-like odor, it’s time to bid it farewell. 

    The Touch Test: Good fish should feel firm, not slimy. If touching your fish feels like a handshake with a jellyfish, it’s a no-go.

    The Sight Test: If you see any sign of mold or discoloration, your fish is definitely past its prime. 

    BUT! Not all improperly stored or expired fish present these obvious indicators, so you can’t trust these alone. Make sure you know where your fish came from, where it’s been stored, and for how long. The mantra here is simple: When in doubt, throw it out. It’s not worth the risk of food poisoning!


    Chinese New Year steamed fish

    Tips on How to Maximize the Shelf Life of Fish

    Here are some great ways to ensure your fish stays as fresh as possible:

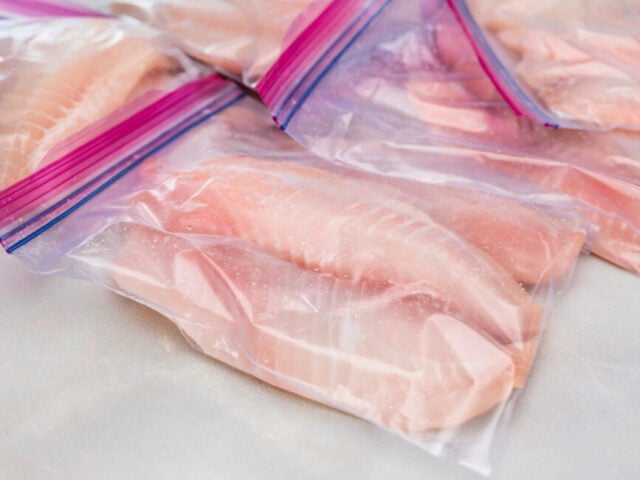
    • Fridge Storage: The best way to store a whole fish (or fish fillets) is to wrap it tightly in plastic wrap or aluminum foil to ward off bacterial growth, and keep it at the bottom of the refrigerator (the last shelf) for no more than 48 hours. If it’s already been cooked, it should keep for about 3 – 4 days.
    • Freezer Storage: For those who revere their freezer for its time-stopping abilities, the freezing process is great for fresh seafood! According to the USDA, frozen fish and shellfish of all kinds are safe in the freezer indefinitely. However, that doesn’t mean the flavor and texture will survive forever. For the best quality, you should enjoy frozen cooked fish within 3 months, frozen raw fish within 3 to 8 months, and shellfish within 3 to 12 months. Wrapping your fish tightly is the key to avoiding freezer burn. Using a freezer bag is good, but using a vacuum sealer is even better. If neither work for you, wrap your fish tightly in plastic wrap and then in aluminum foil. When it’s time to thaw, do so in the refrigerator or in cold water, changing the water every 30 minutes to maintain a safe temperature. Cook thawed fish within 1-2 days.
    • Home-Canning: If you want to keep your fish around for about a year without using your fridge, your only option is to can it. But first, you’ll need a pressure canner. We’re not the foremost authority on canning, so if that’s something you’re interested in, we suggest checking out this canning tutorial from Sharon of Simply Canning.
    • Label it!: For the best results, label your fish with the freezing (or canned) date so you can make sure to use it within the optimal time frame.


    Make Leftover Seafood into Fish Cakes

    More Tips:

    Got leftover fish? Transform it into fish cakes, a hearty fish chowder, or flake it over a salad for a yummy protein boost.

    Also, did you know that the American Heart Association recommends eating fish at least two times per week? If you’re looking to maintain a healthy diet, consider oily fishes like salmon, tuna and mackerel, because they’re rich in omega-3 fatty acids.


    Fishy FAQs

    Can I refreeze fish that has been thawed?

    It is safe to refreeze fish that has been thawed in the refrigerator, as long as it hasn’t been left in the fridge for more than 2 days. You should note, however, that refreezing may affect the texture and quality of the fish.

    How can I tell if frozen fish is still good?

    Check for ice crystals and freezer burn. If the fish has been frozen too long, it may have lost some of its quality. If the fish smells and looks good once thawed, the flavor and texture are likely okay.

    What’s the best way to defrost fish quickly?

    The safest method is in the refrigerator, but if you need a quicker method, you can use cold water. Place the fish in a sealed bag and submerge it in cold water. Make sure you change the water every 30 minutes until it’s thawed. Never, ever defrost fish at room temperature.


    Lemon caper fish

    You’re a Fish Master!

    Now you have all it takes to go forth and enjoy fish in the safest way.

    But also, we’d love to hear from you! Do you have any fishy tales to tell? Maybe a favorite fish recipe? Let us know in the comments below!


    Want More Fridge Tips? 

    This post may contain affiliate links. Please read our
    disclosure policy
    for more information.

    Did you try this recipe? Please leave a star rating in the recipe card below and leave a review in the comment section! I always appreciate your feedback and I know other readers do, too!

    Stay in touch with me in our Facebook group, on Pinterest or follow me on Instagram! Sign up for my email list, too where we chat all things recipes, tips, giveaways, and more!


    Source link

  • The BEST Mongolian Beef Recipe

    The BEST Mongolian Beef Recipe


    This mouthwatering Mongolian Beef recipe is loaded with bold flavor and comes together fast! Sweet, savory and with a subtle, spicy kick, it’s better than your favorite takeout! Serve with steamed, fluffy rice for an easy, irresistible dinner the whole family will love!

    Looking for more stir fry recipes to make? Try my Chicken Stir Fry, Cashew Chicken or Beef and Broccoli next!

    A top down view of Mongolian Beef served with rice on a white plate. The beef is garnished with sesame seeds and green onions.

    Mongolian Beef Recipe

    Mongolian Beef has always been one of my favorite takeout dishes, but making it at home is surprisingly quick and easy. In less than 30 minutes, you can have a restaurant-quality meal that tastes even better than the original. Plus, you get to control the ingredients – less oil, lower sodium, and no mystery artificial ingredients. It’s the perfect weeknight dinner that feels a little indulgent but is still simple enough to whip up anytime!

    Both of my boys give this recipe a 10 out of 10. They love it so much it’s become the standard when I’m testing new recipes. “It’s good…but not as good as the Mongolian Beef!” We love easy stir fry recipes and then one is now permanently in the rotation – a meal we all love!

    Thinly sliced flank steak or skirt steak gets coated in cornstarch to create the perfect crisp texture that is begging to be coated with savory sauce. It’s a mix of soy sauce, brown sugar, and a touch of heat from red pepper flakes that caramelizes beautifully, coating every bite of beef in a deep, umami-packed flavor that your tastebuds won’t be able to get enough of! Served over a bowl of fluffy white rice, it soaks up every bit of that sweet and savory sauce, making this meal completely irresistible.

    A top down view of cooked Mongolian Beef in a gray skillet.

    Why You’ll Love This Recipe

    Tender and flavorful, this Mongolian Beef recipe is a definite crowd-pleaser! With just a few simple ingredients, you can create a dish that rivals your favorite takeout spot—no delivery fee required!

    • Bold, takeout-style flavor. This Mongolian Beef is rich, savory, and slightly sweet, with tender slices of steak coated in mouthwatering sauce. It tastes just like your favorite restaurant version – but it’s even better because you made it at home!
    • Fast and easy. With minimal prep and just a few simple ingredients, this dish comes together in under 30 minutes. No complicated techniques, no long marinating – just quick, flavorful cooking that will fit perfectly into your busy schedule.
    • Perfect for any occasion. Whether you’re making it for a casual weeknight dinner or a meal to impress a special someone, this recipe delivers. Serve it over rice for a cozy, satisfying dish, or pair it with roasted veggies for a lighter, nutrient-packed option. However you enjoy it, you’ll be coming back for more!

    How to Make Mongolian Beef

    This recipe has become a staple in our kitchen over the past year and we make it at least once or twice a month. It’s not only quicker than takeout, it tastes better and is better for us. The Mongolian beef sauce is absolutely mouthwatering and uses pantry ingredients that I always have on hand. The steak is so tender and flavorful that between the sauce and the steak, we usually opt for a simple side of steamed rice to go alongside this Mongolian Beef recipe.

    Mongolian Beef Sauce

    1. Whisk together the ginger, garlic, red pepper flakes, brown sugar, soy sauce and water.

    Prepare Beef

    1. Cut steak into ¼ inch or thinner pieces and add to a large ziploc bag with cornstarch. Shake to coat.
    2. Add oil to a large skillet or wok. Once hot, add beef in a single layer and cook for 45 seconds. Flip and cook an additional 45 seconds. Remove.
    3. Add Mongolian beef sauce to the hot pan and bring to a boil.
    4. Reduce heat to medium and add the beef, tossing to combine.
    5. Sprinkle the green onions and sesame seeds over the top and toss once more.
    A 6 image collage that shows the steps for making the Mongolian Beef recipe.

    Storage Information

    • Refrigerator: If you have leftover beef, store it in an airtight container in the refrigerator for up to 3 days.
    • Freezer: Store the cooked beef (without the sauce) in an airtight container or freezer-safe bag for up to 2 months. Thaw overnight in the fridge and reheat in a skillet or microwave. I recommend making the sauce fresh when reheating for the best flavor.
    • Make Ahead: You can slice and coat the beef in cornstarch in advance, then store it in a ziploc bag in the fridge for up to 24 hours. You can also prepare the sauce ahead of time and store it in an airtight container for up to 3 days. When ready to cook, just sear the beef and toss it in the sauce for a quick, flavorful meal.
    • Reheat: To reheat, place the beef in a skillet over medium heat, adding a splash of water or broth to loosen the sauce. You can also microwave it, but be sure to cover it to prevent it from drying out. Serve the sauce as is, either warmed or at room temperature.
    White bowl of Mongolian Beef and steamed rice topped with green onions and sesame seeds.

    Can I use a different cut of beef?

    Yes! While flank steak is ideal for this recipe, you can also use skirt steak, sirloin, or even ribeye. Just make sure to slice the beef thinly against the grain for the best texture.

    How can I make this recipe spicier?

    If you like more heat, add extra red pepper flakes or a splash of chili paste to the sauce. You can also try adding fresh sliced chili peppers when cooking the beef for a bit of extra spice.

    Can I add vegetables to this dish?

    Yes! Feel free to toss in some stir-fried vegetables like bell peppers, broccoli, or snap peas for added flavor and texture. Just cook them separately and toss them in with the beef at the end.

    A top down view of Mongolian Beef served with rice on a white plate. The beef is garnished with sesame seeds and green onions.

    Variations to Try

    • Swap the beef for chicken or pork for a delicious variation.
    • For a vegetarian version, use firm tofu. Press and slice it into thin pieces, then sear it until crispy before adding the sauce.
    • Add more vegetables to make the dish more hearty and colorful. Stir-fried bell peppers, onions, broccoli, or snap peas can be added during the last few minutes of cooking.
    • Kick up the heat by adding sliced jalapeños, red chili flakes, or a drizzle of chili oil. This will give your Mongolian beef a fiery punch, perfect for spice lovers!
    • For a fun twist, serve the Mongolian beef over cooked noodles (like lo mein or rice noodles) instead of rice.
    • If you prefer a sweeter profile, try adding a splash of pineapple juice to the sauce, along with a few chunks of pineapple, for a sweet and tangy variation.
    • Incorporate more stir-fry elements by adding ingredients like water chestnuts, baby corn, or mushrooms.

    Trish’s Tips

    • Pop your beef in the freezer for 30 to 60 minutes before cutting for those perfectly thin cuts.
    • Slice the beef thinly and against the grain. This helps ensure the meat is tender and absorbs the flavors of the sauce better. Use a sharp knife for the best results!
    • When searing the beef, work in batches to avoid steaming the meat. You want it to have that crispy texture.
    • If you prefer your Mongolian beef a little sweeter, feel free to add more brown sugar to the sauce. Taste as you go to get the perfect flavor.
    • When you add the sauce to the pan, whisk continuously to ensure it thickens evenly without clumping or burning.
    • While you can serve the Mongolian Beef with leftover rice, freshly cooked rice absorbs the sauce better and has a fluffier texture.
    • Once you’ve seared the beef, let it rest for a few minutes before tossing it in the sauce to ensure the beef stays tender and juicy.
    • If you prefer more spice, feel free to add extra red pepper flakes or chili paste to the sauce for that extra kick.
    A close up view of black chopsticks holding a piece of Mongolian Beef topped with rice.

    More Stir Fry Recipes to Try

    1. Cashew Chicken
    2. Chicken Stir Fry
    3. Honey Walnut Shrimp
    4. Sesame Chicken with Broccoli
    5. Chicken Lo Mein
    6. Beef and Broccoli

    Mongolian Beef

    This mouthwatering Mongolian Beef recipe is loaded with bold flavor and comes together fast! Sweet, savory and with a subtle, spicy kick, it’s better than your favorite takeout! Serve with rice for an easy, irresistible dinner the whole family will love!

    Keyword mongolian beef, mongolian beef recipe, mongolian beef sauce
    Prep Time 20 minutes
    Cook Time 10 minutes
    Total Time 30 minutes
    Author Trish – Mom On Timeout

    Ingredients

    Mongolian Beef Sauce

    • 2 teaspoons ginger paste
    • 4 cloves garlic minced
    • pinch red pepper flakes
    • ½ cup light brown sugar
    • cup soy sauce low sodium
    • cup water

    Beef

    • 1 pound flank steak or skirt steak
    • ¼ cup corn starch
    • 3 tablespoons extra virgin olive oil

    Garnish (Optional)

    • 3 green onions green parts only cut into 1-2 inch pieces on the diagonal
    • 1 teaspoon sesame seeds

    Instructions

    Prepare Mongolian Beef Sauce

    • In a small bowl whisk together the ginger, garlic, red pepper flakes, brown sugar, soy sauce and water. Set aside.

      2 teaspoons ginger paste, 4 cloves garlic, pinch red pepper flakes, ½ cup light brown sugar, ⅓ cup soy sauce, ⅓ cup water

    Cook Beef

    • Cut the steak into ¼ inch or thinner pieces with a sharp knife against the grain.

      1 pound flank steak

    • Add the cornstarch to a large ziploc bag and add the steak pieces into it. Shake the bag and make sure all the beef is covered. Let it sit in the bag for a few minutes while you continue on in the recipe.

      ¼ cup corn starch

    • Add the oil to a large skillet or wok and heat over hot heat. Once hot, add half the beef in a single layer and cook for 45 seconds. Flip the beef over and cook an additional 45 seconds. Remove to a plate and cook the second half of the beef the same way you cooked the first half. *The beef does not need to cook through in this step. It will continue cooking with the sauce later.*

      3 tablespoons extra virgin olive oil

    Combine

    • Remove to a plate and reduce heat to medium high.

    • Add the sauce you previously mixed to the hot pan and whisk continuously and bring to a boil. Reduce heat to medium and add the beef to the sauce. Toss to combine, cooking to thicken the sauce, about 2-3 minutes.

    • Sprinkle the green onions and sesame seeds over the top and toss once more. Remove from heat and serve with rice, if desired.

      3 green onions, 1 teaspoon sesame seeds, 2-3 cups cooked rice

    Notes

    Storage Information
    • Refrigerator: If you have leftover beef, store it in an airtight container in the refrigerator for up to 3 days.
    • Freezer: Store the cooked beef (without the sauce) in an airtight container or freezer-safe bag for up to 2 months. Thaw overnight in the fridge and reheat in a skillet or microwave. I recommend making the sauce fresh when reheating for the best flavor.
    • Make Ahead: You can slice and coat the beef in cornstarch in advance, then store it in a zipper-top bag in the fridge for up to 24 hours. You can also prepare the sauce ahead of time and store it in an airtight container for up to 3 days. When ready to cook, just sear the beef and toss it in the sauce for a quick, flavorful meal.
    • Reheat: To reheat, place the beef in a skillet over medium heat, adding a splash of water or broth to loosen the sauce. You can also microwave it, but be sure to cover it to prevent it from drying out. Serve the sauce as is, either warmed or at room temperature.

    Tools and Equipment (affiliate links): Wok or Large Skillet | Glass Mixing Bowls Whisk
    Please see post above for more information, step-by-step process photos, recipe tips and frequently asked questions.   

    Nutrition

    Calories: 407kcal | Carbohydrates: 37g | Protein: 27g | Fat: 16g | Saturated Fat: 4g | Polyunsaturated Fat: 1g | Monounsaturated Fat: 10g | Cholesterol: 68mg | Sodium: 1153mg | Potassium: 504mg | Fiber: 1g | Sugar: 27g | Vitamin A: 90IU | Vitamin C: 3mg | Calcium: 68mg | Iron: 3mg


    Source link
  • Best Recipe for German Chocolate Cake

    Best Recipe for German Chocolate Cake


    What is German Chocolate Cake?

    German chocolate cake is a rich, show-stopping dessert that’s all about layers of tender, sweet chocolate cake stacked up with a gooey, dreamy coconut-pecan frosting!

    The “German” part? Fun fact—it’s not named after Germany! It’s named after Samuel German, the baker who created a special kind of sweet baking chocolate back in the 1850s. His chocolate—Baker’s German’s Sweet Chocolate—is milder and sweeter than regular dark chocolate, giving the cake its signature smooth, mellow flavor.

    Instead of being bold and dark, German chocolate cake has a lighter, almost caramelized chocolate taste that perfectly balances the rich, buttery frosting. Every bite is soft, sweet, nutty, and decadent—basically, it’s happiness in cake form!


    Source link

  • Pickling Spice Recipe – The Daring Gourmet

    Pickling Spice Recipe – The Daring Gourmet


    This post may contain affiliate links. See my disclosure policy.

    Behind every delicious pickled vegetable is a great pickling spice. And this special blend has the ability to transform everyday vegetables into tangy, zesty, crunchy morsels of pure delight. This homemade pickling spice recipe combines a gourmet variety of fabulous spices to create an extraordinary blend of flavors. Let the pickling begin!

    pickling spice recipe ingredients diy homemade gourmet blend all purpose best easy

    The Magic of Pickled Vegetables

    I’ve been canning and pickling for years, and my love for gardening definitely plays a role in that. Being able to bring in a fresh harvest of garden produce and transform it into something zesty, flavorful and crunchy that lasts throughout the year is incredibly satisfying.

    Having a variety of pickled vegetables and condiments on hand makes cooking and entertaining all the more fun. Do you have a pasta or potato salad that needs some embellishing or are you throwing some burgers on the grill? Open up a jar of dill pickle relish, sweet pickle relish or corn relish. Laying out a cheese and charcuterie spread for a party? Grab a jar of pickled pepperoncini peppers, English pickled onions, pickled asparagus, pickled green beans, pickled okra and arrange them on the board. Making a sandwich and want some yummy flavor crunch? Open up a can of bread and butter pickles or giardiniera. Or if you simply have the munchies, open up a jar of pickled carrots or pickled beets and dig in!

    This homemade pickling spice is the perfect all-purpose blend for your pickling needs!

    What is Pickling Spice?

    Pickling spice is a blend of spices that is used for pickling vegetables. It is added to vinegar and water to make a pickling brine. Every canner and pickler needs a good homemade pickling spice recipe and I’ve developed a gourmet pickling blend that combines some seriously fabulous spices in just the right ratios to infuse your pickled veggies with incredible flavor.

    And it’s not just vegetables, this is also the pickling spice you’ll need to make your own corned beef and it will elevate your homemade corned beef to delicious flavor heights! I used this blend to make our corned beef for this past St. Patrick’s Day dinner and it was a hit. Check out the bottom of this post for info on how to use this homemade pickling spice.

    pickling spice recipe ingredients diy homemade gourmet blend all purpose best easy

    What is in Pickling Spice?

    There is no “one” way to make pickling spice. It can be as simple or as elaborate as you choose to make it. But you know me, I am all about FLAVOR and when I can find ways to maximize flavor I do it. No, that doesn’t mean that the recipe is any more difficult, it just means taking the time to source the additional ingredients. And I would only recommend you doing that if I felt the end result was worth it. And I am always of the opinion that you can’t have too many spices in your cabinet. Spices are the magic behind great tasting food! So let’s take a look at what goes into this gourmet pickling spice:

    • Black Peppercorns
    • Allspice Berries
    • Yellow and Brown Mustard Seeds – you can use one or the other if you don’t have both. Yellow is the classic choice for pickling with its mild flavor, and brown adds just a bit of robust punch.
    • Coriander Seeds
    • Dill Seeds – dill seeds pack more flavor than dill weed and are better suited for pickling, especially long-term storage.
    • Star Anise
    • Cloves – use whole cloves, not ground, to avoid making the brine murky.
    • Juniper Berries – the Germans and Swedes know how to incorporate these in their cooking and they’re sadly overlooked in many other countries. They contribute an old-fashioned flavor reminiscent of fruity citrus and pungent, piney spiciness almost bordering sweetness. If you don’t want to use these simply omit.
    • Cardamom Seeds
    • Red Pepper Flakes
    • Dried Ginger Root – Avoid using ginger powder as it will make the pickling brine murky and will cause your pickled vegetables to turn color over time. You can easily make your own dried ginger root by peeling and slicing it, spreading the slices out on a lined baking sheet, and dehydrating it in the oven at 170-180 F for a few hours until it’s dried out, let it cool, and then break it up into small pieces either by hand or pulsing it in a spice grinder.
    • Cinnamon Stick – avoid using ground cinnamon to prevent the brine from being murky and discoloring the vegetables.
    • Bay Leaves
    pickling spice recipe ingredients diy homemade gourmet blend all purpose best easy

    Homemade Pickling Spice Recipe

    Let’s get started!

    Break up the star anise, cinnamon stick and bay leaves into small pieces and set aside.

    For maximum flavor I like to toast the spices. In a dry skillet over medium heat, toast the whole spices (leave out the ginger, bay leaves and pepper flakes) until very fragrant. Be careful not to let them burn. Let cool completely.

    Combine all of the ingredients.

    pickling spice recipe ingredients diy homemade gourmet blend all purpose best easy

    Transfer the pickling spice to an airtight jar and store it in a cool, dark place. It will keep for several months.

    This makes roughly 1/2 cup of pickling spice.

    pickling spice recipe ingredients diy homemade gourmet blend all purpose best easy

    How to Use Pickling Spice

    Use this picking spice in any recipe that calls for it. As a general guideline for making pickled vegetables, follow this procedure:

    • To make the brine, use equal parts water and vinegar.
    • Depending on the recipe add sugar and salt for flavor and balance.
    • Combine the water, vinegar, salt and sugar in a pot and boil until the salt and sugar are dissolved.
    • Use 1 tablespoon of pickling spice for every quart of pickling brine. You can place a tablespoon of pickling spice in each quart jar, add the vegetables to be pickled, and pour the hot brine over them. Seal the jars and follow the recipe instructions for canning.

    This homemade pickling spice blend pairs wonderfully with any of the following vegetables: cucumbers, asparagus, carrots, beets, cauliflower, green beans, peppers, radishes, okra, zucchini, cabbage, beets, onions, and more.

    Pickling Spice for Corned Beef

    This homemake pickling spice makes an absolutely phenomenal corned beef! For a standard 5-pound brisket you’ll need 1/4 cup of pickling spice for the brine and then an additional tablespoon to add to the water when you cook the brisket.

    Enjoy!

    pickling spice recipe ingredients diy homemade gourmet blend all purpose best easy

    For more delicious homemade spice blends try my:

    pickling spice recipe ingredients diy homemade gourmet blend all purpose best easy

    Pickling Spice Recipe

    A gourmet pickling blend that will transform your vegetables into tangy, zesty, crunchy morsels of pure delight and also enable you to create the most delicious homemade corned beef!

    Prep Time 5 minutes

    Cook Time 5 minutes

    Total Time 10 minutes

    Servings 8

    Calories 29 kcal

    • In a dry skillet over medium heat, toast the whole spices (except for the ginger, bay leaves and pepper flakes) until very fragrant. Be careful not to let them burn. Let cool completely. Toasting the spices will greatly enhance their flavor.Combine all of the ingredients and store in an airtight jar in a dark, cool place. Will keep for several months. Makes roughly 1/2 cup pickling spice.
    Make your own dried ginger root by peeling and slicing it, spreading the slices out on a lined baking sheet, and dehydrating it in the oven at 170-180 F for a few hours until it’s dried out, let it cool, and then break it up into small pieces either by hand or pulsing it in a spice grinder.
    Avoid using the powdered form of any of these spices as it will make the pickle brine murky and discolor the vegetables.  

    Serving: 1tablespoonCalories: 29kcalCarbohydrates: 4gProtein: 1gFat: 2gSaturated Fat: 0.1gPolyunsaturated Fat: 0.4gMonounsaturated Fat: 1gSodium: 7mgPotassium: 82mgFiber: 2gSugar: 0.2gVitamin A: 94IUVitamin C: 1mgCalcium: 45mgIron: 1mg

    kimberly killebrew the daring gourmet

    Hi, I’m Kimberly Killebrew and welcome to Daring Gourmet where you’ll find delicious originals, revitalized classics, and simply downright good eats from around the world! Originally from Germany, later raised in England, world-traveled, and now living in the U.S., from my globally-influenced kitchen I invite you to tour the world through your taste buds!

    Read more about me…


    Source link

  • Easy Ricotta Zeppole (Italian Donuts)

    Easy Ricotta Zeppole (Italian Donuts)


    This post may contain affiliate links. Please read my disclosure policy.

    If you’ve never had Zeppole before, get ready — these fluffy, powdered-sugar-coated Italian donuts are dangerously good! Light, airy, and made with ricotta, this is the kind of sweet treat you’ll be making on repeat.

    Close-up of golden ricotta zeppole stacked high on a plate, dusted with powdered sugar, with one cut open revealing the airy center.

    Years ago, my Italian friend taught me how to make these little golden clouds of joy known as Zeppole — and let me tell you, it took zero convincing for me to keep the tradition alive. These ricotta donuts are ridiculously easy to make (we’re talking one bowl, no yeast, and done in 30 minutes), which is both a blessing and a problem… because I now make them far more often than I probably should. Light, fluffy, and shamelessly coated in powdered sugar — they’re what you serve when you want people to think you’re fancy, without actually doing anything fancy.

    process shots showing how to make ricotta zeppole.

    Flour, baking powder, salt, sugar—into a big bowl they go. Give it a good whisk. You want everything evenly mixed so you don’t end up biting into a salty or baking powder explosion later. (Ask me how I know.)

    process shots showing how to make ricotta zeppole.

    In a second bowl, whisk the eggs, ricotta, vanilla, and milk until mostly smooth. Little ricotta lumps? Totally normal. This is homemade, not factory-made—embrace the rustic vibes.

    process shots showing how to make ricotta zeppole.

    Add the wet stuff to the dry stuff and stir just until it comes together. Thick, sticky, and slightly ugly? Perfect. Stop mixing the moment it looks combined—overmixing makes tough zeppole, and nobody wants to eat little rubber balls unless they’re training a Labrador.

    Get about 2 inches of vegetable oil into a heavy-bottomed pot or skillet and bring it to 350°F (175°C). No thermometer? Drop a little batter in—if it sizzles and floats, you’re close. If it sinks like a stone or goes nuclear, adjust. Oil that’s too cool = greasy sadness. Too hot = burnt armor with raw insides.

    process shots showing how to make ricotta zeppole.

    Use a small cookie scoop (or two spoons if you’re feeling chaotic) to drop blobs of batter into the oil. Fry a few at a time—don’t overcrowd or the oil temp tanks and you end up with soggy fritters that even your dog will judge.

    After about 2–3 minutes, once they’re puffed and golden, flip them over with a slotted spoon. If you’re wrestling with them, your oil’s probably too cold—turn the heat up a smidge and carry on.

    process shots showing how to make ricotta zeppole.

    Scoop them out onto a paper towel-lined plate. Don’t be shy with the powdered sugar—you want that snowstorm effect. If people aren’t coughing sugar clouds across your kitchen, you didn’t use enough.

    Zeppole do not age gracefully. These are a fry-them-and-eat-them situation. Pour some coffee, park yourself next to the plate, and pretend you might share. (You won’t.)

    Golden, fluffy ricotta zeppole piled high on a dark plate, generously dusted with powdered sugar, with a side of raspberry jam.
    Ricotta zeppole stacked in a parchment-lined basket, being dusted with powdered sugar, with coffee cups and jam in the background.

    Frequently Asked Questions

    Can I fill these donuts?

    Absolutely. Slice them open like little sandwich buns and stuff with jam, Nutella, pastry cream—whatever makes your heart (and waistband) happy. Just make sure they’re cooled a bit first or you’ll have a hot mess on your hands. Literally.

    Can I air fry them instead?

    Not this recipe, no. The batter is way too soft and loose—you’d need a much thicker dough to even stand a chance. If you try to air fry this version, you’ll just end up with sad, flat blobs. Real talk: these were made to be fried the old-fashioned way. It’s faster, it tastes better, and your kitchen will smell like an Italian bakery instead of dashed dreams.

    Can I make the batter ahead?

    Nope. This is a mix-and-go situation. If you let the batter sit around, the baking powder will lose its mojo and your donuts will fry up sad and flat. You deserve fluffy.

    How do I keep them fresh?

    Short answer: you don’t. Zeppole are best eaten fresh—like, within an hour. If you have to save them, keep them loosely covered at room temperature and pop them in the oven at 350°F (175°C) for a few minutes to crisp back up. Just know… they’re never as good as that first glorious bite.

    Can I freeze them?

    Honestly? Not recommended. Fried donuts just don’t freeze well. They turn weirdly chewy and sad. If you must, freeze the raw batter in dollops on a baking sheet, then fry straight from frozen. But fresh is king here.

    Stack of golden ricotta zeppole dusted with powdered sugar, with one cut open and filled with vibrant red raspberry jam.

    Try These Delicious Donuts Next

    Close-up of golden ricotta zeppole stacked high on a plate, dusted with powdered sugar, with one cut open revealing the airy center.

    Easy Ricotta Zeppole (Italian Donuts)

    Prep 15 minutes

    Cook 15 minutes

    Total 30 minutes

    Fluffy Ricotta Zeppole, fried to golden perfection and buried under powdered sugar — ready in just 30 minutes!

    Instructions 

    • In a large bowl, whisk together the flour, baking powder, salt, and sugar.

    • In a separate bowl, whisk the eggs, ricotta cheese, vanilla extract, and milk until smooth.

    • Gradually add the wet ingredients to the dry ingredients, mixing until just combined. The batter will be thick and sticky.

    • Heat about 2 inches of vegetable oil in a deep, heavy-bottomed pot or skillet to 350°F (175°C). Use a candy thermometer to maintain the temperature.

    • Using a small cookie scoop or two spoons, drop tablespoon-sized portions of the batter into the hot oil. Do not overcrowd the pot. Fry for 2-3 minutes per side, or until golden brown and puffed. Use a slotted spoon to turn them as they cook.

    • Remove the zeppole with a slotted spoon and drain them on a plate lined with paper towels.

    • Once slightly cooled, dust the zeppole generously with powdered sugar.

    • Serve warm, with optional sides like chocolate sauce, honey, or fruit preserves for dipping.

    Notes

    1. Ricotta: Use full-fat ricotta. If it’s very wet, drain it a little in a fine mesh sieve so your batter isn’t too loose.
    2. Oil Temperature: Keep the oil steady at 350°F (175°C). Too cold = greasy. Too hot = burnt on the outside, raw inside. A cheap candy thermometer is worth it.
    3. Don’t overcrowd: Fry just a few at a time. Adding too many drops the oil temp fast and gives you sad, soggy donuts.
    4. Best served fresh: Zeppole are at their peak warm and fluffy, right after frying. They don’t store well—make them, eat them, no regrets.
    5. Optional fillings: Once cooled, slice and fill with jam, Nutella, or pastry cream for a next-level treat.

    Nutrition Information

    Serving: 1zeppoleCalories: 69kcal (3%)Carbohydrates: 10g (3%)Protein: 3g (6%)Fat: 2g (3%)Saturated Fat: 1g (6%)Polyunsaturated Fat: 0.2gMonounsaturated Fat: 1gTrans Fat: 0.01gCholesterol: 21mg (7%)Sodium: 114mg (5%)Potassium: 69mg (2%)Fiber: 0.3g (1%)Sugar: 1g (1%)Vitamin A: 73IU (1%)Vitamin C: 0.01mgCalcium: 46mg (5%)Iron: 1mg (6%)

    Notice: Nutrition is auto-calculated for your convenience. Where relevant, we recommend using your own nutrition calculations.

    Close-up of golden ricotta zeppole stacked high on a plate, dusted with powdered sugar, with one cut open revealing the airy center.

    Did You Make This?

    We love seeing what you made! Tag us on Instagram at @jocooks or hashtag #jocooks so we can see your creations!


    [ad_2]
    Source link