This website may contain affiliate links and advertising so that we can provide recipes to you. Read my disclosure policy.
My homemade BBQ seasoning brings bold, smoky flavor to just about anything! It’s the perfect blend of sweet, savory, and just a little kick, ready to shake onto chicken, veggies, ribs, and more.
Why You’ll Want to Keep This on Hand
Big flavor, few ingredients: Just a few pantry spices turn into a tasty blend that you can use all BBQ season long!
Totally customizable: Dial up the heat or sweetness to make it your own.
Use it on EVERYTHING: Perfect for grilling, roasting, or seasoning snacks like popcorn and roasted nuts!
BBQ Seasoning Ingredients
Paprika: Use smoked paprika for a more smoky flavor.
Sugar: Brown sugar adds a sweet balance, but feel free to cut it back if you want more spice than sweet in your bbq rub.
Spice level: This blend’s got a little kick—skip or reduce the cayenne pepper if you’re not into the heat.
How to Make BBQ Seasoning
Get ready to level up your grilling game! This easy BBQ seasoning mix comes together in minutes and brings rich, smoky depth with a touch of sweetness to everything you add it to!
Add Spices: In a small bowl, add paprika, brown sugar, kosher salt, chili powder, garlic powder, onion powder, black pepper, and cayenne pepper.
Mix: Whisk all of the ingredients together until evenly mixed, then store in an airtight container.
How to Store Homemade Seasoning
This is great to have in the spice cabinet to add great flavor to so many different recipes.
Storing: Store your homemade seasoning in a spice jar or an airtight container in a cool, dark place.
How long does BBQ Seasoning Last? If you make sure it is in an airtight container, it will keep at room temperature for 1 year.
How Do I Use BBQ Seasoning?
This spice blend is great for meat rubs, seasoning vegetables, steak, pork, shrimp, and more. Here are a few more options for you to try!
In a small bowl, add 3 tablespoons paprika, 2 tablespoons brown sugar, 1 tablespoon kosher salt, 1 tablespoon chili powder, 2 teaspoons garlic powder, 2 teaspoons onion powder, 1 teaspoon black pepper, and ½ teaspoon cayenne pepper.
Whisk all of the ingredients together until evenly mixed. Store in an airtight container.
After you make your version of my Chicken Fajitas (remember, any variation is fine!), send a picture of your creation to cookingchallenge@spendwithpennies.com.
Make the recipe of the month (or a variation of it!).
Snap a photo of your creation.
Email photos to cookingchallenge@spendwithpennies.com by the last day of the month at 11:59 PM PST for a chance to win a $100 Amazon gift card.
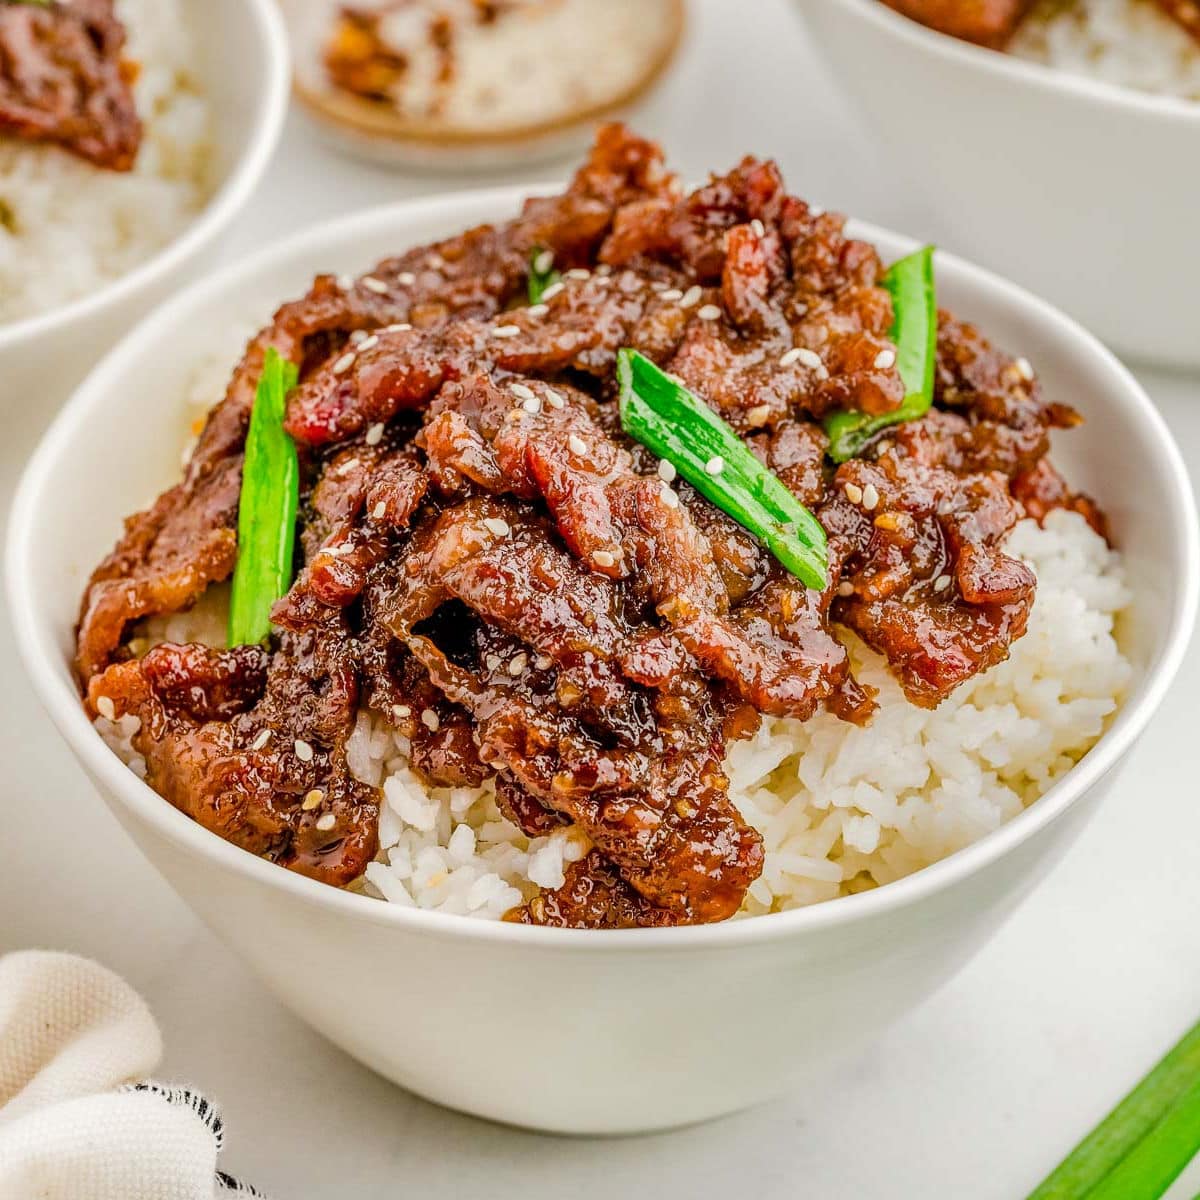
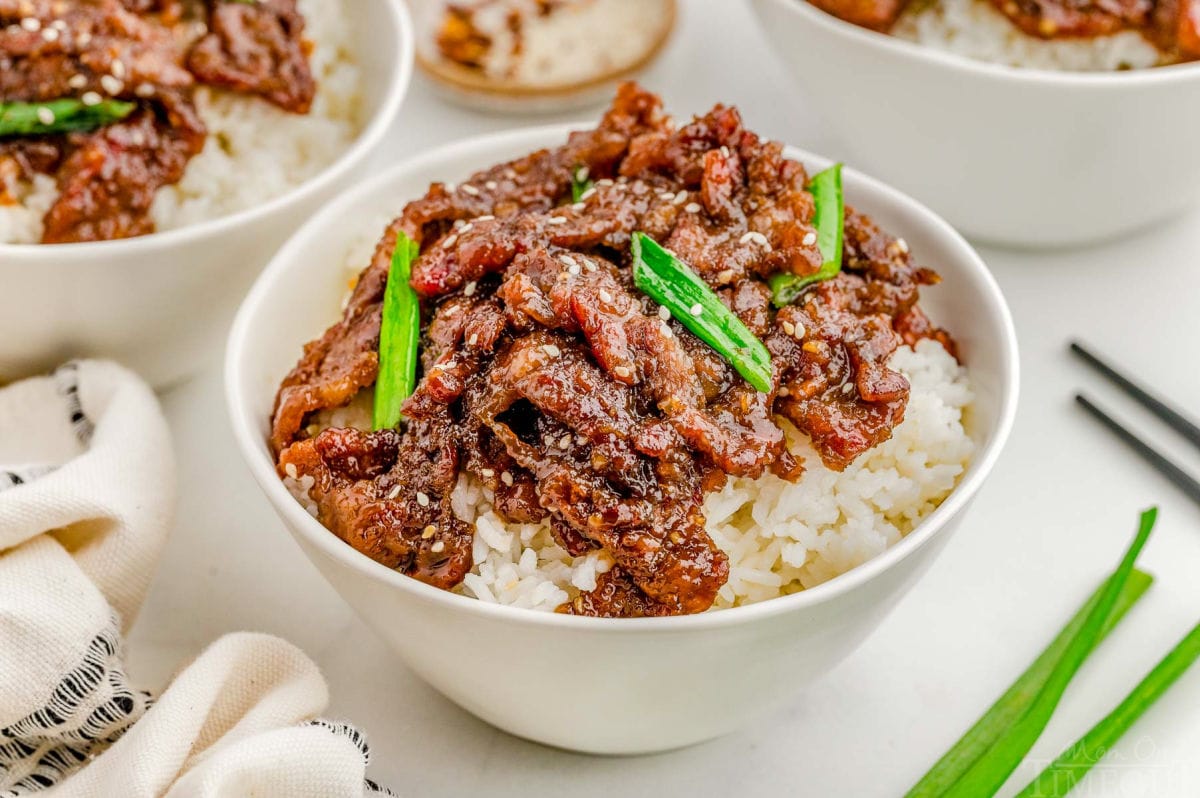
This mouthwatering Mongolian Beef recipe is loaded with bold flavor and comes together fast! Sweet, savory and with a subtle, spicy kick, it’s better than your favorite takeout! Serve with steamed, fluffy rice for an easy, irresistible dinner the whole family will love!
Mongolian Beef has always been one of my favorite takeout dishes, but making it at home is surprisingly quick and easy. In less than 30 minutes, you can have a restaurant-quality meal that tastes even better than the original. Plus, you get to control the ingredients – less oil, lower sodium, and no mystery artificial ingredients. It’s the perfect weeknight dinner that feels a little indulgent but is still simple enough to whip up anytime!
Both of my boys give this recipe a 10 out of 10. They love it so much it’s become the standard when I’m testing new recipes. “It’s good…but not as good as the Mongolian Beef!” We love easy stir fry recipes and then one is now permanently in the rotation – a meal we all love!
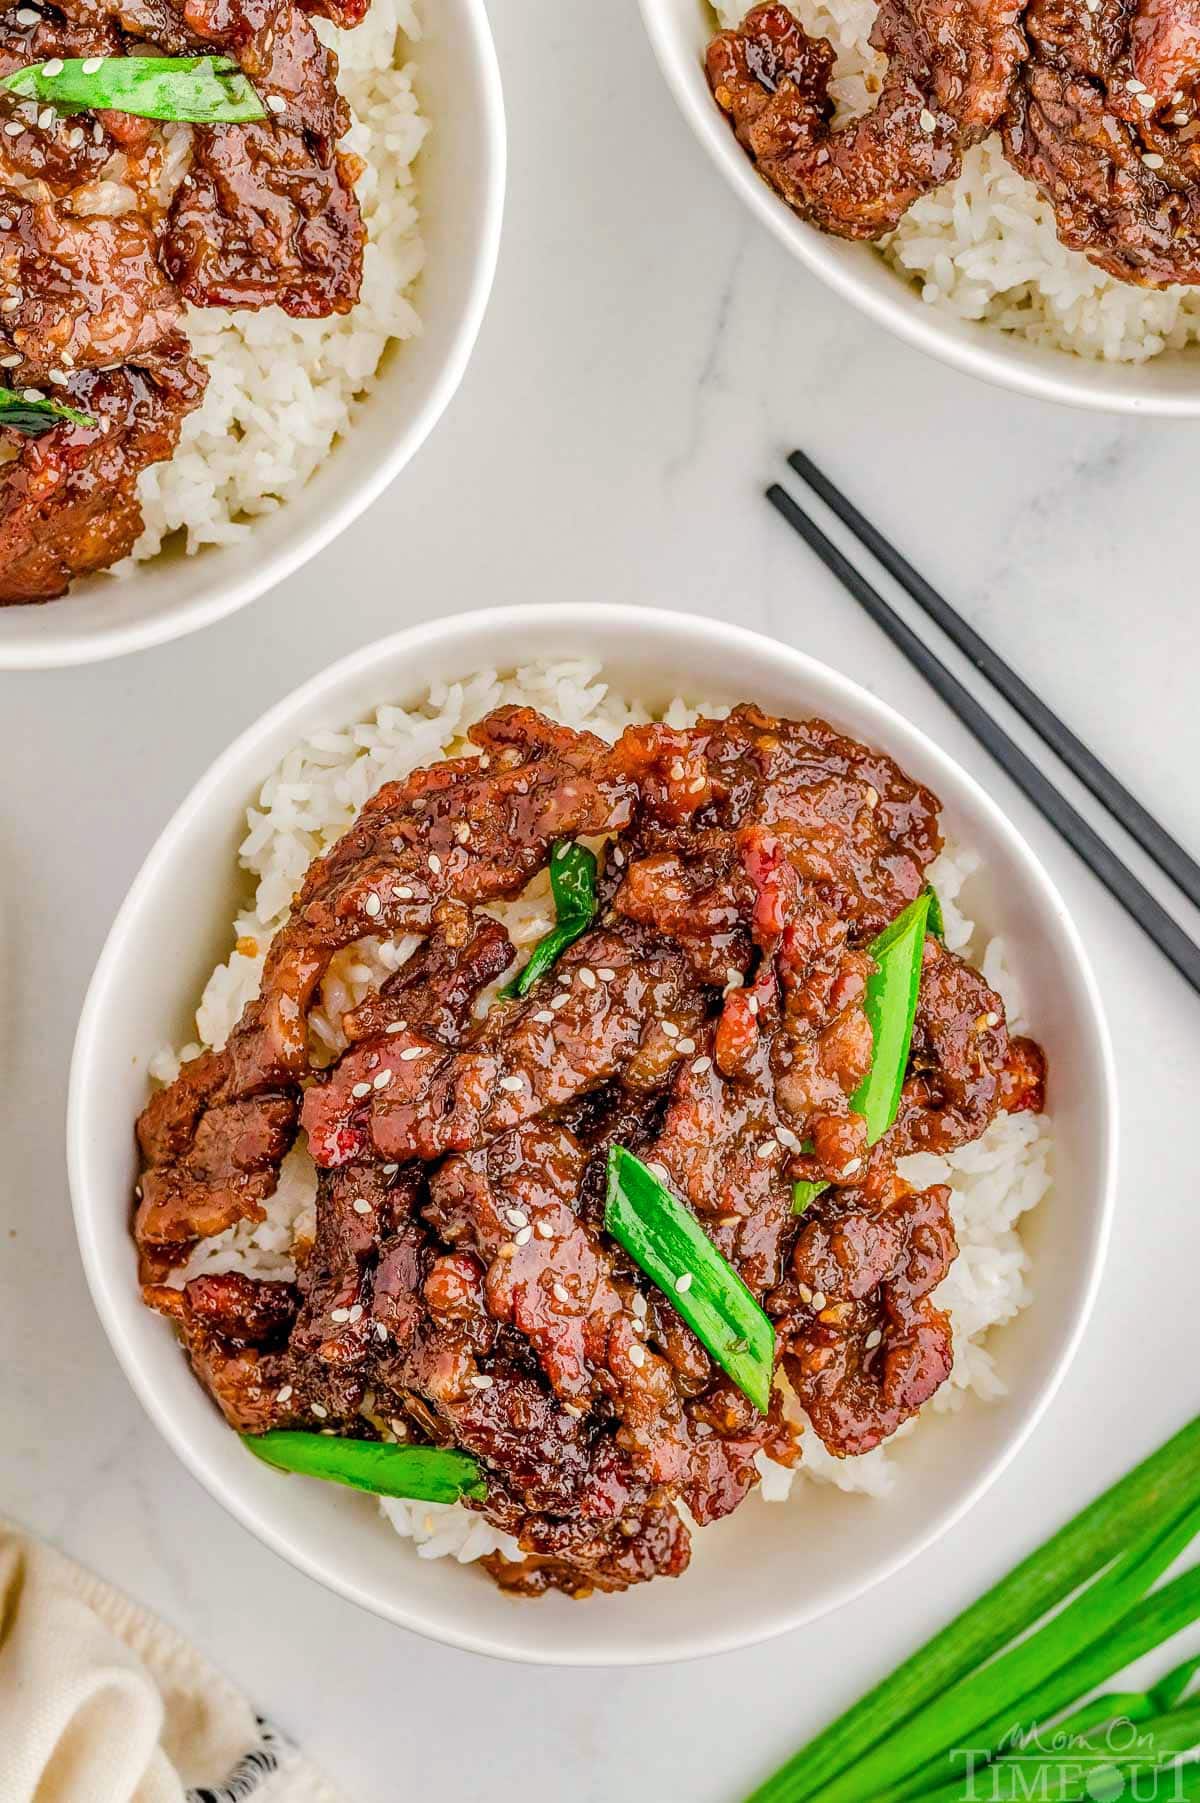
Thinly sliced flank steak or skirt steak gets coated in cornstarch to create the perfect crisp texture that is begging to be coated with savory sauce. It’s a mix of soy sauce, brown sugar, and a touch of heat from red pepper flakes that caramelizes beautifully, coating every bite of beef in a deep, umami-packed flavor that your tastebuds won’t be able to get enough of! Served over a bowl of fluffy white rice, it soaks up every bit of that sweet and savory sauce, making this meal completely irresistible.
The Mongolian Beef sauce is so good, you’ll want more of it! Double the sauce recipe and keep some on hand for extra drizzling over rice or veggies. It’s a great way to elevate any side dish!
free email course
5 SECRETS TO GETTING
DINNER ON THE TABLE…FAST!
Why You’ll Love This Recipe
Tender and flavorful, this Mongolian Beef recipe is a definite crowd-pleaser! With just a few simple ingredients, you can create a dish that rivals your favorite takeout spot—no delivery fee required!
Bold, takeout-style flavor. This Mongolian Beef is rich, savory, and slightly sweet, with tender slices of steak coated in mouthwatering sauce. It tastes just like your favorite restaurant version – but it’s even better because you made it at home!
Fast and easy. With minimal prep and just a few simple ingredients, this dish comes together in under 30 minutes. No complicated techniques, no long marinating – just quick, flavorful cooking that will fit perfectly into your busy schedule.
Perfect for any occasion. Whether you’re making it for a casual weeknight dinner or a meal to impress a special someone, this recipe delivers. Serve it over rice for a cozy, satisfying dish, or pair it with roasted veggies for a lighter, nutrient-packed option. However you enjoy it, you’ll be coming back for more!
How to Make Mongolian Beef
This recipe has become a staple in our kitchen over the past year and we make it at least once or twice a month. It’s not only quicker than takeout, it tastes better and is better for us. The Mongolian beef sauce is absolutely mouthwatering and uses pantry ingredients that I always have on hand. The steak is so tender and flavorful that between the sauce and the steak, we usually opt for a simple side of steamed rice to go alongside this Mongolian Beef recipe.
As always, you’ll find the full printable recipe card at the end of this post.
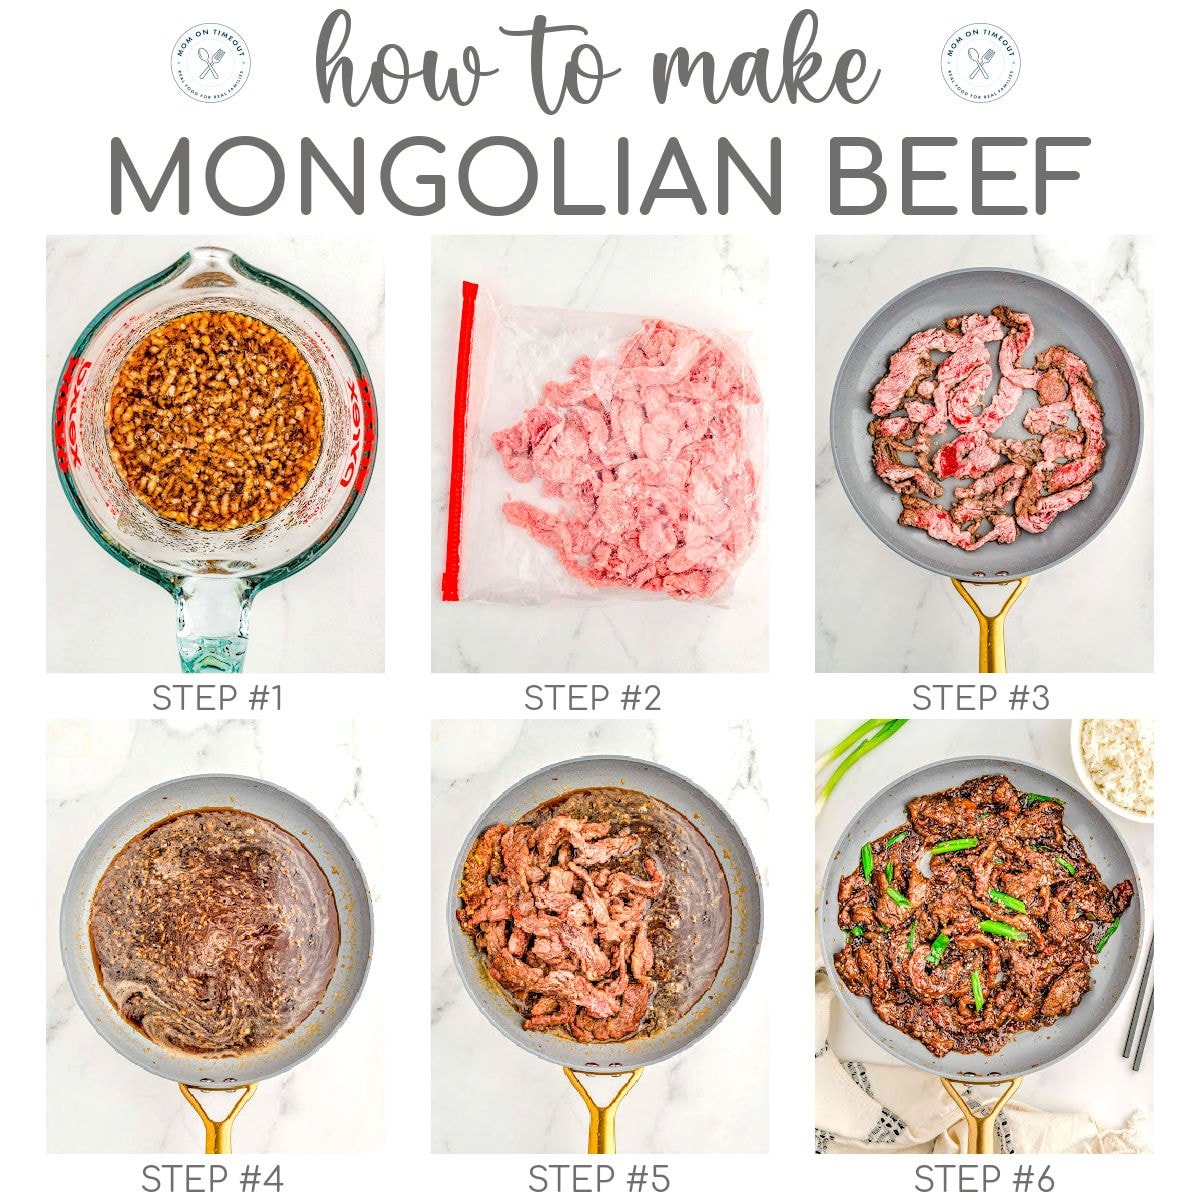
Mongolian Beef Sauce
Whisk together the ginger, garlic, red pepper flakes, brown sugar, soy sauce and water.
Prepare Beef
Cut steak into ¼ inch or thinner pieces and add to a large ziploc bag with cornstarch. Shake to coat.
Add oil to a large skillet or wok. Once hot, add beef in a single layer and cook for 45 seconds. Flip and cook an additional 45 seconds. Remove.
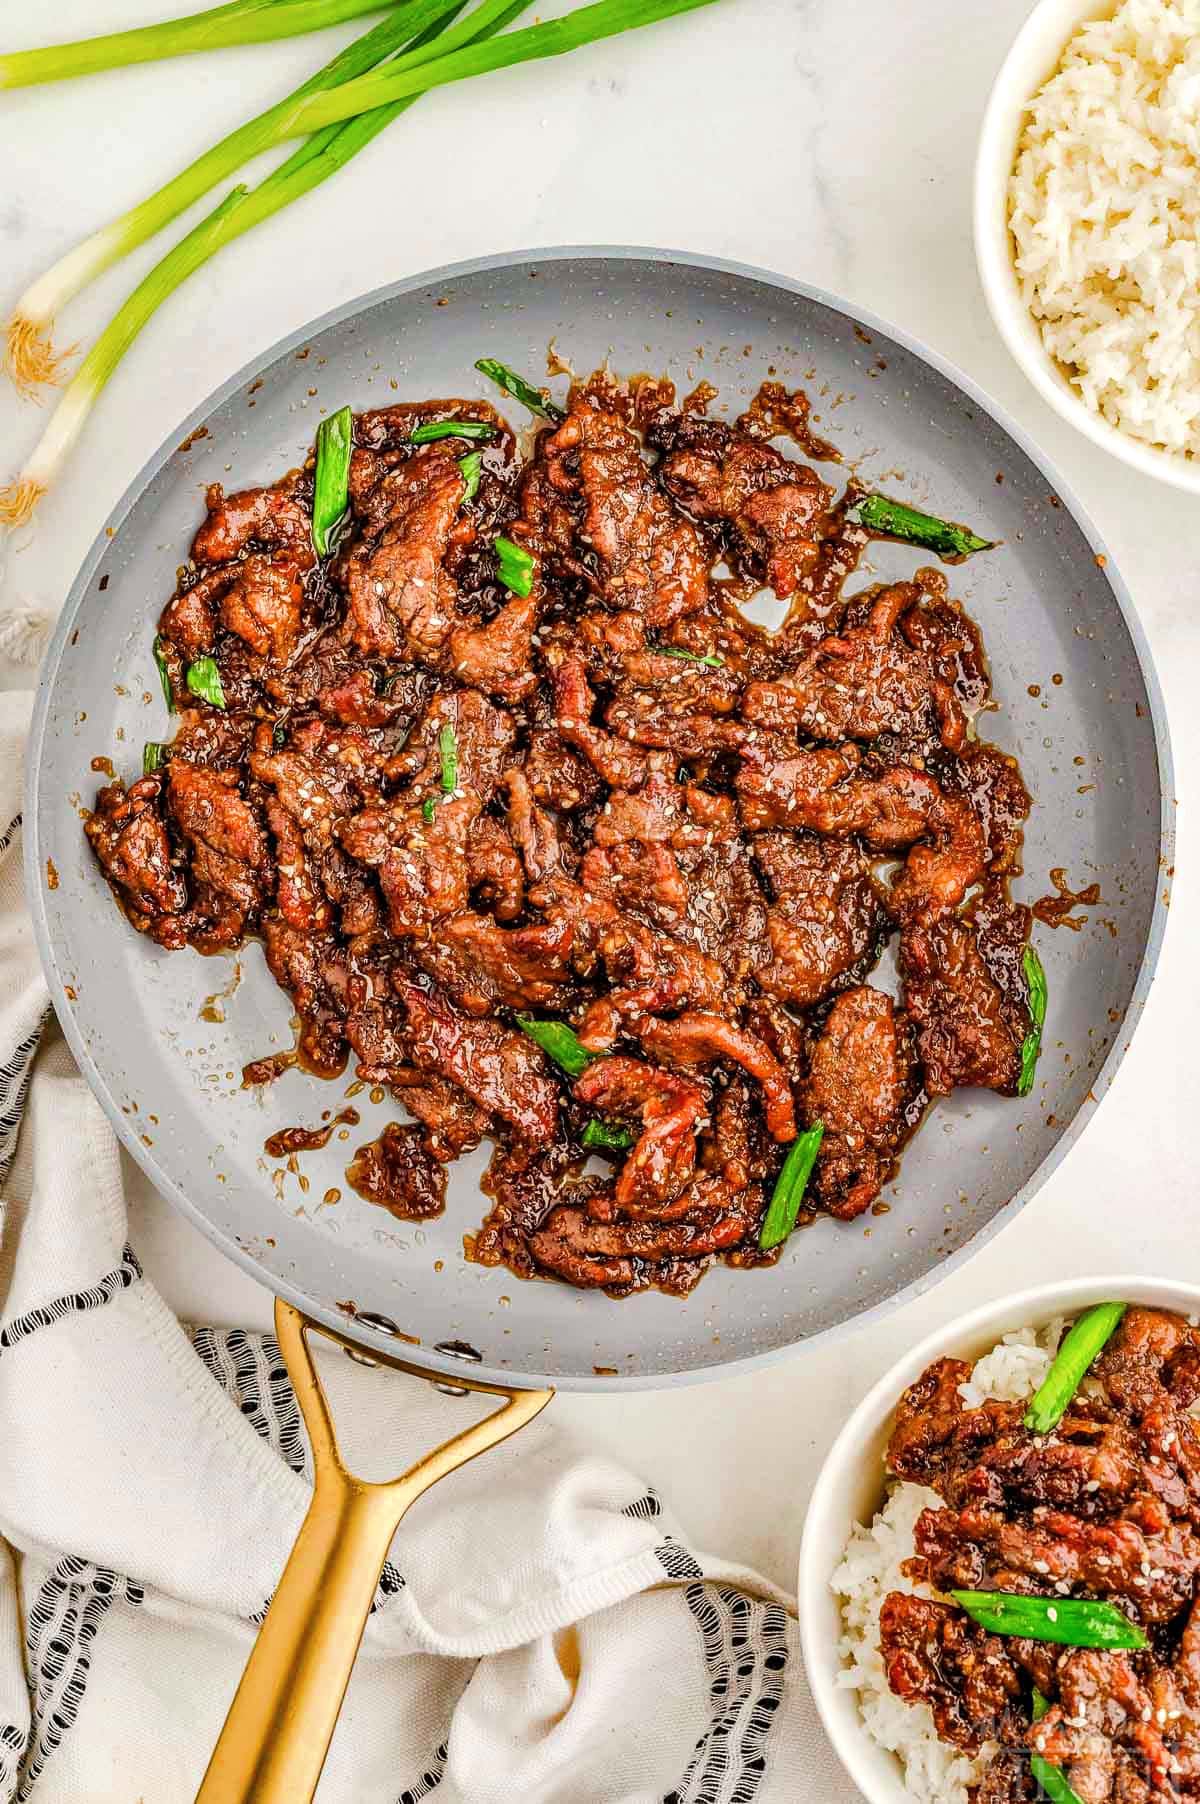
Add Mongolian beef sauce to the hot pan and bring to a boil.
Reduce heat to medium and add the beef, tossing to combine.
Sprinkle the green onions and sesame seeds over the top and toss once more.
Slice the meat thinly and against the grain for more tender and flavorful Mongolian beef! Freezing the meat for an hour before slicing helps firm it up, making it easier to achieve those perfectly thin cuts.
Storage Information
Refrigerator: If you have leftover beef, store it in an airtight container in the refrigerator for up to 3 days.
Freezer: Store the cooked beef (without the sauce) in an airtight container or freezer-safe bag for up to 2 months. Thaw overnight in the fridge and reheat in a skillet or microwave. I recommend making the sauce fresh when reheating for the best flavor.
Make Ahead: You can slice and coat the beef in cornstarch in advance, then store it in a ziploc bag in the fridge for up to 24 hours. You can also prepare the sauce ahead of time and store it in an airtight container for up to 3 days. When ready to cook, just sear the beef and toss it in the sauce for a quick, flavorful meal.
Reheat: To reheat, place the beef in a skillet over medium heat, adding a splash of water or broth to loosen the sauce. You can also microwave it, but be sure to cover it to prevent it from drying out. Serve the sauce as is, either warmed or at room temperature.
Can I use a different cut of beef?
Yes! While flank steak is ideal for this recipe, you can also use skirt steak, sirloin, or even ribeye. Just make sure to slice the beef thinly against the grain for the best texture.
How can I make this recipe spicier?
If you like more heat, add extra red pepper flakes or a splash of chili paste to the sauce. You can also try adding fresh sliced chili peppers when cooking the beef for a bit of extra spice.
Can I add vegetables to this dish?
Yes! Feel free to toss in some stir-fried vegetables like bell peppers, broccoli, or snap peas for added flavor and texture. Just cook them separately and toss them in with the beef at the end.
Variations to Try
Swap the beef for chicken or pork for a delicious variation.
For a vegetarian version, use firm tofu. Press and slice it into thin pieces, then sear it until crispy before adding the sauce.
Add more vegetables to make the dish more hearty and colorful. Stir-fried bell peppers, onions, broccoli, or snap peas can be added during the last few minutes of cooking.
Kick up the heat by adding sliced jalapeños, red chili flakes, or a drizzle of chili oil. This will give your Mongolian beef a fiery punch, perfect for spice lovers!
For a fun twist, serve the Mongolian beef over cooked noodles (like lo mein or rice noodles) instead of rice.
If you prefer a sweeter profile, try adding a splash of pineapple juice to the sauce, along with a few chunks of pineapple, for a sweet and tangy variation.
Incorporate more stir-fry elements by adding ingredients like water chestnuts, baby corn, or mushrooms.
Trish’s Tips
Pop your beef in the freezer for 30 to 60 minutes before cutting for those perfectly thin cuts.
Slice the beef thinly and against the grain. This helps ensure the meat is tender and absorbs the flavors of the sauce better. Use a sharp knife for the best results!
When searing the beef, work in batches to avoid steaming the meat. You want it to have that crispy texture.
If you prefer your Mongolian beef a little sweeter, feel free to add more brown sugar to the sauce. Taste as you go to get the perfect flavor.
When you add the sauce to the pan, whisk continuously to ensure it thickens evenly without clumping or burning.
While you can serve the Mongolian Beef with leftover rice, freshly cooked rice absorbs the sauce better and has a fluffier texture.
Once you’ve seared the beef, let it rest for a few minutes before tossing it in the sauce to ensure the beef stays tender and juicy.
If you prefer more spice, feel free to add extra red pepper flakes or chili paste to the sauce for that extra kick.
This mouthwatering Mongolian Beef recipe is loaded with bold flavor and comes together fast! Sweet, savory and with a subtle, spicy kick, it’s better than your favorite takeout! Serve with rice for an easy, irresistible dinner the whole family will love!
3green onionsgreen parts only cut into 1-2 inch pieces on the diagonal
1teaspoonsesame seeds
Instructions
Prepare Mongolian Beef Sauce
In a small bowl whisk together the ginger, garlic, red pepper flakes, brown sugar, soy sauce and water. Set aside.
2 teaspoons ginger paste, 4 cloves garlic, pinch red pepper flakes, ½ cup light brown sugar, ⅓ cup soy sauce, ⅓ cup water
Cook Beef
Cut the steak into ¼ inch or thinner pieces with a sharp knife against the grain.
1 pound flank steak
Add the cornstarch to a large ziploc bag and add the steak pieces into it. Shake the bag and make sure all the beef is covered. Let it sit in the bag for a few minutes while you continue on in the recipe.
¼ cup corn starch
Add the oil to a large skillet or wok and heat over hot heat. Once hot, add half the beef in a single layer and cook for 45 seconds. Flip the beef over and cook an additional 45 seconds. Remove to a plate and cook the second half of the beef the same way you cooked the first half. *The beef does not need to cook through in this step. It will continue cooking with the sauce later.*
3 tablespoons extra virgin olive oil
Combine
Remove to a plate and reduce heat to medium high.
Add the sauce you previously mixed to the hot pan and whisk continuously and bring to a boil. Reduce heat to medium and add the beef to the sauce. Toss to combine, cooking to thicken the sauce, about 2-3 minutes.
Sprinkle the green onions and sesame seeds over the top and toss once more. Remove from heat and serve with rice, if desired.
Refrigerator: If you have leftover beef, store it in an airtight container in the refrigerator for up to 3 days.
Freezer: Store the cooked beef (without the sauce) in an airtight container or freezer-safe bag for up to 2 months. Thaw overnight in the fridge and reheat in a skillet or microwave. I recommend making the sauce fresh when reheating for the best flavor.
Make Ahead: You can slice and coat the beef in cornstarch in advance, then store it in a zipper-top bag in the fridge for up to 24 hours. You can also prepare the sauce ahead of time and store it in an airtight container for up to 3 days. When ready to cook, just sear the beef and toss it in the sauce for a quick, flavorful meal.
Reheat: To reheat, place the beef in a skillet over medium heat, adding a splash of water or broth to loosen the sauce. You can also microwave it, but be sure to cover it to prevent it from drying out. Serve the sauce as is, either warmed or at room temperature.
Tools and Equipment (affiliate links):Wok or Large Skillet | Glass Mixing Bowls| WhiskPlease see post above for more information, step-by-step process photos, recipe tips and frequently asked questions.
These honey sriracha wings are grilled to juicy perfection, then tossed in a sweet and spicy sauce. They’re finger lickin’ good and perfect for game days, tailgates, and BBQs.
Chicken wings are marinated in a simple blend of oil and spices before being slapped on the grill and left to develop gorgeous grill marks and a delightful smoky flavor.
Once tender and juicy, the wings are tossed in a honey sriracha sauce that’s reminiscent of my go-to buffalo wing sauce. But instead of buffalo sauce, we’re using sriracha to add a kick of heat.
A little honey and orange juice balances out the sriracha, and you’re left with smoky-sweet-spicy chicken wings that taste best straight off the grill.
Heidi’s Tips for Recipe Success
Freshly squeezed orange juice really makes the flavors of the honey sriracha wing sauce pop. This is one recipe where bottled really won’t cut it.
Coat the chicken wings in a simple oil-based marinade before grilling. This prevents them from sticking to the grill, locks in moisture, and crisps them up.
If your grocery store has a butcher’s counter, they should be able to skin the chicken wings for you (though they might charge for it). This saves you tons of time at home.
What’s in This Recipe?
The full recipe, with amounts, can be found in the recipe card below.
Chicken wings — Skinning these bad boys isn’t fun, but it makes all the difference. It takes some time, but a sharp paring knife and your hands are all you’ll need to loosen, peel, and trim off the skin.
Spices — Ground coriander, garlic salt, and black pepper gently flavor the marinade.
Oil — Use a neutral-flavored oil with a high smoke point so it doesn’t burn. I used vegetable oil.
Honey — Makes the sauce perfectly sweet and sticky.
Butter — Balances out the spicy sriracha and makes for a richer wing sauce.
Sriracha — Huy Fong is the classic brand, but use your favorite bottle. (Or make your own sriracha.)
Citrus juice — I used a blend of lime and orange juice to add some tang and round out the flavors.
Fresh cilantro — Just a sprinkle adds a pop of color and plays up the Asian-inspired flavors of these spicy-sweet wings.
How to Make Honey Sriracha Wings
Skin and clean the wings. Try to remove as much of the excess fat and stringy tendons as possible.
Oil ’em up. Toss the wings with a mixture of oil and spices (a zip-top bag makes easy work of this). The wings need to chill for at least 2 hours.
Make the wing sauce. The butter, sriracha, honey, and juices need to be cooked over medium heat for about 5 minutes to thicken the sauce.
Grill until done. Since the wings are already coated in a thin layer of oil, there’s no need to oil the grill grates. Turn the wings every 4 to 5 minutes to encourage even cooking.
Toss with the sauce. Once done, pop the grilled wings into a heat-proof bowl and toss with the honey sriracha sauce. Garnish with fresh cilantro before diving in.
FAQs
How can you tell when chicken wings are done?
Chicken needs to be cooked until it reaches 165ºF. The only way to know for sure that they’re done is to use a meat thermometer.
Otherwise, cut one open to make sure it’s no longer pink inside.
Can this recipe be made in advance?
Feel free to whisk together and cook the wing sauce a couple days in advance, but wait until you’re ready to plate these babies to grill them.
Can this recipe be made without a grill?
If you don’t have an outdoor grill, try using a stove-top grill pan.
Or, follow the oven instructions on my baked buffalo wings recipe if grilling is totally out of the question.
Storage Tips
These sweet and spicy chicken wings can be refrigerated in an airtight container for up to 5 days. Reheat them gently in the microwave or cut the meat off the bone and add to this ramen noodle salad, a sandwich, or a wrap.
What to Serve with Honey Sriracha Chicken Wings
If you make this recipe, please let me know! Leave a ⭐️⭐️⭐️⭐️⭐️ rating below, leave a comment to tell us what you think, and tag me on Instagram @foodiecrush.
Honey Sriracha Wings Recipe
Sweet and spicy grilled honey sriracha chicken wings are perfect for game days, summer bbqs, pool parties, and more!
In a large plastic freezer bag combine chicken wings, vegetable oil, coriander, salt and pepper. Place in refrigerator and chill for 2 hours or overnight.
Bring grill to medium-high heat, place chicken on grill, and grill for 18-20 minutes, turning wings every 4 minutes or so.
Meanwhile, melt butter over medium heat in a small saucepan. Add sriracha, honey and juices and mix well to combine.
Remove wings from grill. In a large bowl combine wings and sauce, garnish with cilantro and serve.
We send good emails. Subscribe to FoodieCrush and have each post plus exclusive content only for our subscribers delivered straight to your e-mail box.
As always, thank you for reading and supporting companies I partner with, which allows me to create more unique content and recipes for you. There may be affiliate links in this
This website may contain affiliate links and advertising so that we can provide recipes to you. Read my disclosure policy.
Fresh lemons make me so happy! They’re bright, cheerful, and lift me out of the winter rut. Add that citrusy sunshine to a creamy pasta, and you get this dreamy Creamy Lemon Orzo! Simple, rich, and bursting with feel-good flavor.
Why This Orzo Understood the Assignment!
One PanSimplicity: I know you need minimal cleanup meals, and this dish is made in one pan and done in under 30 minutes. I’ve got you!
Cozy, Creamy, Family Favorite: With rich heavy cream and fresh lemon, this dish feels fancy but is still totally family-friendly! Everyone always asks for seconds.
Light Pasta Dish: Even though this dish is pasta, the lemon makes it light and bright, and not so heavy.
Creamy Lemon Orzo Ingredients
Parmesan: I used freshly shredded Parmesan for bold flavor. Pre-shredded works, but fresh makes all the difference in this simple dish.
Fresh Vs. Dry Basil: You can use 2 teaspoons of dried basil in place of fresh, but fresh brings way more flavor.
Heavy Cream Substitution: I recommend full-fat heavy cream for the creamiest texture. Half and half works, but it won’t be quite as rich.
How to Make Creamy Lemon Orzo
You know I’m all about making your weeknights easier! This creamy lemon orzo is one of those gems that comes together fast, with simple ingredients and the best flavor in every bite.
Cook Shallots: Heat the butter in a large pan over medium-high heat, then add in the shallots and cook, stirring frequently, for 3 minutes.
Toast Orzo: Add the orzo to the pan and continue to cook, stirring occasionally, for 5 minutes, to lightly toast the orzo. Add the garlic and lemon zest to the pan and cook for 1 minute, until fragrant. Whisk in the chicken broth, heavy cream, lemon juice, salt, and pepper.
Cook, Stirring Frequently: Bring the liquid to a boil, then reduce the heat to medium-low and simmer the pasta for 8-10 minutes. Stir frequently to keep the pasta from sticking to the pan. Once the pasta is tender and the liquid has cooked down, sprinkle the dish with parmesan cheese and basil and then serve warm.
How to Store Leftovers
In the Fridge: Store creamy lemon orzo leftovers in an airtight container in the fridge for up to 4 days.
In the Freezer: Store completely cooled leftovers in a freezer-safe container in the freezer for up to 3 months.
What to Serve With Lemon Orzo
This creamy lemon orzo pairs beautifully with just about anything—chicken, steak, pork, baked cod, even shrimp! Make these items below for an amazing meal. Your family will think you went all out (but we’ll know the truth).
Heat the 2 tablespoons salted butter in a large pan over medium-high heat. Add in the 2 minced shallots and cook, stirring frequently for 3 minutes.
Add the 1 ½ cups orzo to the pan and continue to cook, stirring occasionally for 5 minutes, to lightly toast the orzo.
Add the 3 minced cloves garlic and 1 tablespoon lemon zest to the pan and cook for 1 minute, until fragrant. Whisk in the 2 cups chicken broth, 1 cup heavy cream, 3 tablespoons lemon juice, 1 teaspoon salt, and ½ teaspoon pepper.
Bring the liquid to a boil, then reduce the heat to medium-low and simmer the pasta for 8-10 minutes, stirring frequently to keep the pasta from sticking to the pan.
Once the pasta is tender and the liquid has cooked down, sprinkle the dish with ½ cup freshly shredded Parmesan cheese and 2 tablespoons freshly chopped basil and serve.
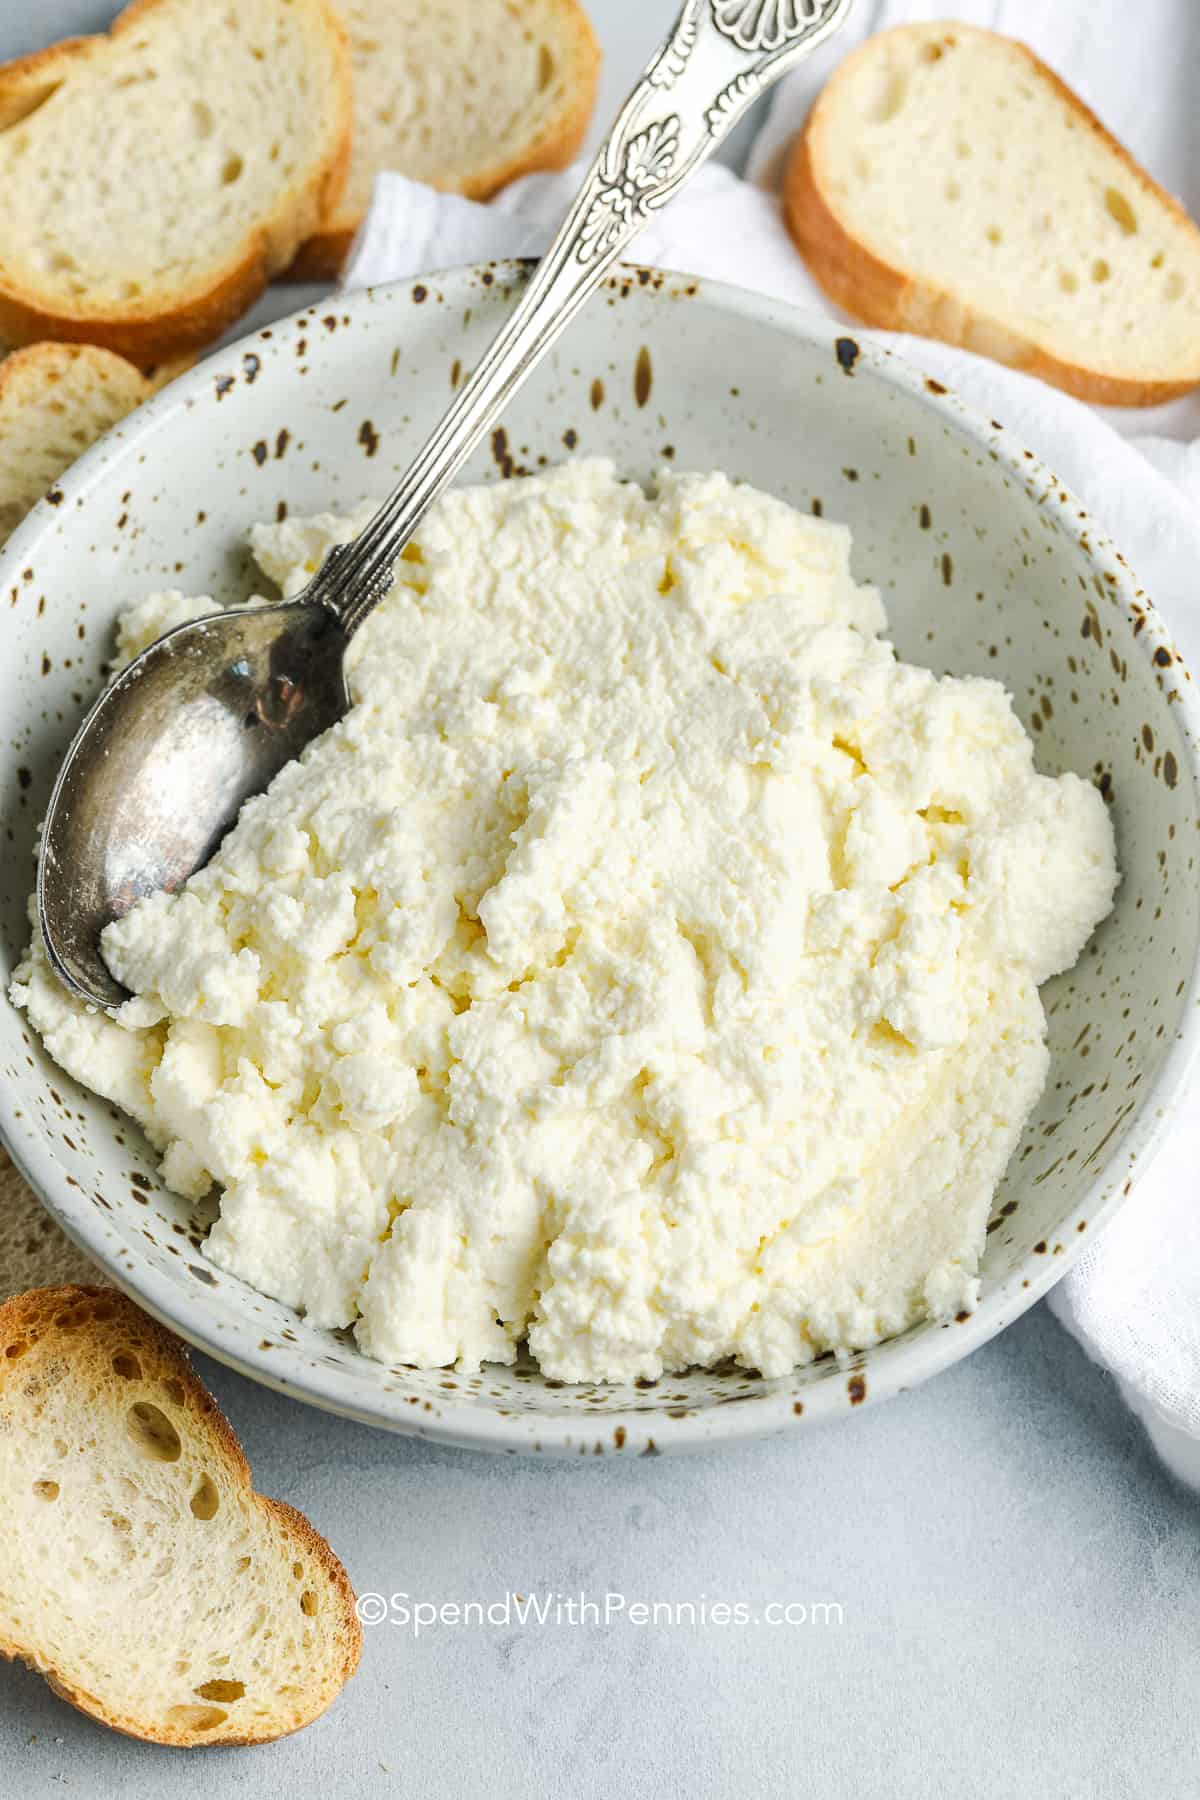
Did you know you can make homemade ricotta cheese with just 4 ingredients you likely have on hand? No special tools are required!
A Soft Homemade Cheese
Ricotta is Italian for ‘recooked’, and ricotta cheese is a soft curd cheese with a mild flavor and creamy texture.
It pairs well with bold flavors like tomato marinara, basil pesto, or roasted garlic. It’s also great with fruit and a drizzle of honey over crostini.
Ricotta vs. Cottage Cheese
While they can be used interchangeably in many recipes, cottage cheese is cheese curds, so the texture is more chunky, while ricotta is smoother. I find ricotta cheese to be a bit sweeter in flavor and richer.
What You’ll Need
Milk: The base of this ricotta cheese recipe is milk. I use cow milk, but it can also be made with goat, sheep, or buffalo milk. Do not use ultra-pasteurized milk (UHT).
Heavy cream: This gives ricotta its rich, creamy flavor.
Vinegar: Vinegar is the acidic ingredient that creates the curds. If you don’t have vinegar, use lemon juice.
Salt: Salt is added for flavor.
How to Make Homemade Ricotta Cheese
It’s so easy to make fresh ricotta cheese!
Boil milk, cream, and salt in a large pot (full recipe below).
Remove from the heat, stir in vinegar, and let it rest until it forms curds.
Strain the curds in a colander and enjoy your homemade cheese.
The liquid strained from the cheese is called whey. Leftover whey is great to add to baked goods like bread, pizza dough, or even mixed with pancake mix in place of water. Place the colander over a bowl to catch the whey.
Storage
Store ricotta cheese in the refrigerator for up to 5 days. It may need to be drained or stirred before using.
Did you love this Ricotta Cheese recipe? Leave a comment and a rating below.
4.99 from 55 votes↑ Click stars to rate now! Or to leave a comment, click here!
Homemade Ricotta Cheese (4 ingredients)
Homemade Ricotta Cheese is easy to make with ingredients you likely have on hand—no special tools required. It’s perfect for homemade pasta dishes and more!
Prep Time 5 minutesminutes
Cook Time 40 minutesminutes
Drain Time 45 minutesminutes
Total Time 1 hourhour30 minutesminutes
Prevent your screen from going dark
In a heavy-bottomed saucepan, heat milk, cream, and salt over medium heat while stirring. Cook just until the mixture comes to a boil.
Remove from the heat, add the vinegar, and stir to combine.
Let the mixture rest undisturbed for 30 minutes to allow curds to form.
Line a fine mesh strainer or colander with 2 layers of damp cheesecloth. Gently spoon the ricotta curds into the strainer.
Allow to drain for 30-45 minutes.
Homemade ricotta cheese will last up to 5 days if stored in an airtight container in the fridge.
German chocolate cake is a rich, show-stopping dessert that’s all about layers of tender, sweet chocolate cake stacked up with a gooey, dreamy coconut-pecan frosting!
The “German” part? Fun fact—it’s not named after Germany! It’s named after Samuel German, the baker who created a special kind of sweet baking chocolate back in the 1850s. His chocolate—Baker’s German’s Sweet Chocolate—is milder and sweeter than regular dark chocolate, giving the cake its signature smooth, mellow flavor.
Instead of being bold and dark, German chocolate cake has a lighter, almost caramelized chocolate taste that perfectly balances the rich, buttery frosting. Every bite is soft, sweet, nutty, and decadent—basically, it’s happiness in cake form!
Looking for a delightful, gluten-free dessert that’s fun to make and even more fun to eat? These No-Bake Cookie Pops are exactly what you need! Whether you’re planning a spring party, filling Easter baskets, or just searching for an easy activity with the kids, this no-bake recipe is a sweet solution.
To begin with, these cookie pops are made with Home Free Chocolate Chip Mini Cookies which are free of the top 14 allergens and deliciously crunchy. Since no baking is required, they’re a perfect choice for little helpers in the kitchen. Kids can join in every step of the way—from crushing the cookies and mixing the filling, to rolling and decorating each pop.
In addition to being easy, these cookie pops are wonderfully customizable. We used pastel-colored chocolate melts—like soft pink, blue, yellow, and green—for a vibrant spring theme. However, you can switch up the colors or decorations to fit any celebration. Naturally, a generous dash of sprinkles adds a playful touch and plenty of personality.
Moreover, these cookie pops are not only good for people with dietary restrictions, but they’re also mess-friendly. There’s no oven, minimal cleanup, and lots of opportunities for creativity. Simply chill the cookie mixture, insert your sticks, dip them in melted chocolate, and let the decorating begin.
Because they’re so quick and simple, these treats are ideal for weekend projects or last-minute party snacks. Additionally, they store well in the fridge, making them a great make-ahead option.
So, if you’re looking to add a little extra fun to your spring dessert lineup this season, these no-bake cookie pops are a must-try. They’re proof that gluten free can still mean all the fun—and all the flavor.
Gluten Free No-Bake Cookie Pops
Easy no-bake treat made with allergy-friendly ingredients and pastel decorations. Perfect for spring and fun with kids.
Prep Time15 minutesmins
Fridge Time45 minutesmins
Servings: 10pops
Calories: 40kcal
Author: Gluten Free & More
Nutrition Facts
Gluten Free No-Bake Cookie Pops
Amount Per Serving
Calories 40 Calories from Fat 36
% Daily Value*
Fat 4g6%
Saturated Fat 2g10%
Polyunsaturated Fat 0.2g
Monounsaturated Fat 1g
Cholesterol 11mg4%
Sodium 36mg2%
Potassium 15mg0%
Carbohydrates 1g0%
Sugar 0.4g0%
Protein 1g2%
Vitamin A 152IU3%
Calcium 11mg1%
Iron 0.01mg0%
* Percent Daily Values are based on a 2000 calorie diet.
Disclaimer: All nutrition facts on Gluten Free & More are meant only as a guide and may differ depending on product brands used or ingredient substitutions. Some errors may occur, so you are encouraged to confirm the recipe’s ingredient and nutrition suitability for your own diet.
Have you tried this recipe? Give it a star rating and let us know your thoughts in the Ratings & Reviews section below.
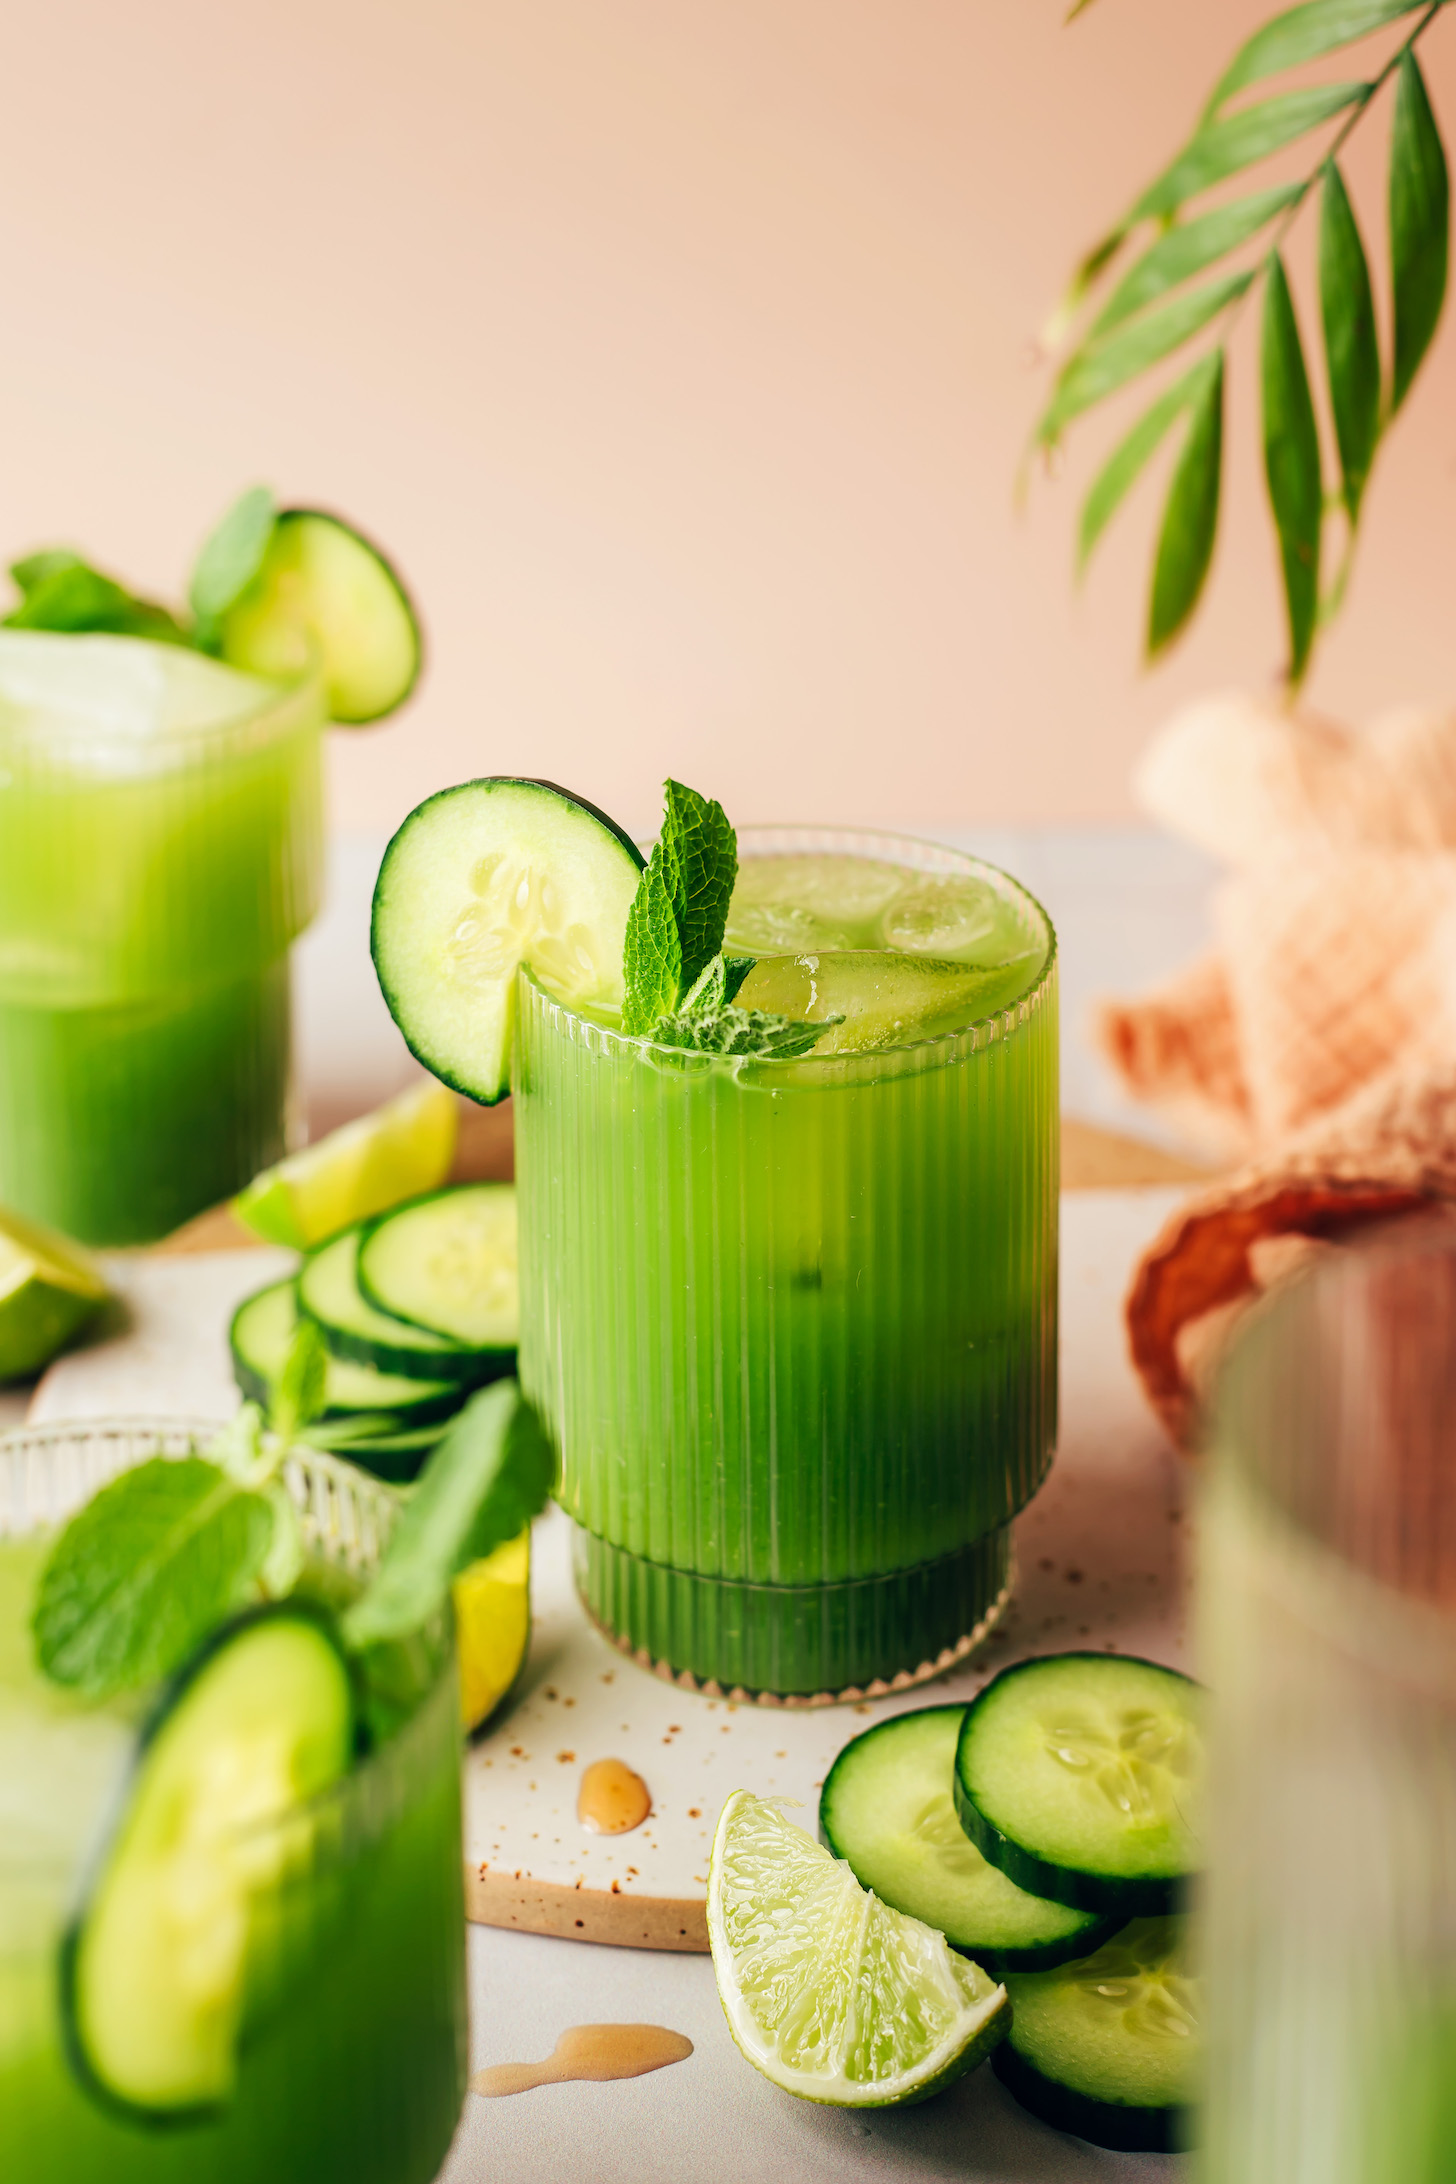
Staycation, anyone? One sip in and this cucumber lime agua fresca will have you feeling in full vacation mode. Made with just 3 ingredients in 10 minutes, it couldn’t be simpler or more refreshing!
It’s the ultimate hydrating sip, poolside drink, and also perfect for making in large batches for sharing. Let’s get refreshed!
What is an Agua Fresca?
An agua fresca (which translates to “fresh water”) is a refreshing drink widely popular in Central and South America, Mexico, and parts of the Caribbean. It’s typically a combination of water and sugar mixed with fruit, flowers, or other flavorful ingredients.
It’s thought that the making of agua frescas may go back centuries and that they may have originally been created by the Aztec people. The following is our inspired, naturally sweetened take based on one we tried in Mexico.
How to Make a Cucumber Lime Agua Fresca
This agua fresca employs the subtle, cooling, and thirst-quenching goodness of one of our favorite veggies: cucumber! The best part? You don’t even have to peel them. Just wash, chop, and toss in the blender!
Along with the cucumber, lime juice adds bright fruitiness while agave nectar (or maple syrup) adds a touch of sweetness. Mint is optional but highly recommended!
After combining the ingredients with water, it’s as easy as blend, strain, and serve. Easy peasy, lime squeezy! That’s how it goes, right?
We hope you LOVE this agua fresca, friends! It’s:
Refreshing Subtly sweet Hydrating Quick & easy & Vacay in a cup!
It’s the ultimate summer drink for parties, poolside, and beyond!
More Refreshing Summer Drinks
If you try this recipe, let us know! Leave a comment, rate it, and don’t forget to tag a photo @minimalistbaker on Instagram. Cheers, friends!
Prep Time 10 minutesminutes
Total Time 10 minutesminutes
Servings 4(~1 cup servings)
Course Beverage
Cuisine Gluten-Free, Mexican-Inspired, Vegan
Freezer Friendly 1 month
Does it keep? 1-2 Days
Prevent your screen from going dark
3cupswater
2mediumcucumbers, roughly chopped (2 medium cucumbers yield ~4 cups or 450 g chopped)
3mediumlimes (3 medium limes yield ~1/4 cup or 60 ml juice)
2-3Tbspagave nectar or maple syrup
1small handfulfresh mint leaves(optional but highly recommended // 1 small handful yields ~15-20 leaves)
Ice cubes(for serving)
Before blending, we recommend tasting your cucumbers to see if the peel is bitter. We left our peels on for vibrant color and flavor, but bitter peels should be removed.
Add all ingredients to a blender (starting with the lesser amount of agave or maple syrup) and blend until completely smooth. Pour through a fine mesh strainer over a large bowl or measuring cup to remove pulp, using a spoon to move it around and speed up straining as needed. Taste and adjust, adding more agave or maple syrup for sweetness or more lime juice for tartness.
Serve chilled, over ice. Leftovers keep for 1-2 days in the refrigerator, or can be frozen into ice cubes or popsicle molds!
Holly Nilsson is the creator of Spend With Pennies, where she creates easy, comforting recipes made for real life. With a passion for nostalgic flavors and simplified techniques, Holly helps busy home cooks create delicious meals that always work. She is also the author of “Everyday Comfort,” which promises to inspire even more hearty, home-cooked meals. See more posts by Holly