This post may contain affiliate links. Please read my disclosure policy.

This Chicken Rice Pilaf is the kind of cozy, no-fuss dinner I grew up with. Tender chicken, buttery rice, and simple flavors that never go out of style. This one’s pure comfort in a pot.

This is the kind of dish I grew up with, the weeknight regular that showed up like clockwork. My mom probably made some version of this every single week, and honestly? No one complained.
It’s simple, hearty, and endlessly forgiving. Didn’t have chicken? No problem, she’d swap in pork and carry on like it was always meant to be that way. That’s the magic of Chicken Rice Pilaf: it doesn’t ask for much, but it always delivers.
Why You’ll Love My Chicken Rice Pilaf
- It’s a full meal in one pot. Less cleanup, more time pretending you’re not already in pajamas by 6.
- It’s flexible. Don’t have chicken? Use pork. Out of peas? Skip ’em. This pilaf doesn’t judge.
- Creamy but not heavy. We’re sneaking in a little half and half for richness without turning it into risotto.
- Tastes even better the next day. Perfect for leftovers… if there are any.
- It’s nostalgic in the best way. Like a warm hug from your childhood, but with more garlic and better seasoning.
- Freezer-friendly. Make a big batch, freeze half, and thank yourself later when dinner feels like a chore.

Before You Start: Tips & Ingredient Notes
- Use long grain rice. I love Basmati here. It stays fluffy, doesn’t get mushy, and soaks up all that flavor like a champ.
- Brown that chicken. Don’t just toss it in and hope for the best, a little sear goes a long way.
- Half and half adds magic. This is how we sneak in creaminess without making it too rich. Don’t skip it unless you’re swapping with something just as cozy.
- Low sodium broth, always. Especially if you’re finishing with Parmesan, things can get salty fast.
- Veggies are flexible. No peas? Add corn. Got mushrooms? Toss them in. This is a clean-out-the-fridge meal disguised as dinner brilliance.
- Bay leaves. Don’t roll your eyes, they actually do something. Just fish them out before serving unless you’re into chewing leaves.

Melt the butter and olive oil in a large skillet or Dutch oven over medium heat. Once it’s shimmering, toss in the chopped onion and let it cook for about 3 minutes, until it softens and smells like dinner’s happening. This is your flavor base, so give it a little love.

Carrots and celery go in next, along with half the salt and pepper. Let them cook for another 3 minutes or so. You’re not looking for a perfect sauté, just a little softening to start building layers of flavor.

In goes the diced chicken breast. Season with the rest of your salt and pepper and cook until no longer pink, about 5 minutes. We’re not aiming for golden brown here (since it’ll simmer later), but don’t just steam it either. Give it a stir now and then.

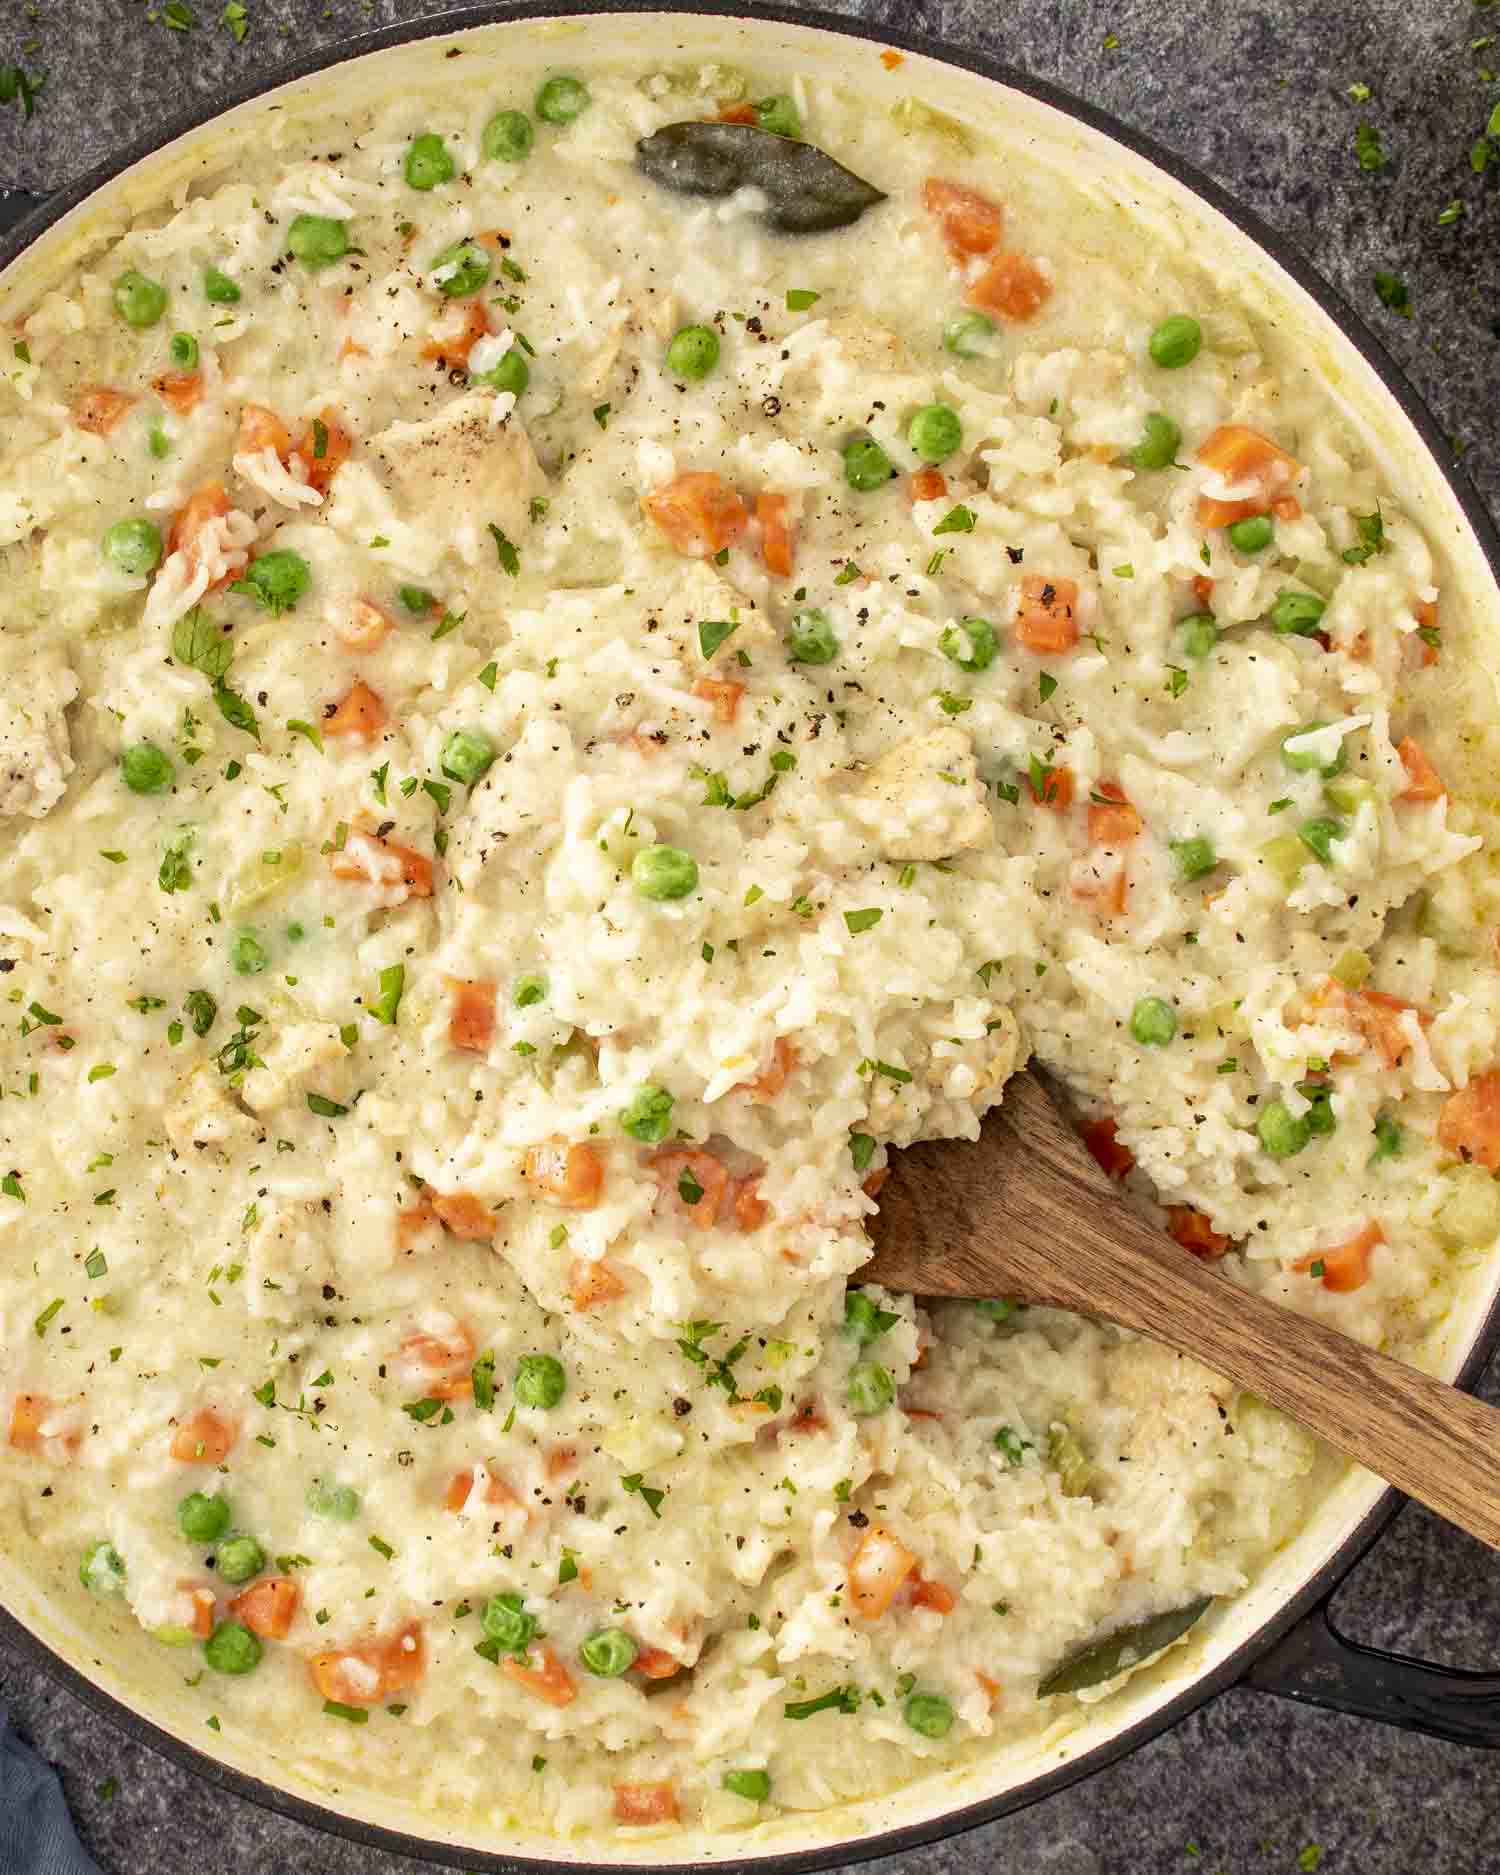
Add the rice, chicken broth, bay leaves, and half and half. Give it all a good stir. This is where the magic starts, the rice is about to soak up all those cozy flavors. Bring it to a gentle boil, then reduce the heat, cover it up, and let it simmer for 20 minutes. Stir occasionally so nothing sticks, especially if you’re using a stainless steel pan.

Once the rice is tender and most of the liquid has been absorbed, stir in the peas and let them cook for another 2 minutes. They’ll heat through quickly and keep their color better this way.
Turn off the heat, fish out those bay leaves, and stir in the chopped parsley. Serve it warm with a generous sprinkle of Parmesan on top, or don’t, but just know you’re missing out.

What to Serve with Chicken Rice Pilaf
Honestly? This one’s a full meal all on its own. But if you’re feeling a little extra (or feeding a crowd), here’s how to round it out:
Frequently Asked Questions
Can I use chicken thighs instead of breasts?
Yes, and honestly, they add even more flavor. Just make sure they’re boneless and cut into bite-sized pieces.
Do I need to rinse the rice first?
If you’re using Basmati or long grain rice, yes, give it a quick rinse to remove excess starch. It helps keep the pilaf fluffy, not gummy.
Can I use frozen veggies instead of fresh?
Totally. Just add them near the end like the peas so they don’t turn to mush.
Can I make this dairy-free?
You can skip the half and half and Parmesan, it’ll still be delicious, just less creamy. A splash of broth or a swirl of olive oil works in a pinch.
Can I freeze it?
Absolutely. Let it cool completely, then store in airtight containers. It’ll keep in the freezer for up to 2 months. Reheat gently on the stove with a splash of broth to bring it back to life.
Can I make this in the Instant Pot?
You could, but honestly, it’s so easy on the stovetop you won’t save much time. If you insist: use sauté mode for the first steps, then pressure cook for 5 minutes with a natural release.

Try These Delicious Rice Dishes Next
Before You Begin! If you make this, please leave a review and rating letting us know how you liked this recipe! This helps our business thrive & continue providing free recipes.

Chicken Rice Pilaf
This Chicken Rice Pilaf is a one-pot wonder packed with tender chicken, fluffy rice, and buttery veggies, all simmered together in a creamy, cozy broth. It’s easy, nostalgic, and perfect for busy weeknights or lazy Sundays alike.
Before You Begin! If you make this, please leave a review and rating letting us know how you liked this recipe! This helps our business thrive & continue providing free recipes.
Instructions
-
Add the butter and olive oil to a large skillet or Dutch oven, and heat over medium heat. Once the butter has melted, add the onion and cook for about 3 minutes until the onion softens and has become translucent.
-
Add the carrots and celery, season with half the salt and pepper, stir then cook for 3 more minutes, until the celery and carrots soften a bit.
-
Add the chopped chicken, season with remaining salt and pepper and cook for about 5 minutes until the chicken is no longer pink.
-
Add the rice, chicken broth and stir. Add the bay leaves and half and half; stir. Bring to a boil, turn down the heat to a simmer and cover the skillet or pot. Cook for 20 minutes, stirring occasionally, until the rice is cooked.
-
Stir in the peas and cook for 2 more minutes or until the peas are cooked. Garnish with parsley and more pepper.
-
Serve warm sprinkled with Parmesan cheese if preferred.
Notes
- Rice type: stick to long grain like Basmati for best texture.
- Swap-friendly: use chicken thighs or even pork, and switch up the veggies based on what you have.
- Don’t skip the half and half: it gives just the right amount of creaminess without making it heavy.
- Make ahead & freeze: perfect for batch cooking.
- Parmesan is optional… but is it really?
Nutrition Information
Serving: 1servingCalories: 562kcal (28%)Carbohydrates: 60g (20%)Protein: 36g (72%)Fat: 18g (28%)Saturated Fat: 7g (44%)Cholesterol: 100mg (33%)Sodium: 1079mg (47%)Potassium: 893mg (26%)Fiber: 2g (8%)Sugar: 3g (3%)Vitamin A: 3985IU (80%)Vitamin C: 11.7mg (14%)Calcium: 148mg (15%)Iron: 1.8mg (10%)
Notice: Nutrition is auto-calculated for your convenience. Where relevant, we recommend using your own nutrition calculations.
[ad_2]
Source link
دیدگاهتان را بنویسید